General Information:
Release Date: 2014
Price Point: ¥ 5000 (about $45.51 USD)
Retailer: Japanese Exclusive
Accessories: Swords x 2, Kabuto helmet/shield x 2

Back in 2013, fans of "Transformers Prime" watched the series wind down with the "Beast Hunters" storyline featuring the Autobots battling the Predacons. Meanwhile, Japan was doing its own thing: "Transformers Go!". This series of figures (and a "direct to DVD" cartoon) featured a series of new Autobot figures exclusive to Japan. One of these was a new version of Optimus Prime called "Optimus Exprime" (I have also seen it written out as "Optimus EXPrime"). This is perhaps one of the most unique versions of the character out there and perhaps one of the most obscure.
Packaging:
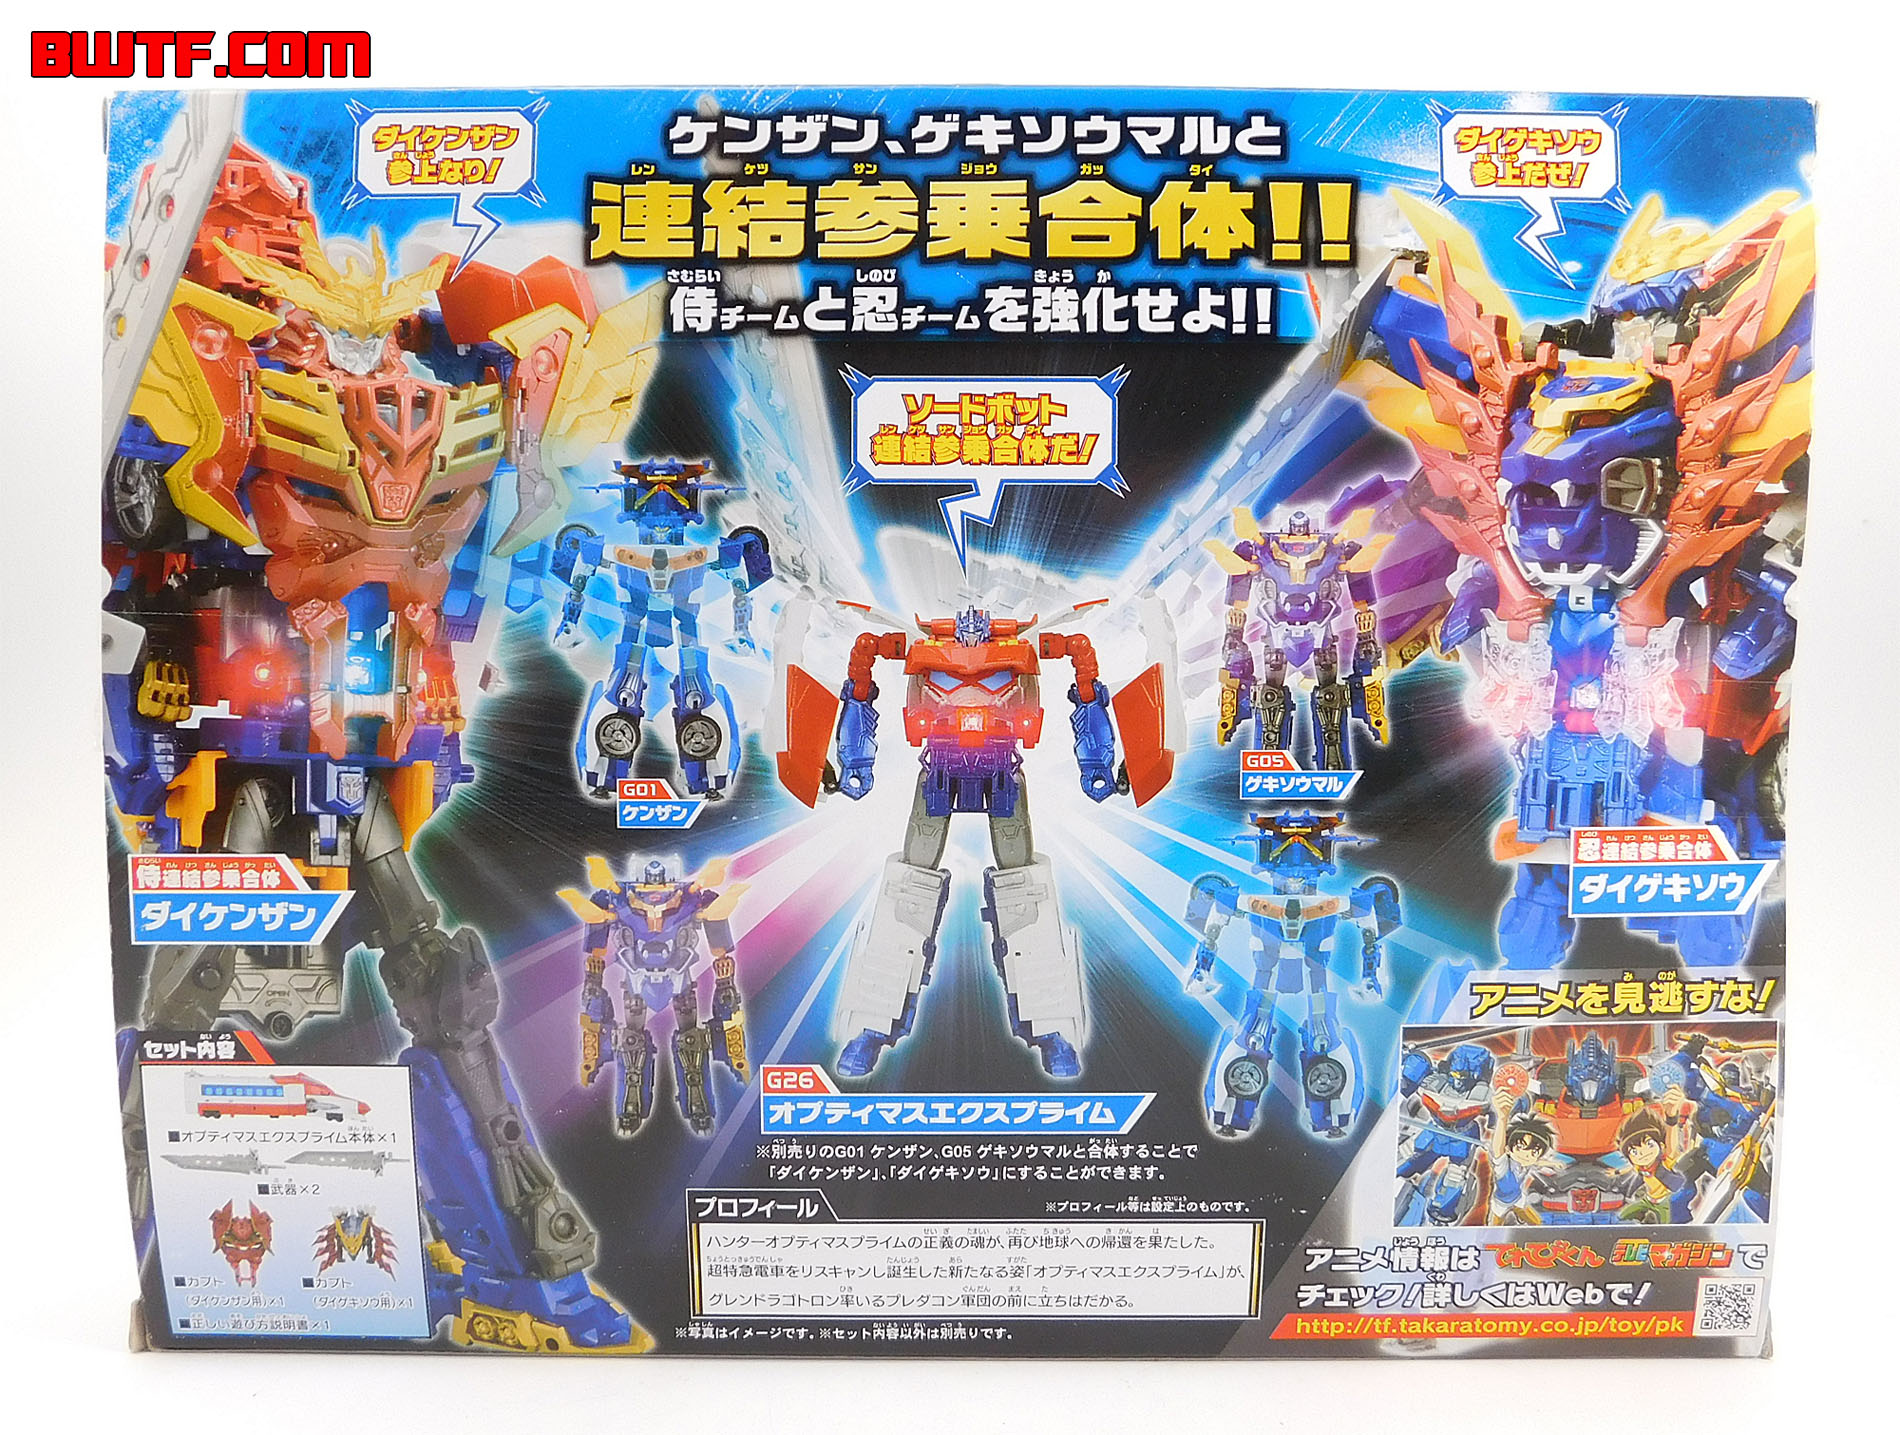
Optimus Exprime is packaged in a box which features no cut away windows to see the figure inside. Instead, the box is wall to wall artwork and photography. The front of the box is set vertically, with photography of the toy in all three modes with lightning effects around it. It is also noteworthy that this packaging has a "Transformers 30 Years" logo on it. The back of the packaging is set horizontally featuring Optimus Exprime in the middle along with his fellow Autobots Kenzan and Gekisou. On either side are the combined forms of all three Autobots (DaiKenzan on the left, DaiGekisou on the right). Given that the packaging has no traditional artwork for the characters, Takara Tomy really did do their best to add in effects to make it look more exciting. The packaging is very eye catching.
Accessories:
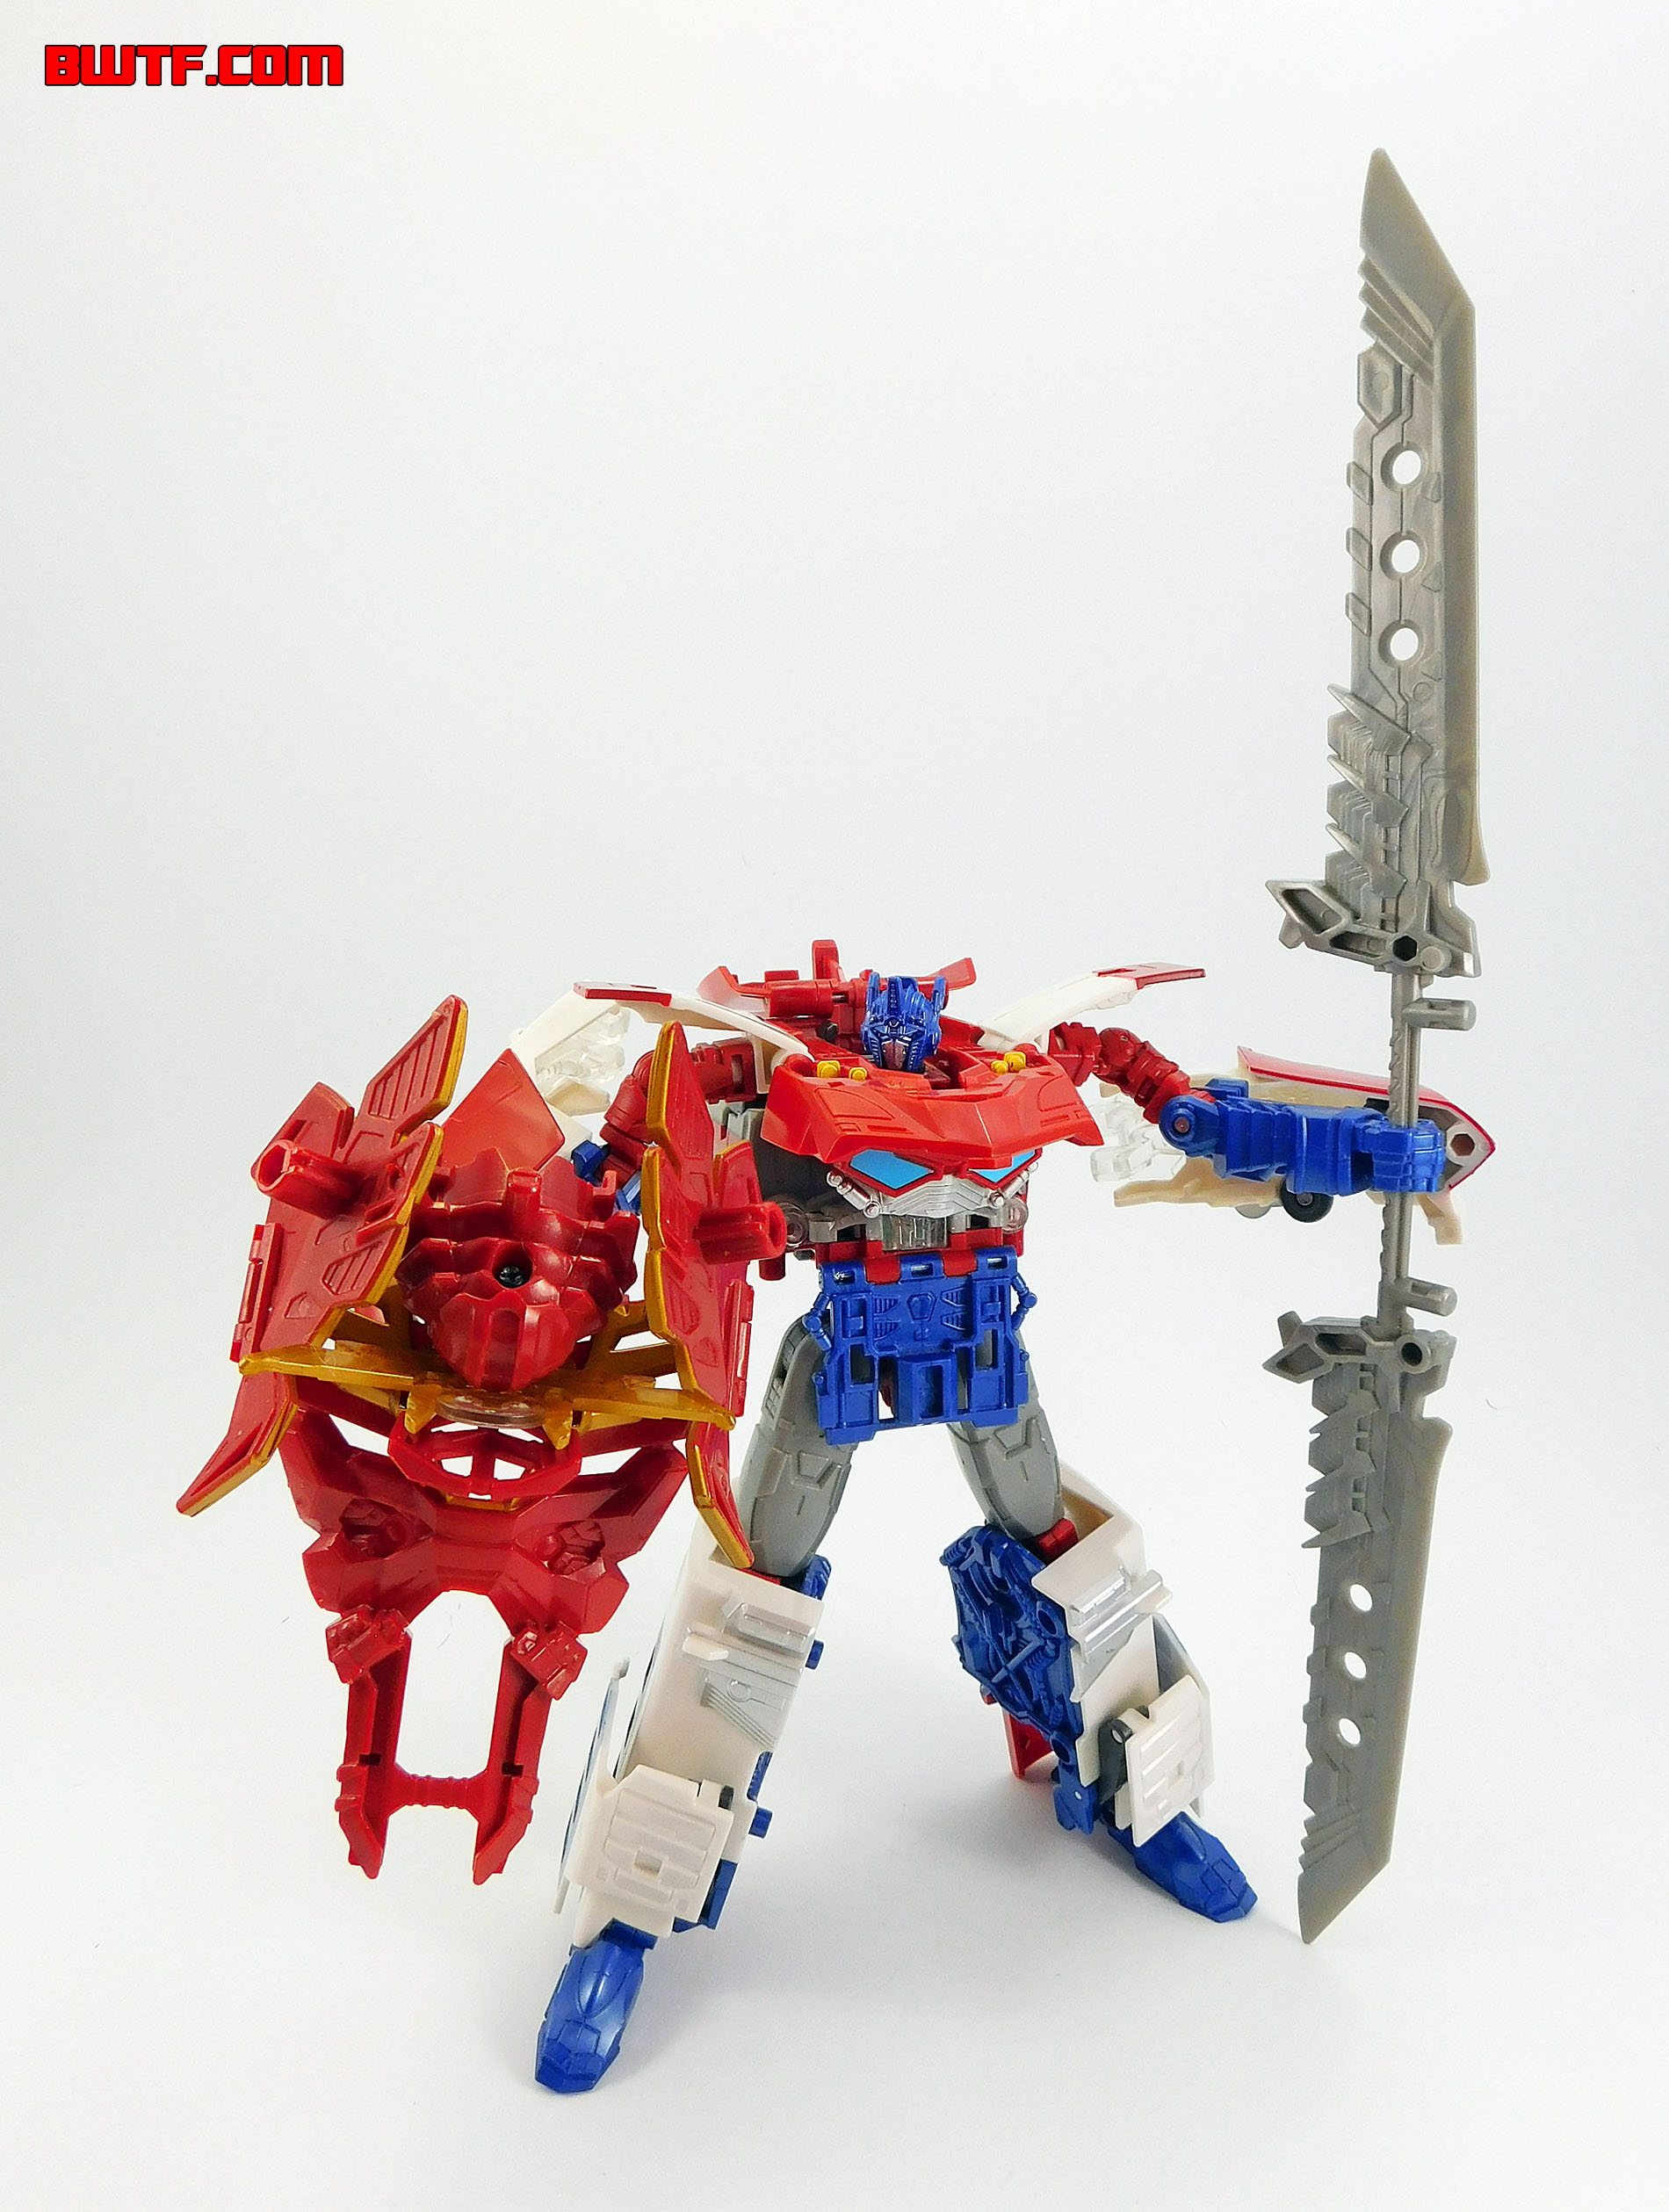
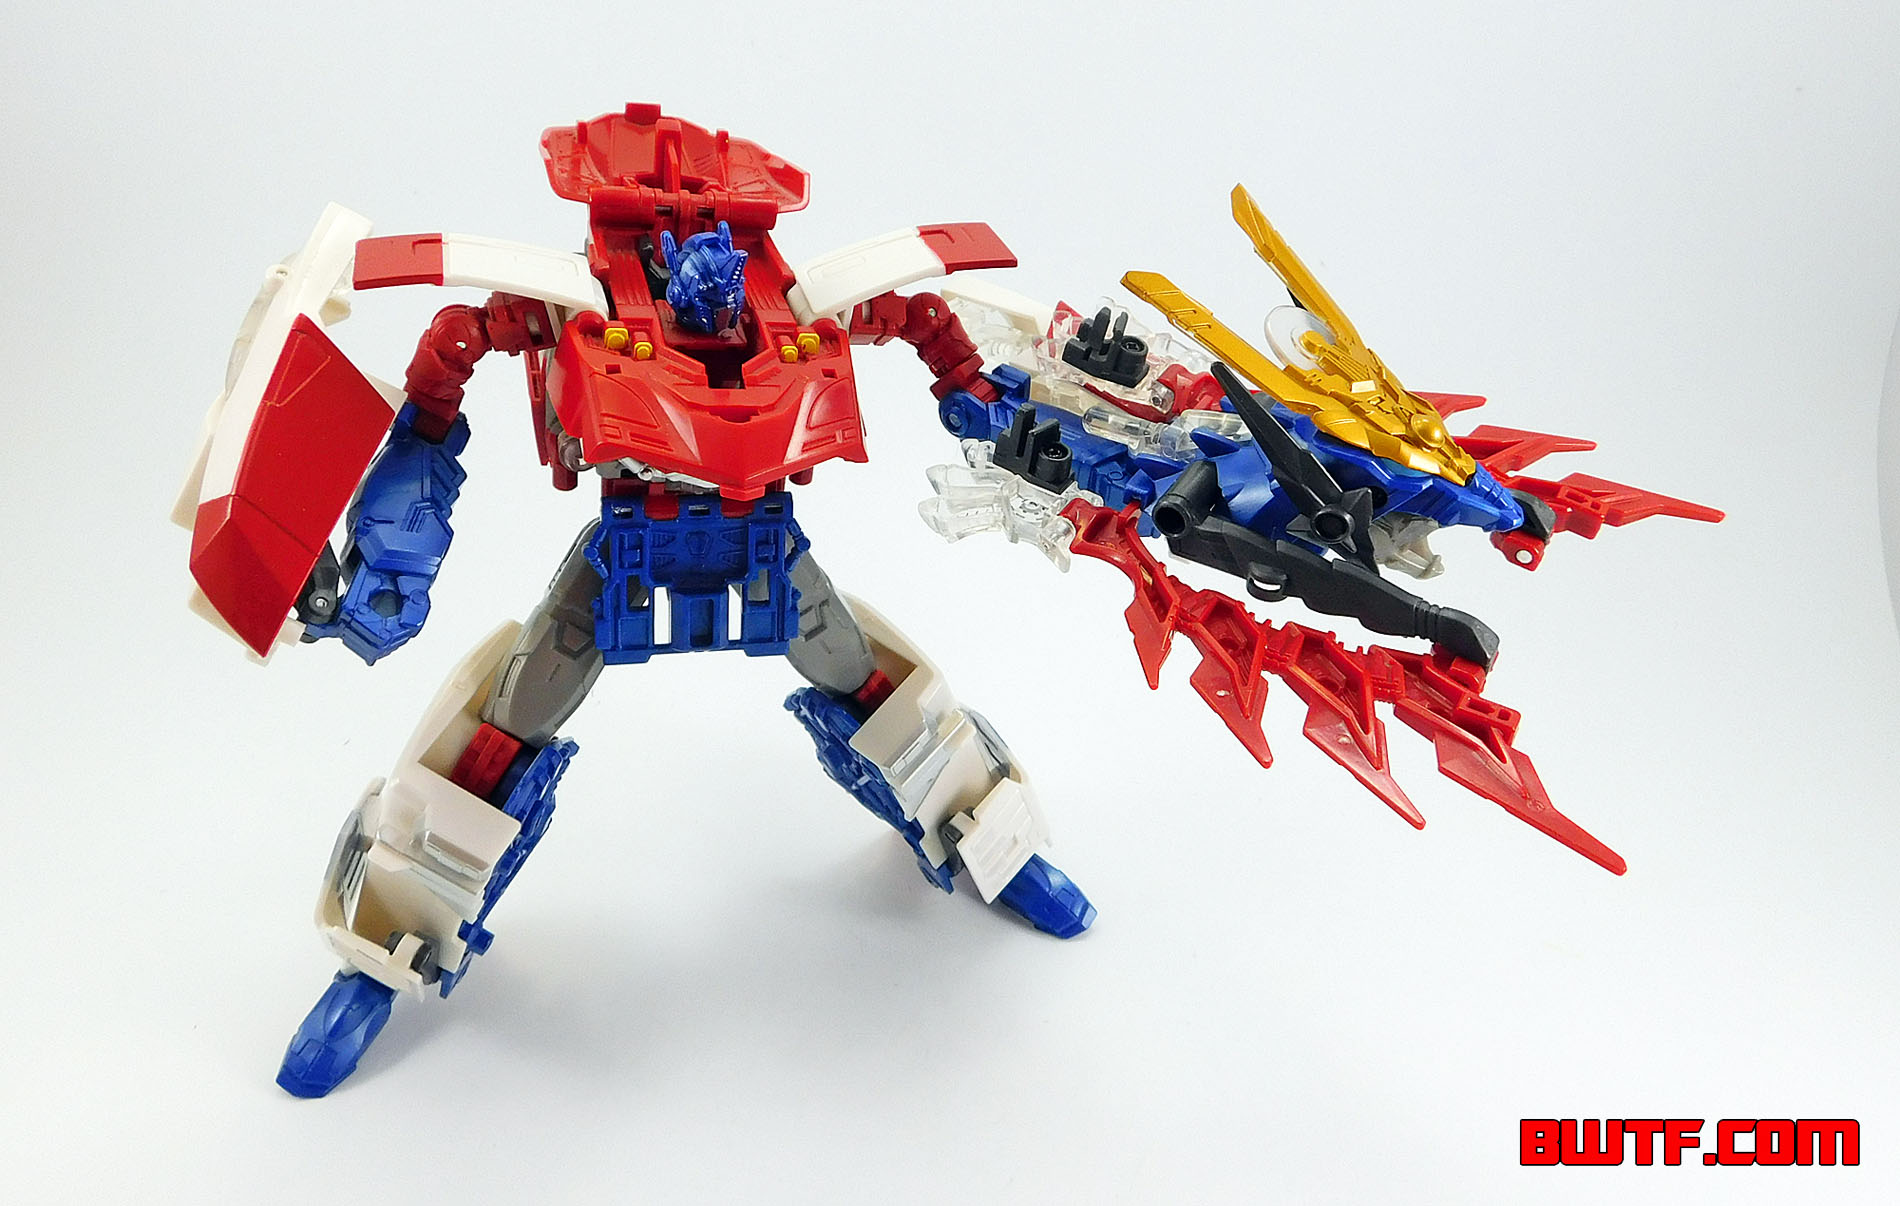
Optimus Exprime includes four accessories. Two are giant swords that are angled at the top and feature 5mm handles and pegs on the sides. Both swords are cast in silver plastic with no paint applications. The sculpt for these swords was also used with "Combiner Wars" Bludgeon.
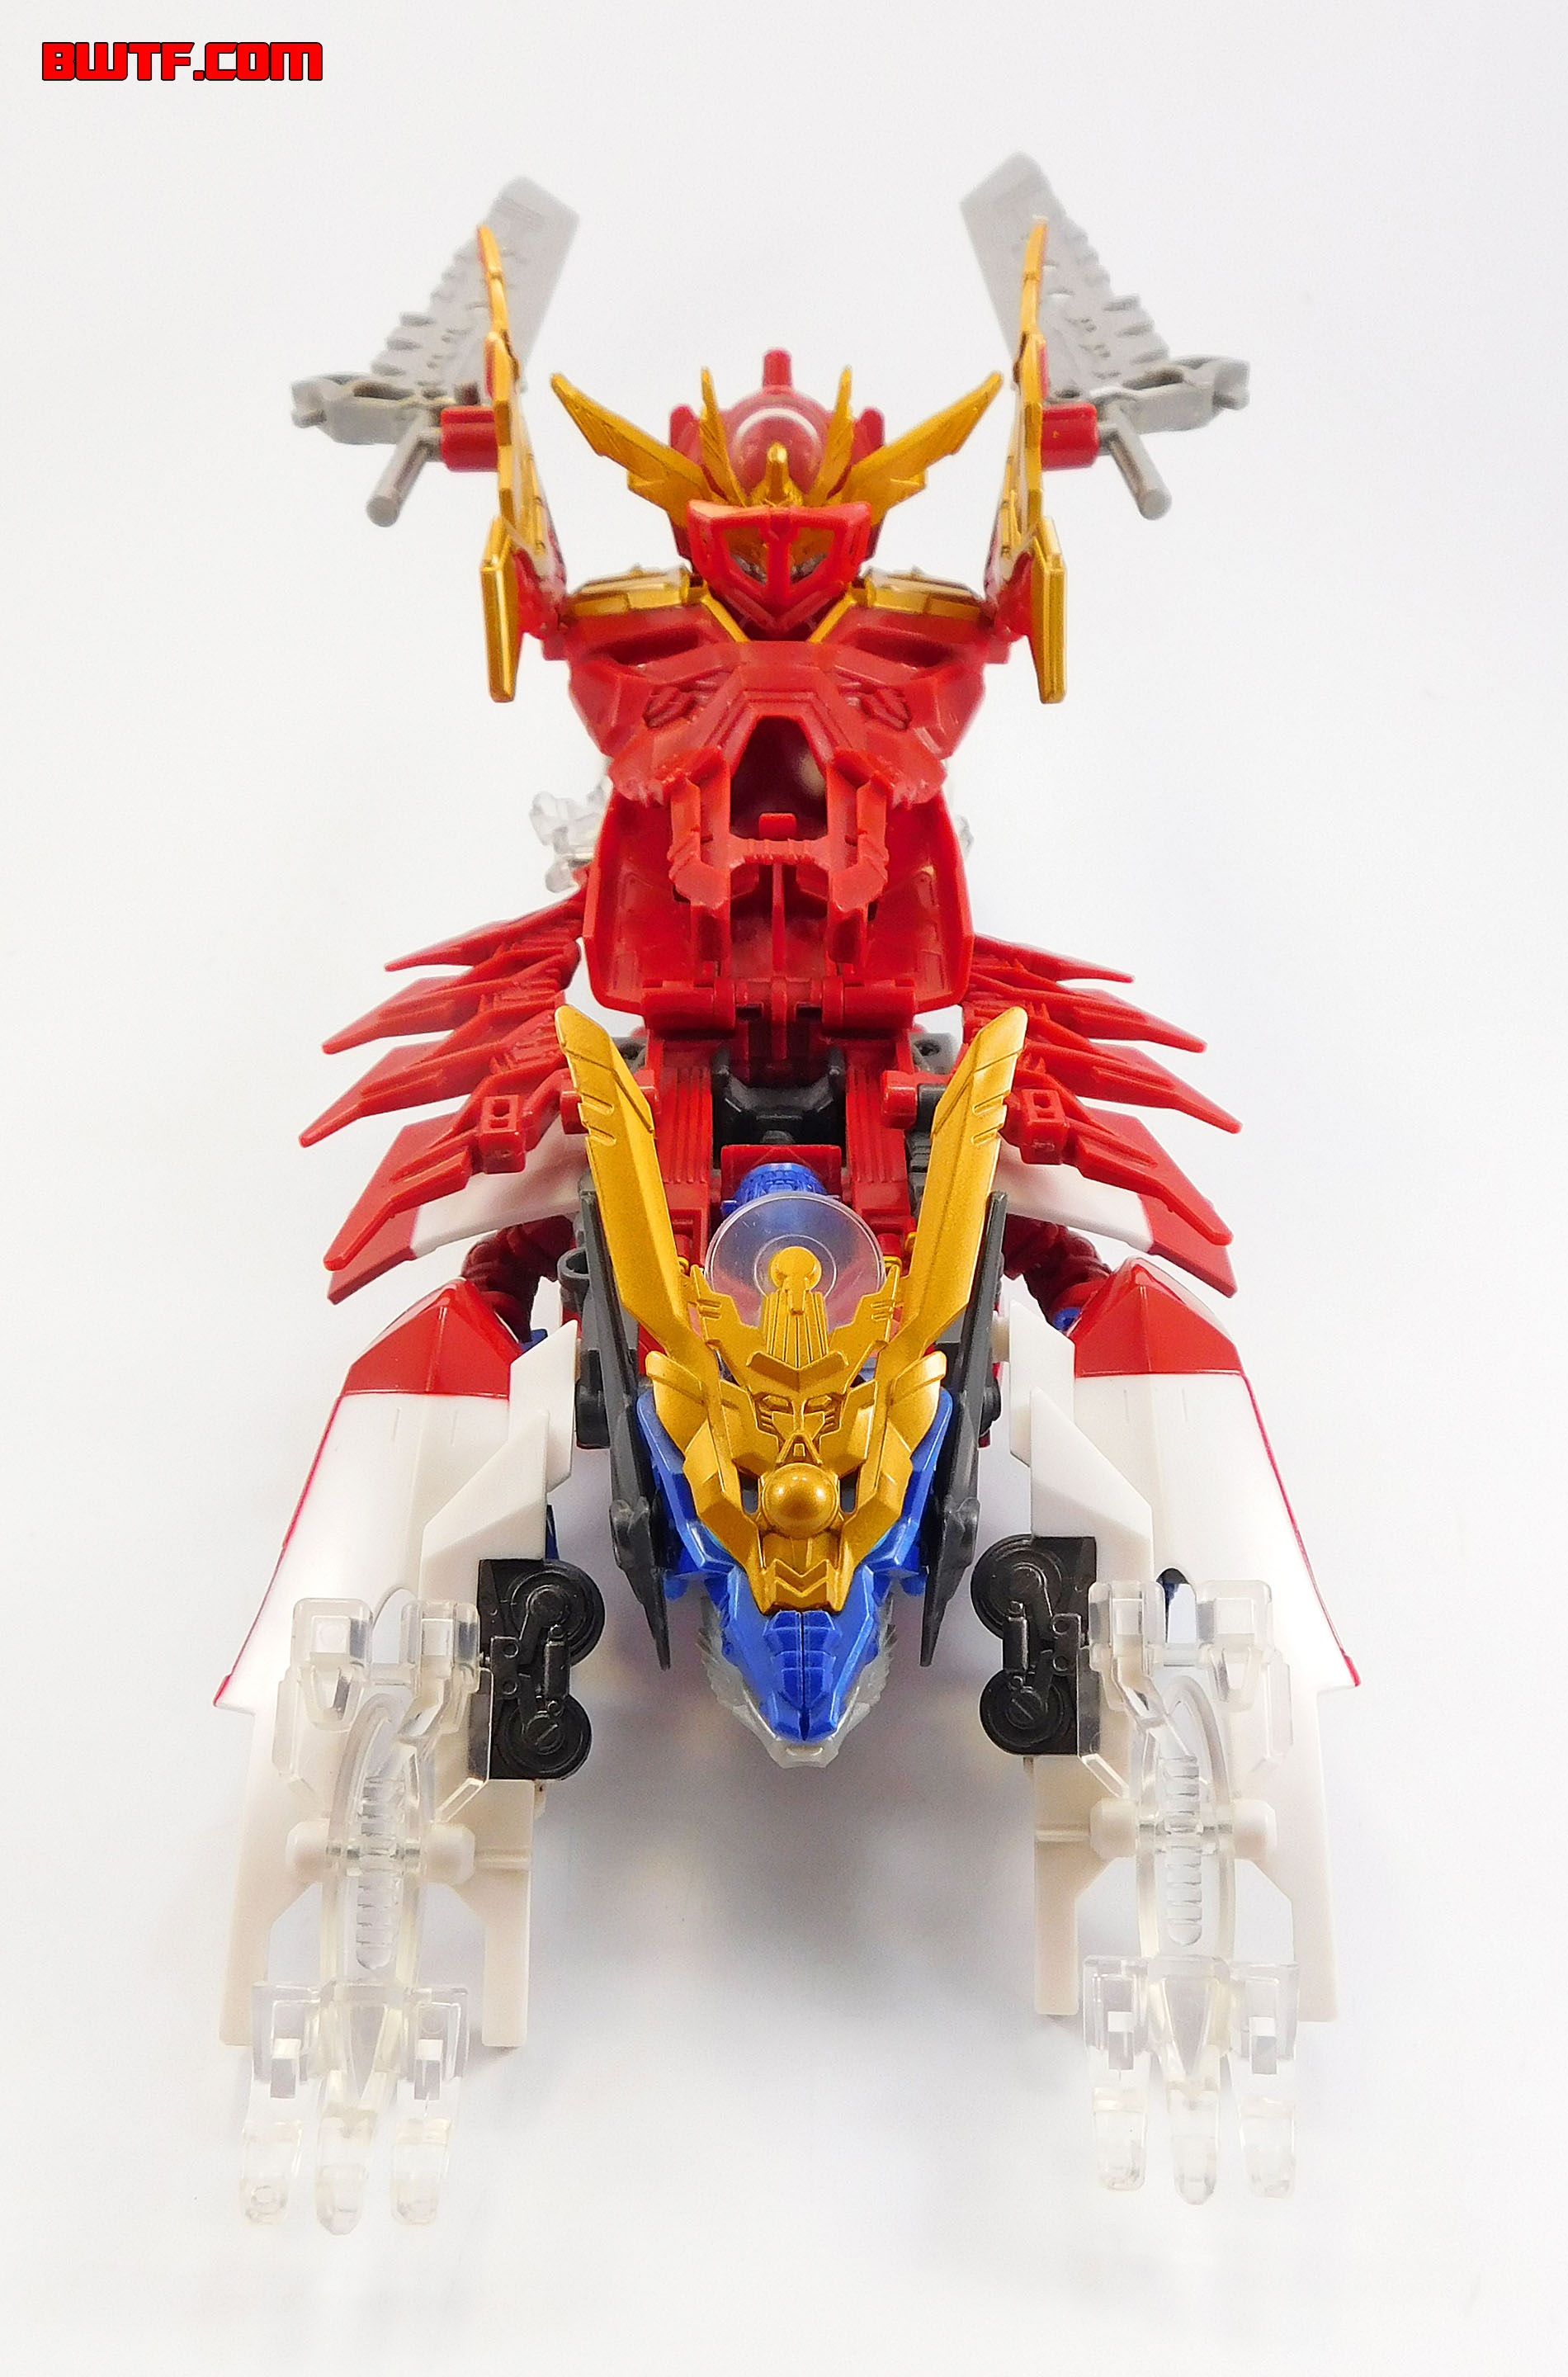
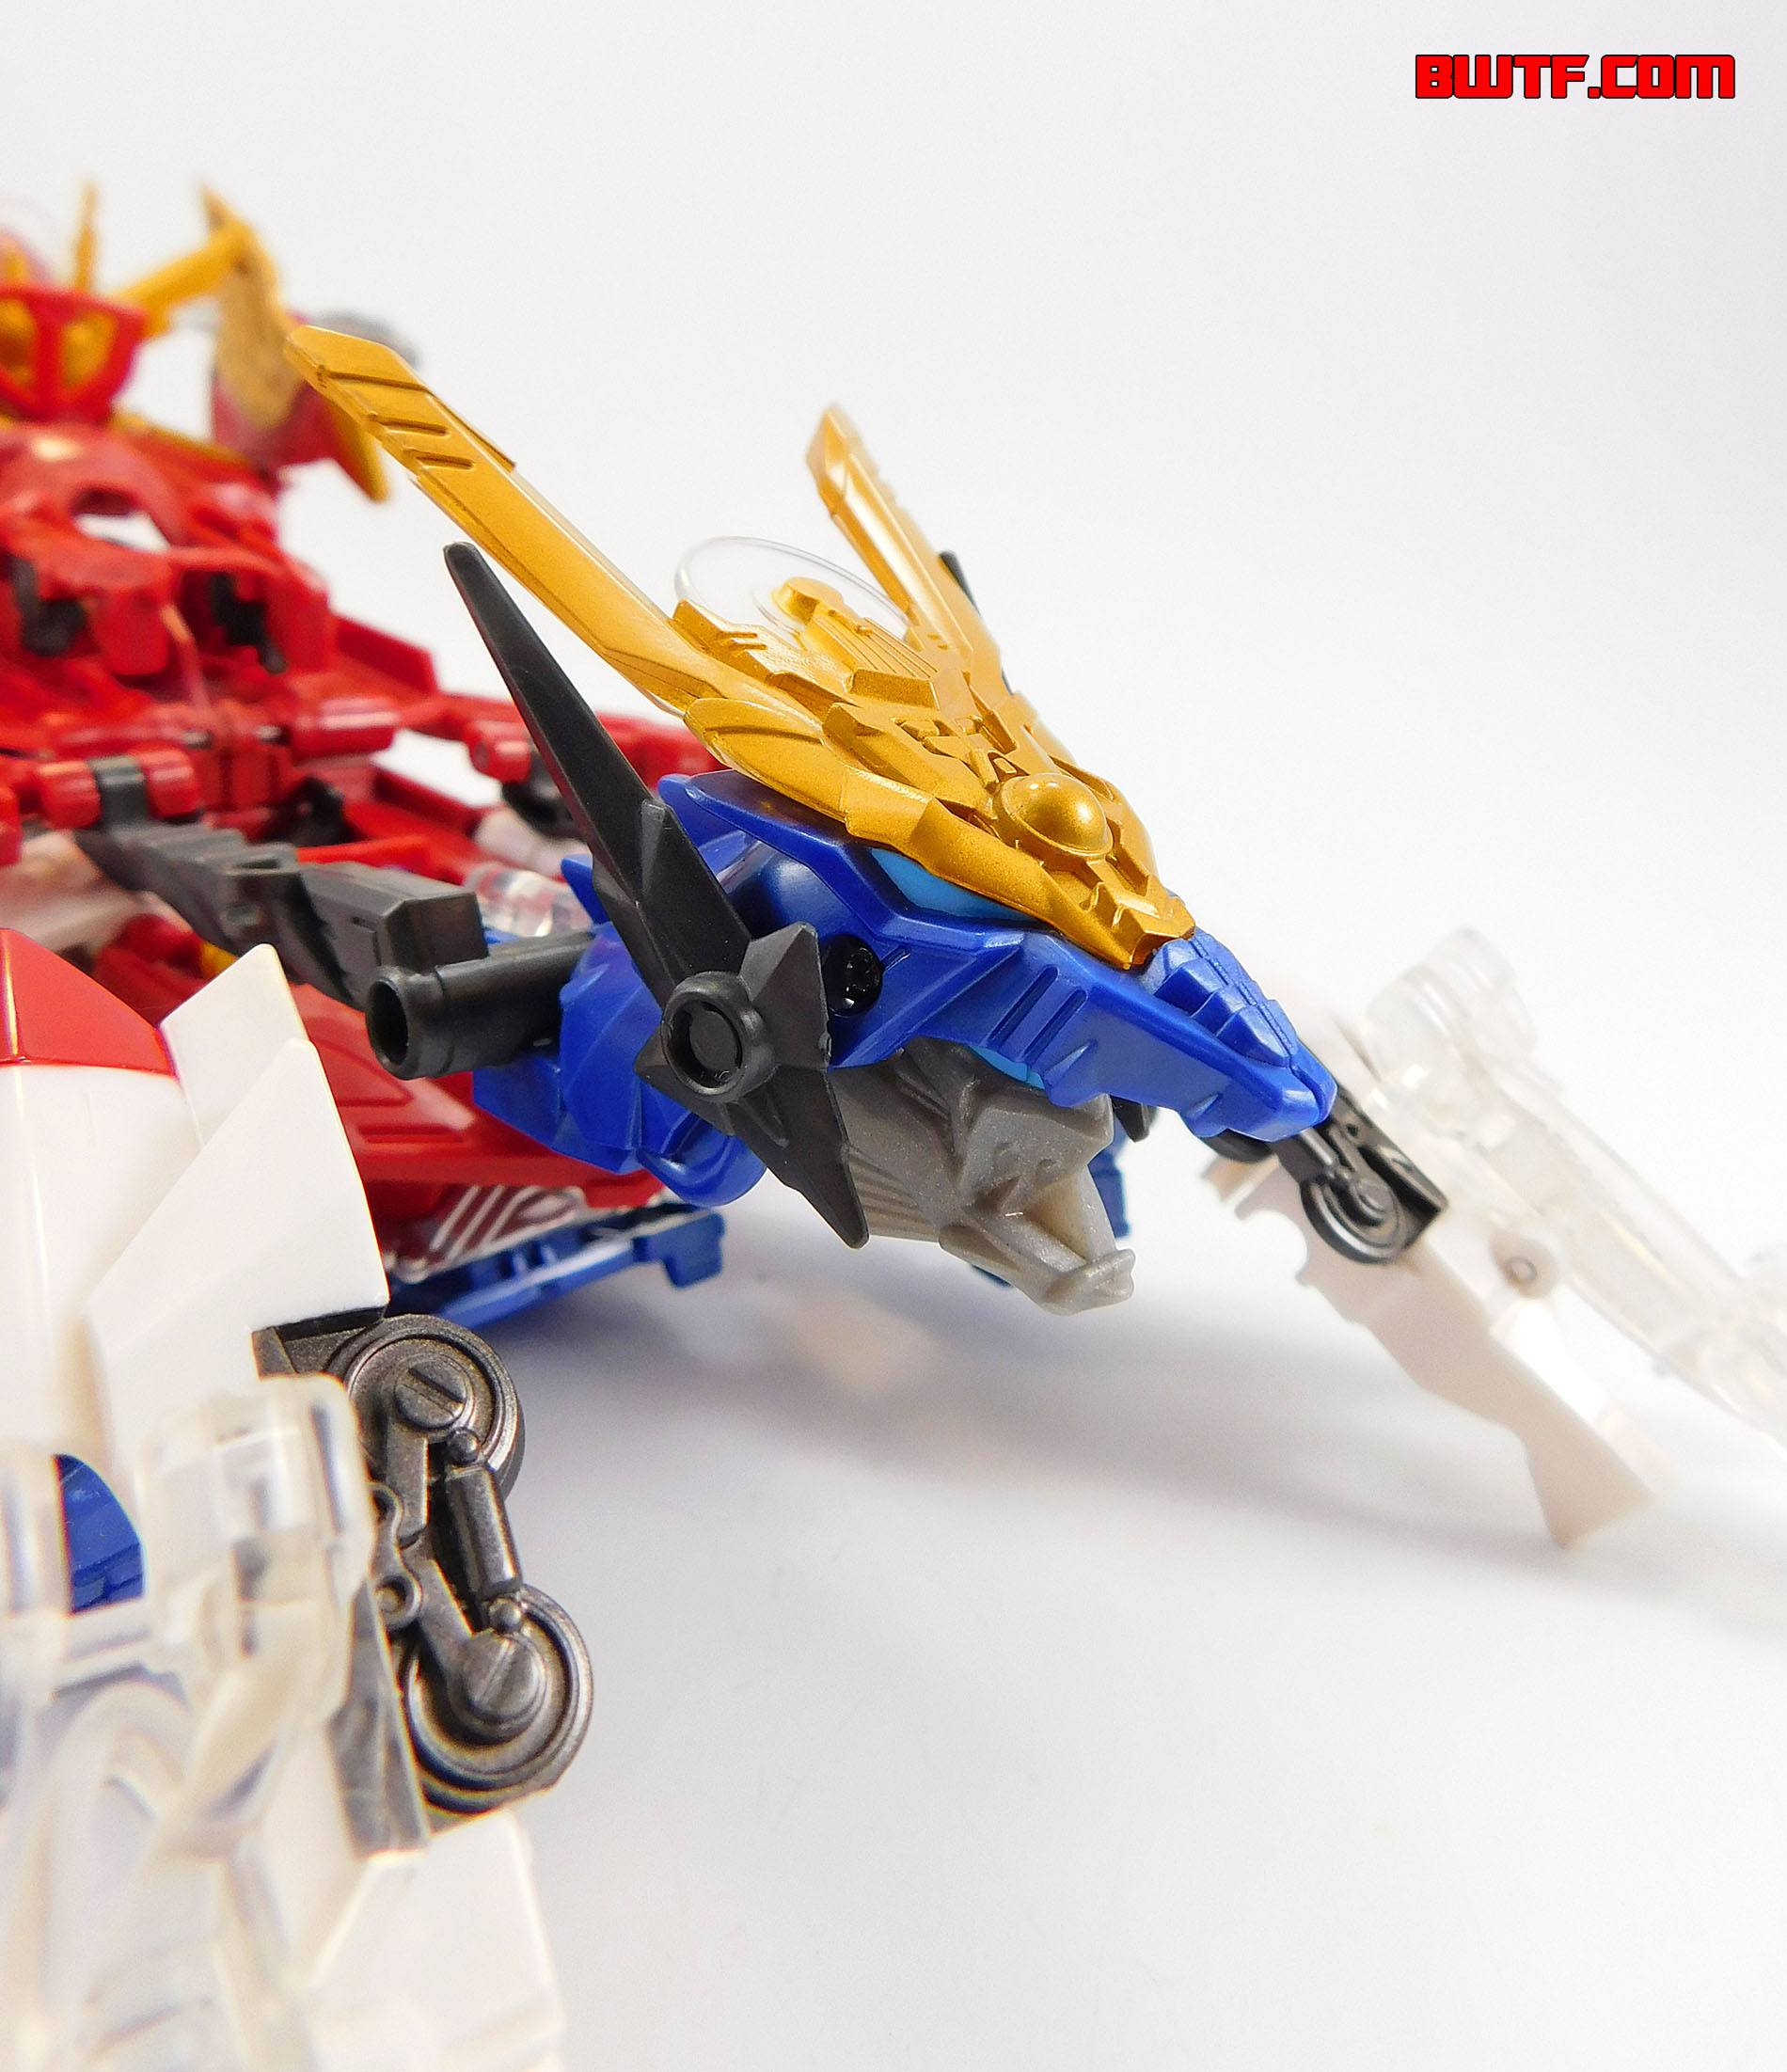
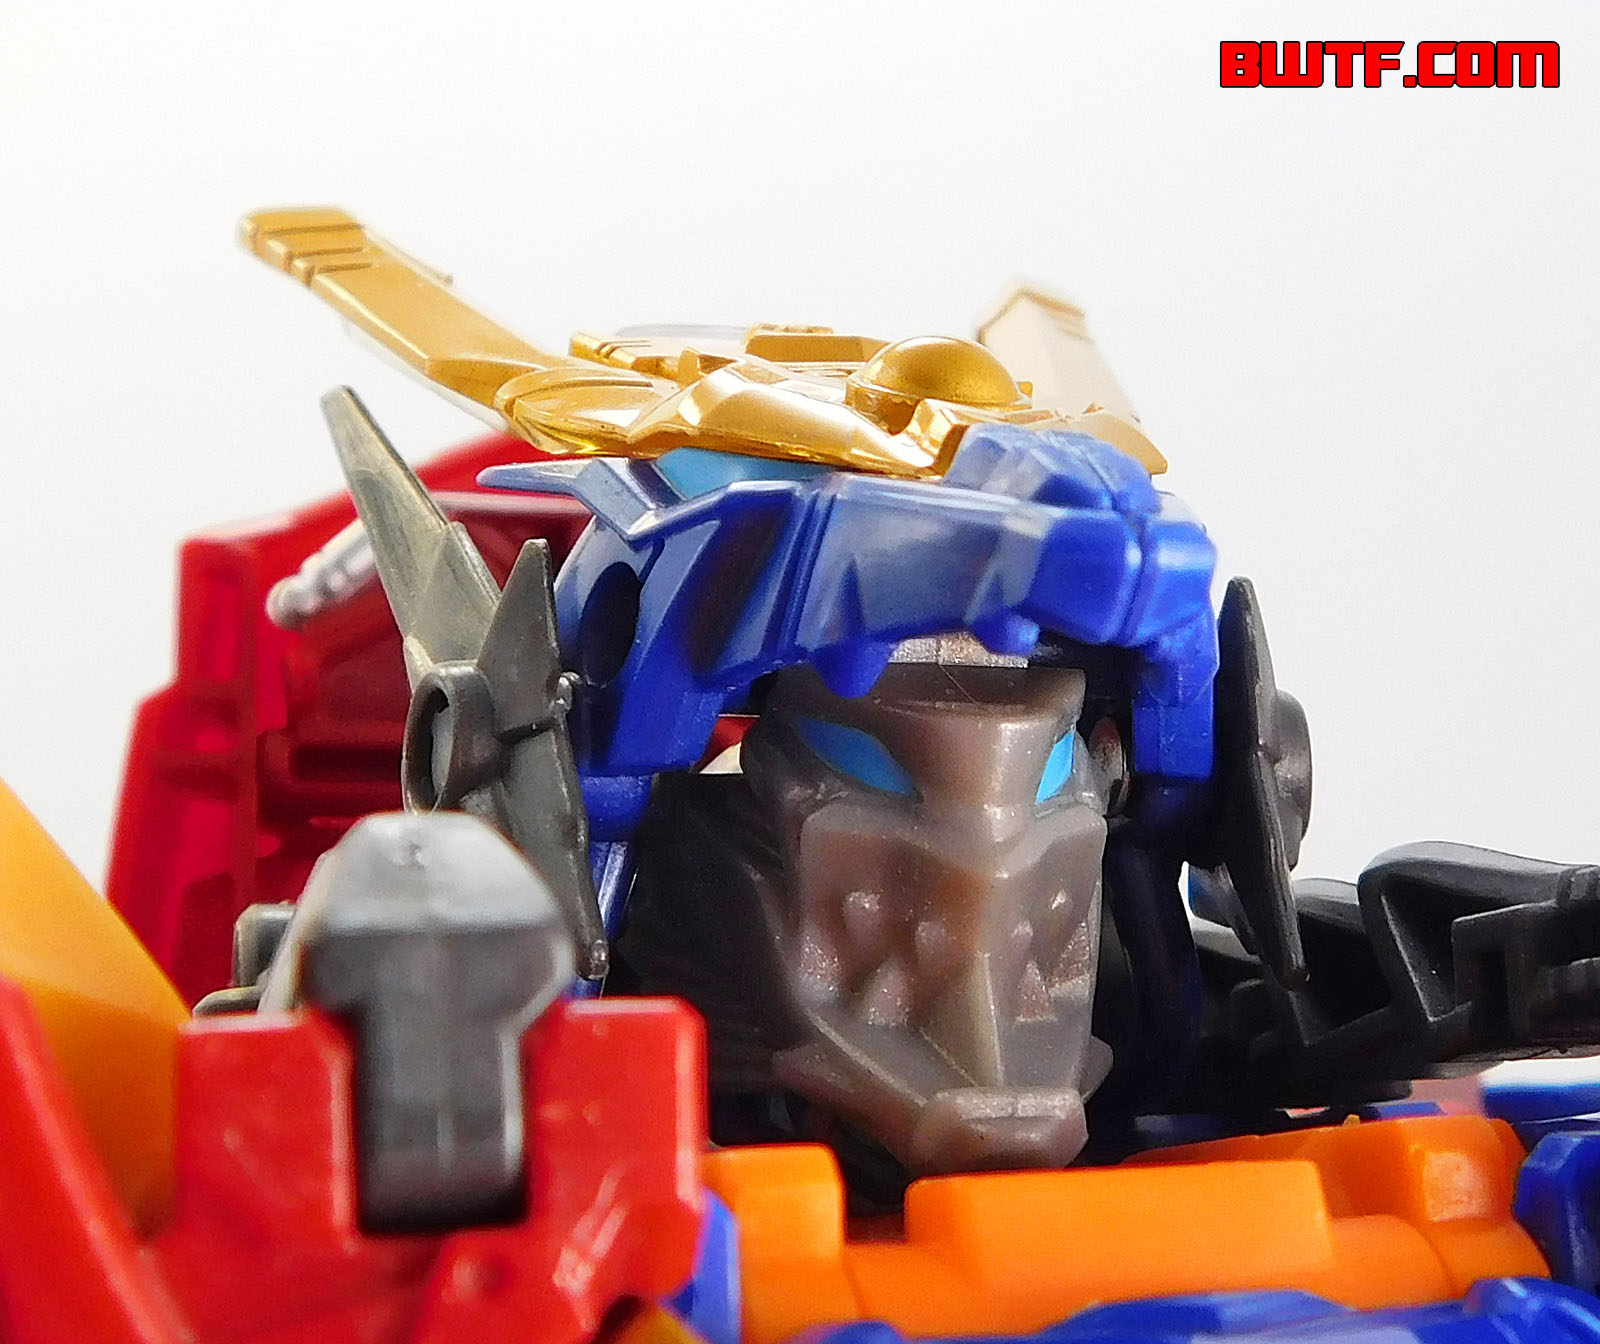
Another accessory serves a few different purposes. First, it features the beast mode head with a beautiful design based on Japanese Kabuto helmets. It has a beautiful pair of "horns" that angle back with a circular design in the center that looks like it could be inspired by the sun or moon. This piece also forms the head and part of the torso armor for DaiGekisou. On top of that the 5mm pegs at the back allows Optimus to hold this as a blaster like weapon with energy (presumably) launching out of the dragon mouth. The DaiGekisou head is a monstrous looking one complete with teeth, which is appropriate for a head that literally gets formed by part of a dragon's mouth! This piece is cast in several different plastic colors: red, dark grey, silver, metallic blue and clear plastic. These are all very "Optimus Prime" style colors and they look great together. The top of the head (including the horns) is painted gold and the eyes are painted light blue, calling back to the G1 trope of giving Autobots blue eyes.
The final accessory is a shield that transforms into the helmet and torso armor for DaiKenzan. The DaiKenzan head is also based on Kabuto armor helmets and it is beautiful, with wing-like structures going across the top of the head and angling out to the sides. The top has "horns" and the circle detail similar to DaiGekisou's head. The face is a bit beast-like with narrow eyes and a mouthplate that looks kind of like a bird's beak open in a scream. The "bird" motif continues on the sides of the armor which look like feathers angling upwards. This piece is cast in red plastic with gold, silver and light blue details.
The two Kabuto helmet pieces can be combined into one "super shield". On the back of the DaiKenzan shield piece are two tabs. These slot into corresponding slots towards the bottom of the DaiGekisou helmet (the bottom being the direction the dragon head is facing). This forms a giant shield that can be held using the red peg on the DaiKenzan piece.
Vehicle Mode:
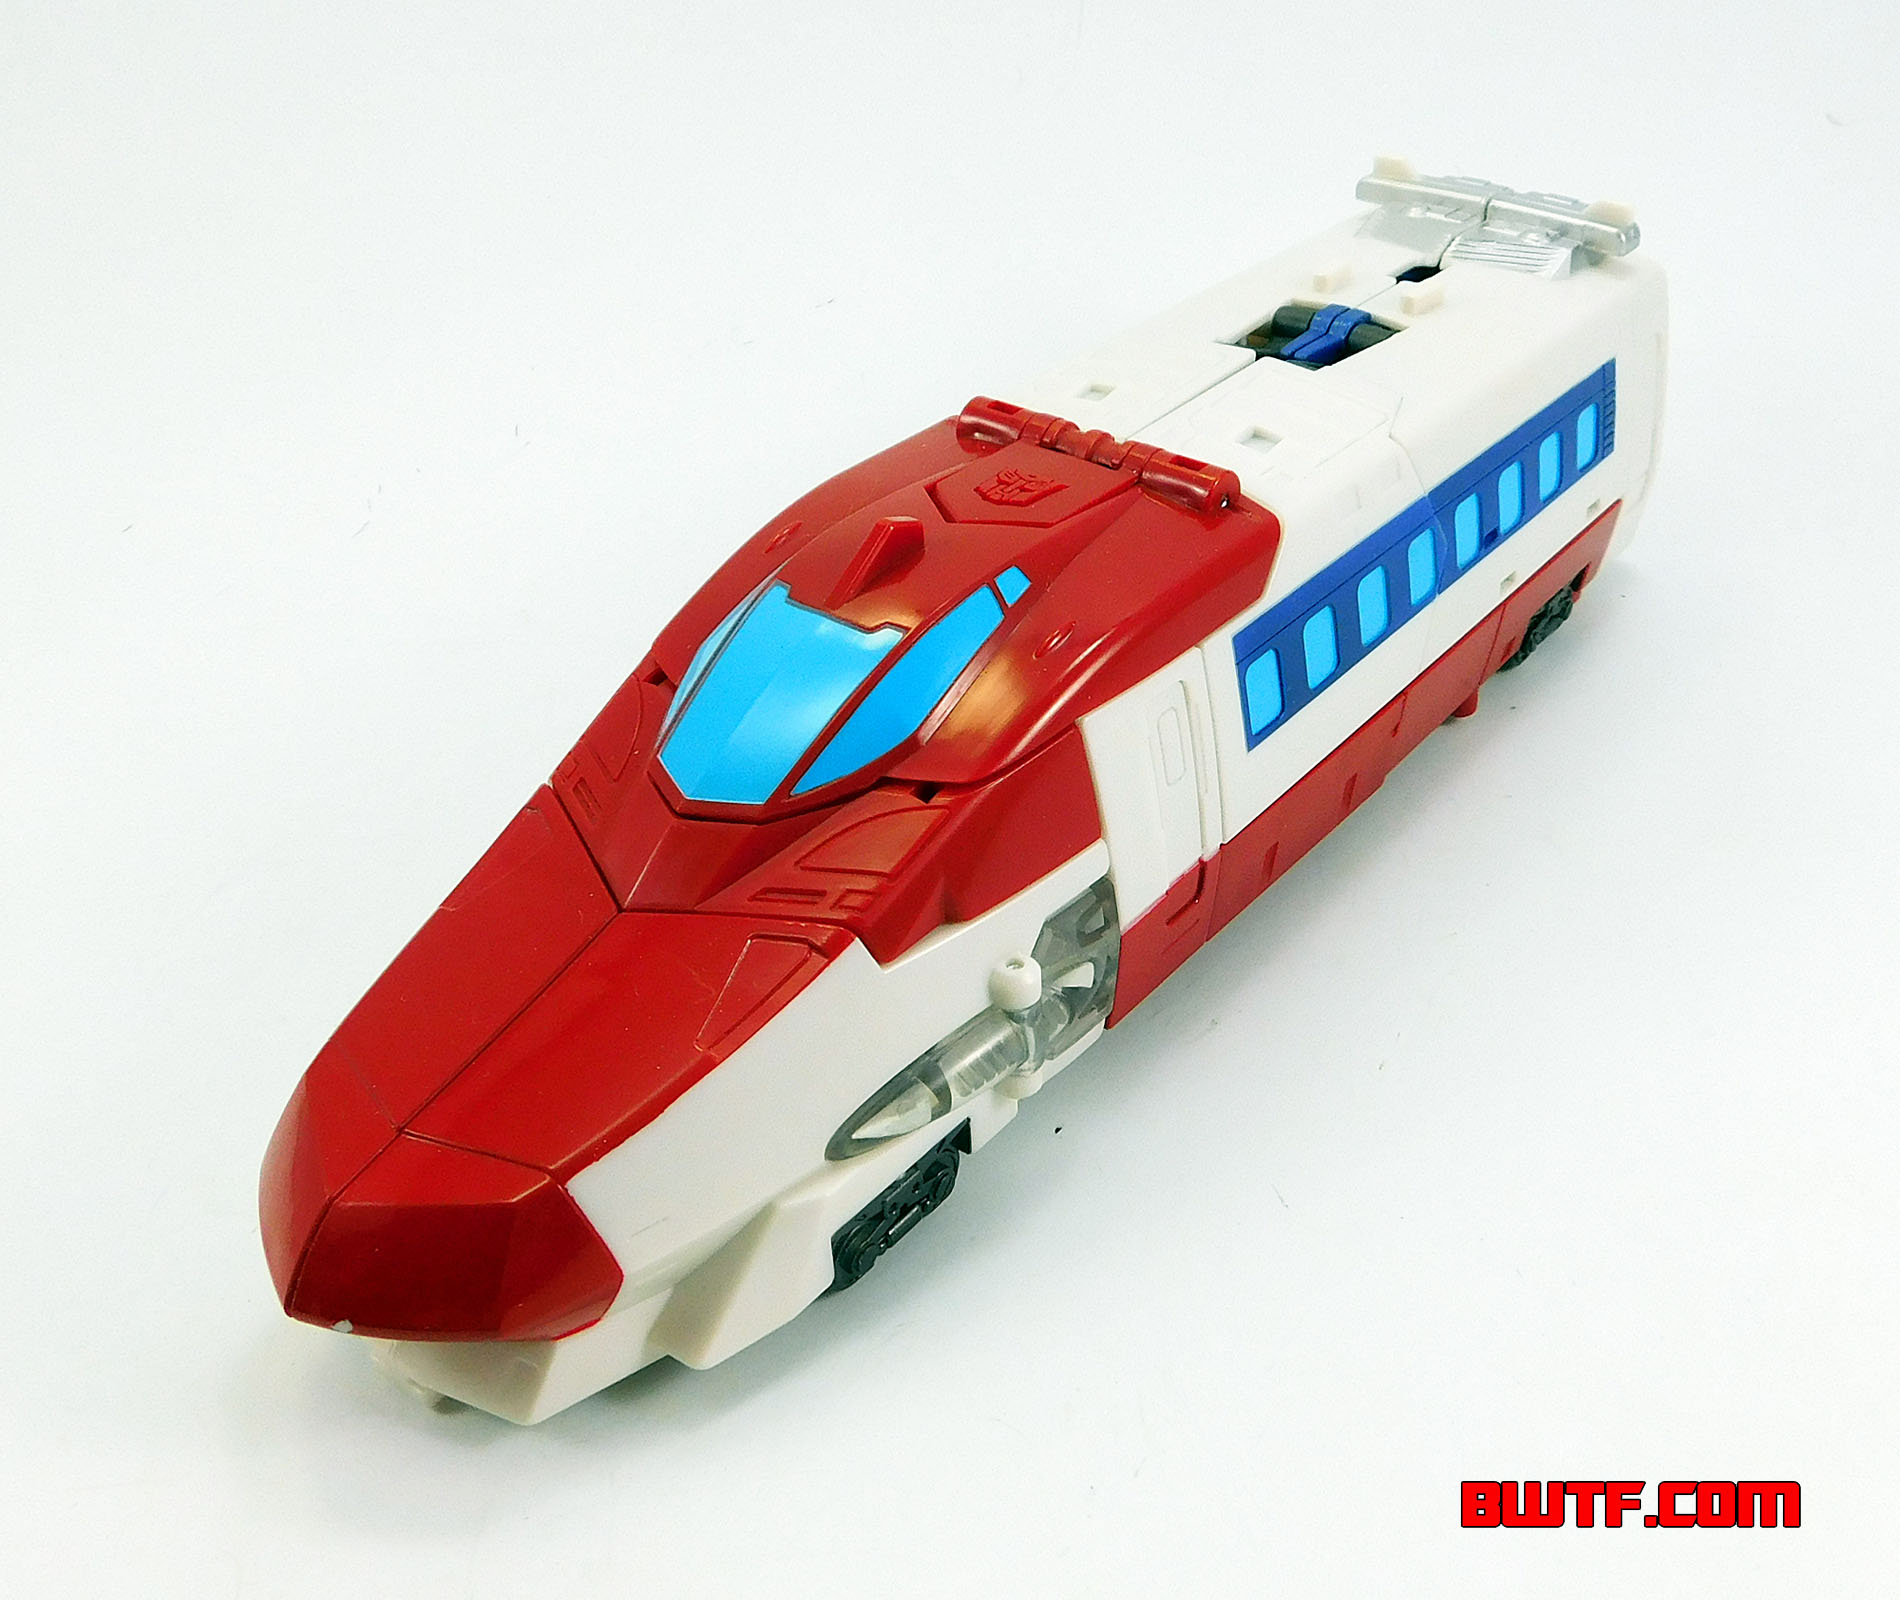
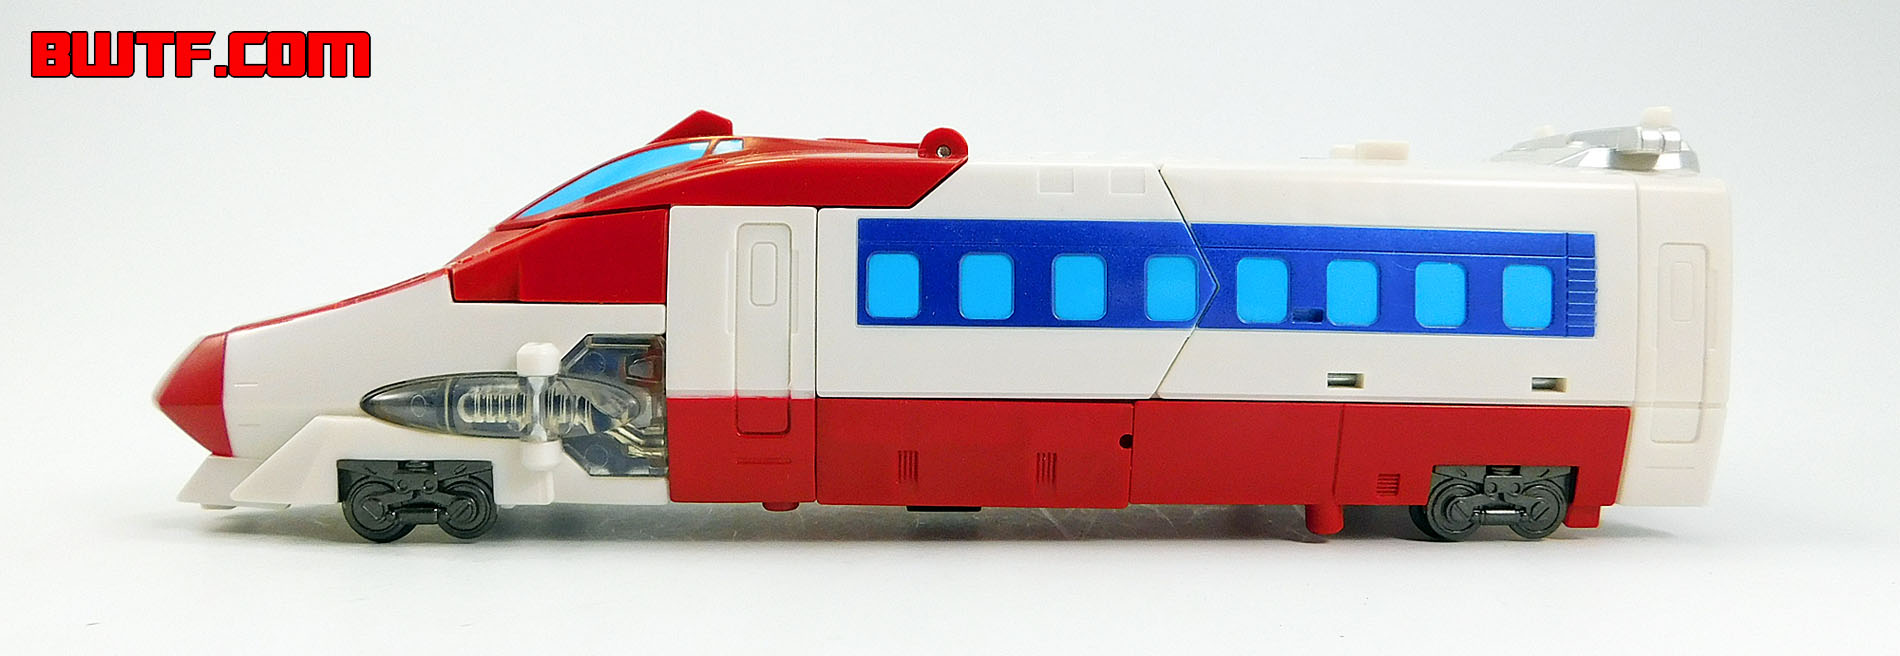
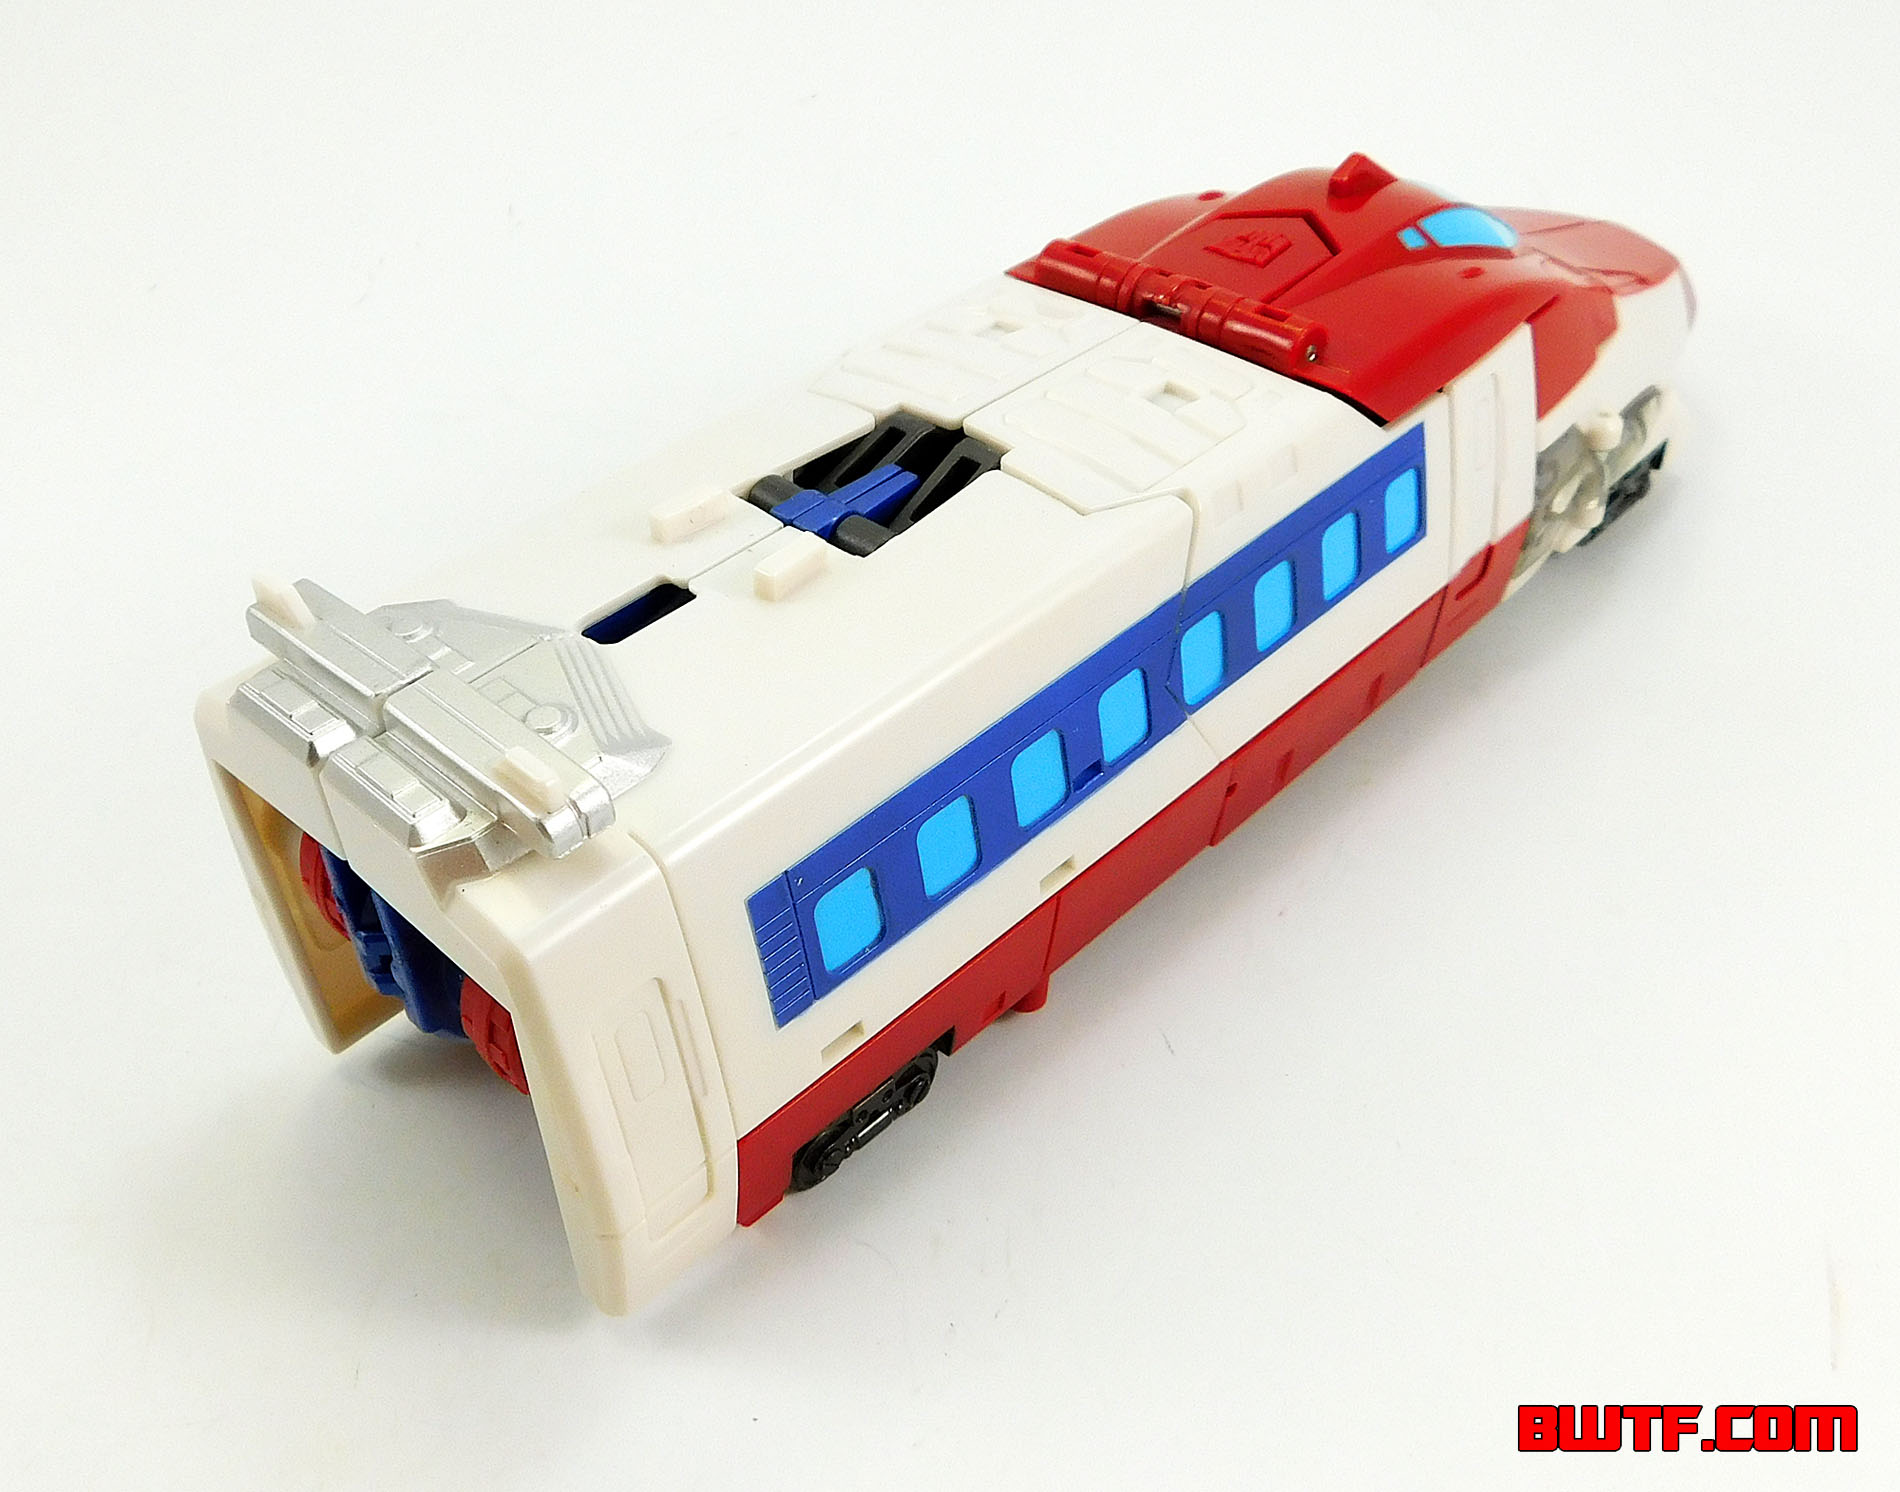
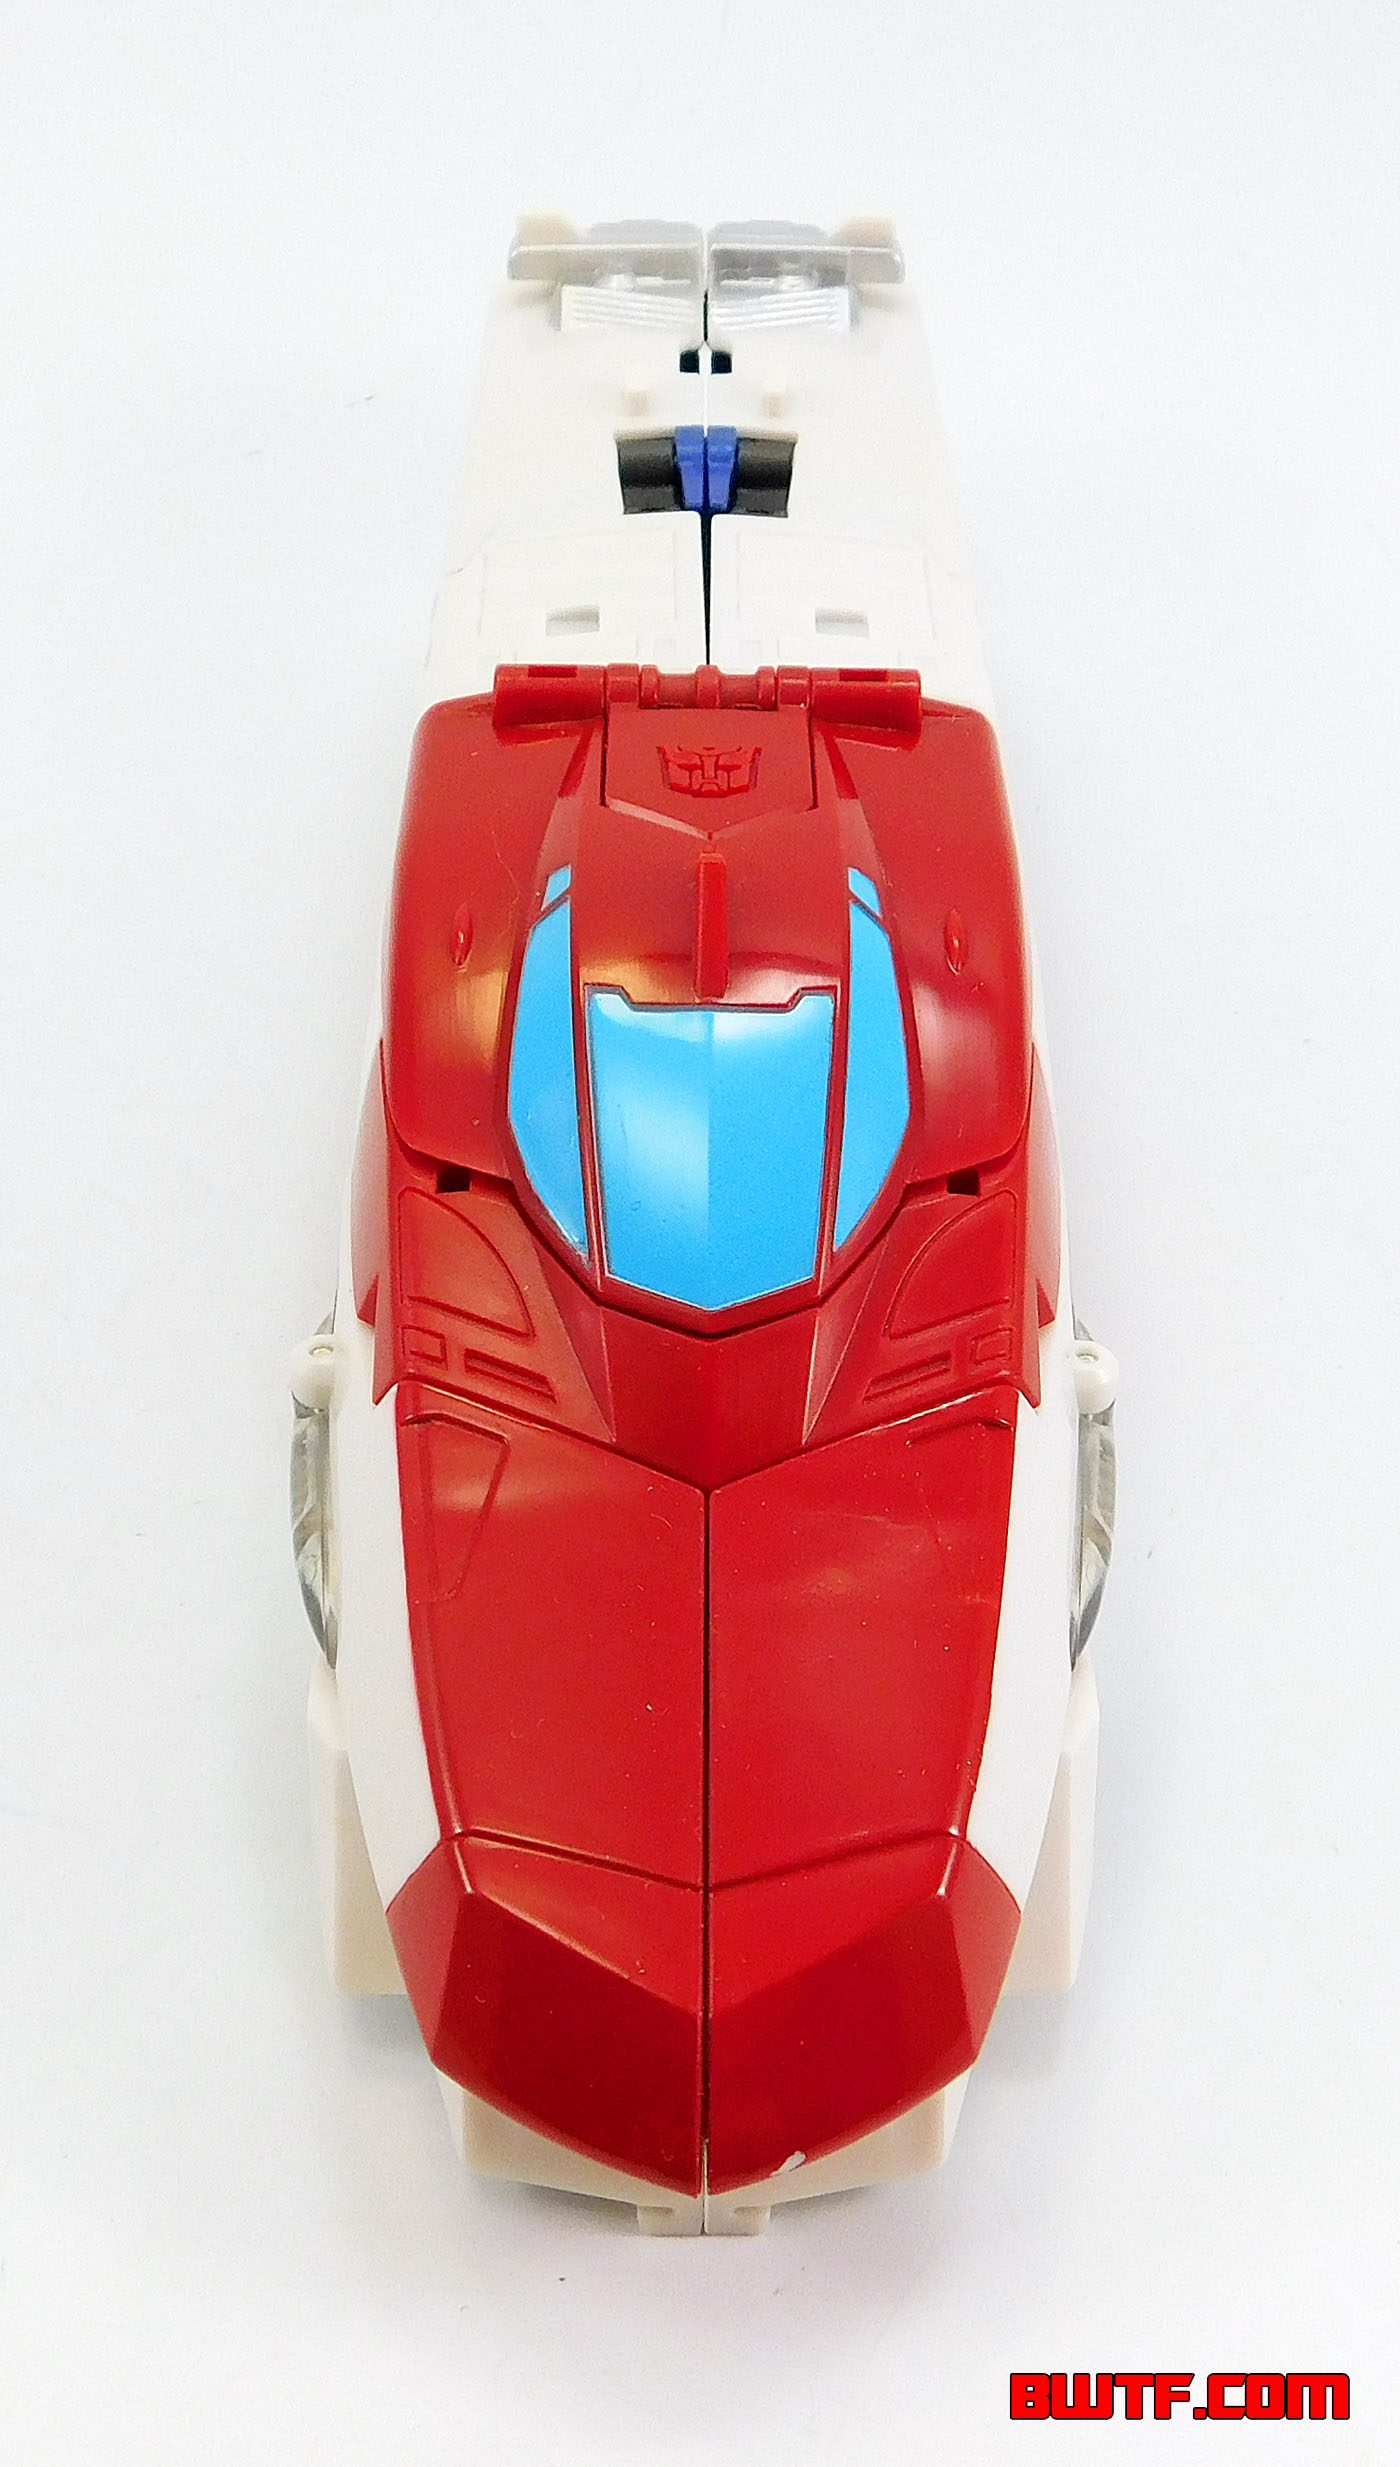
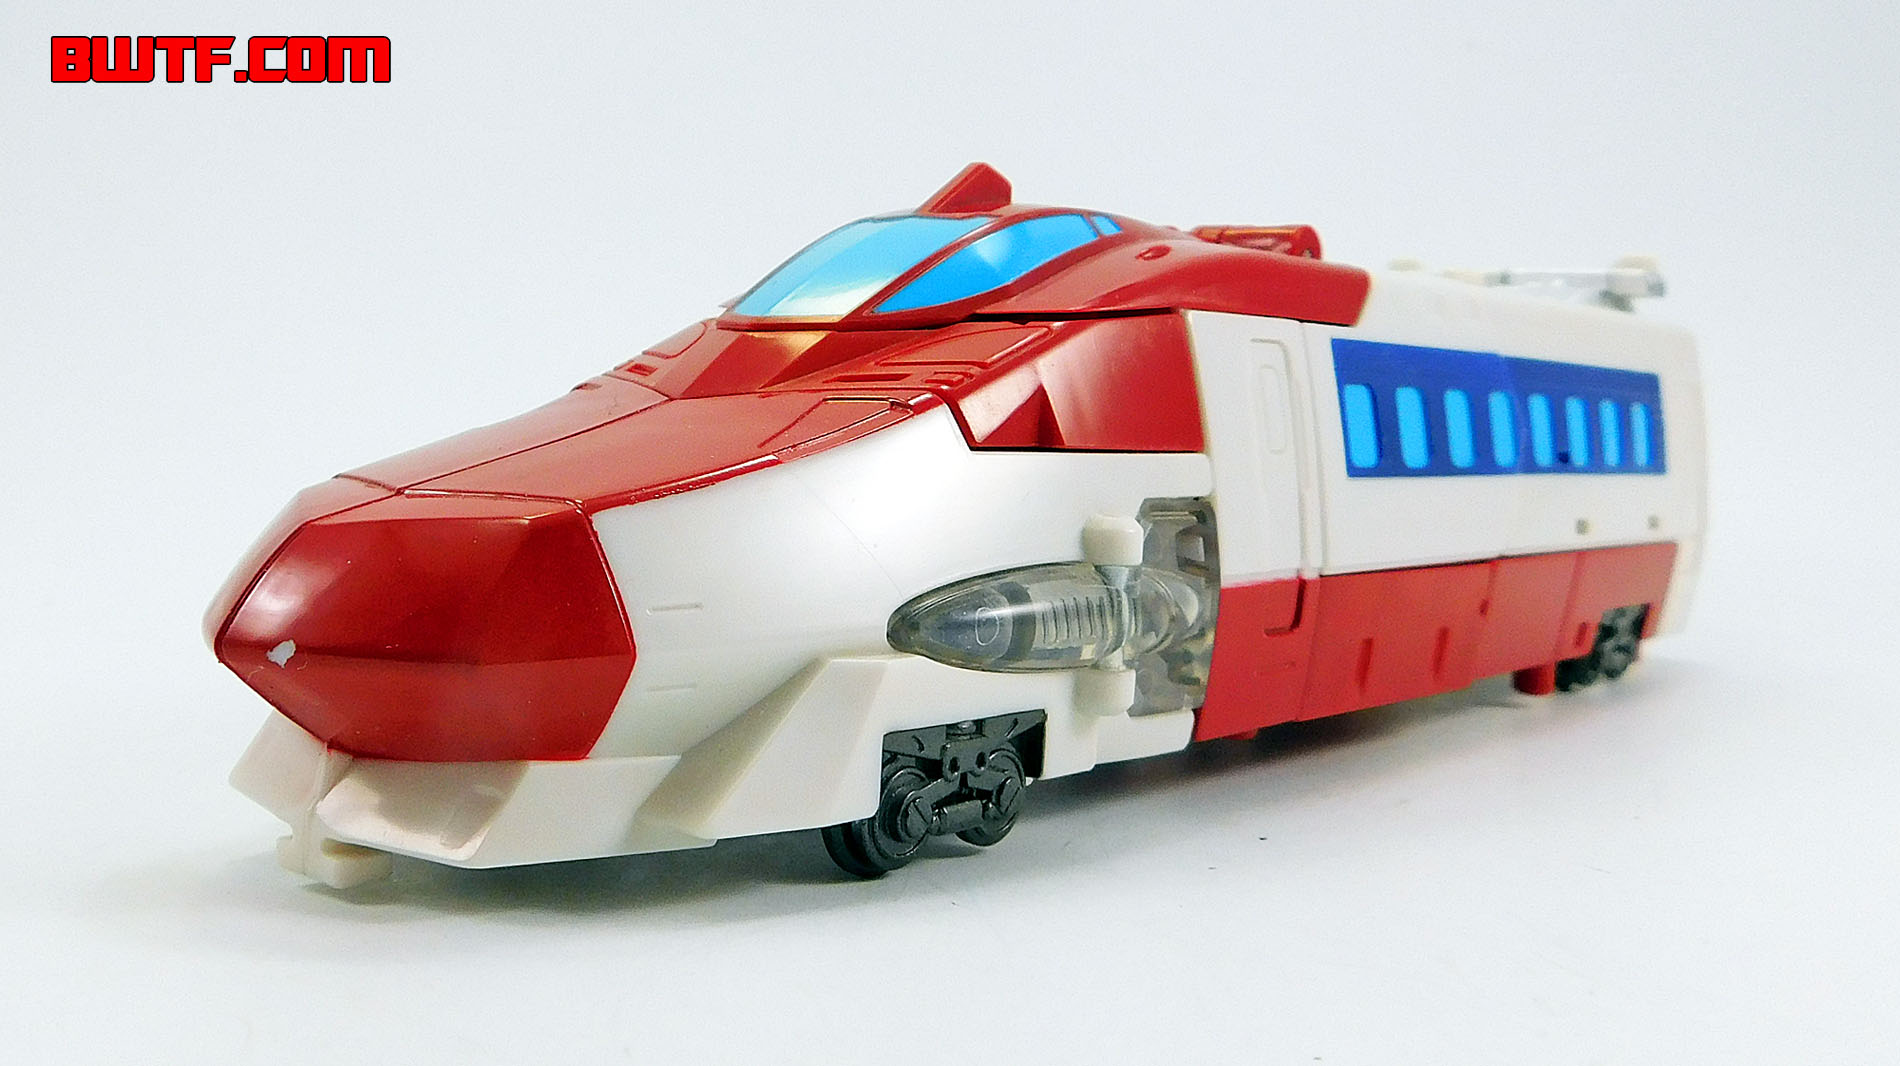
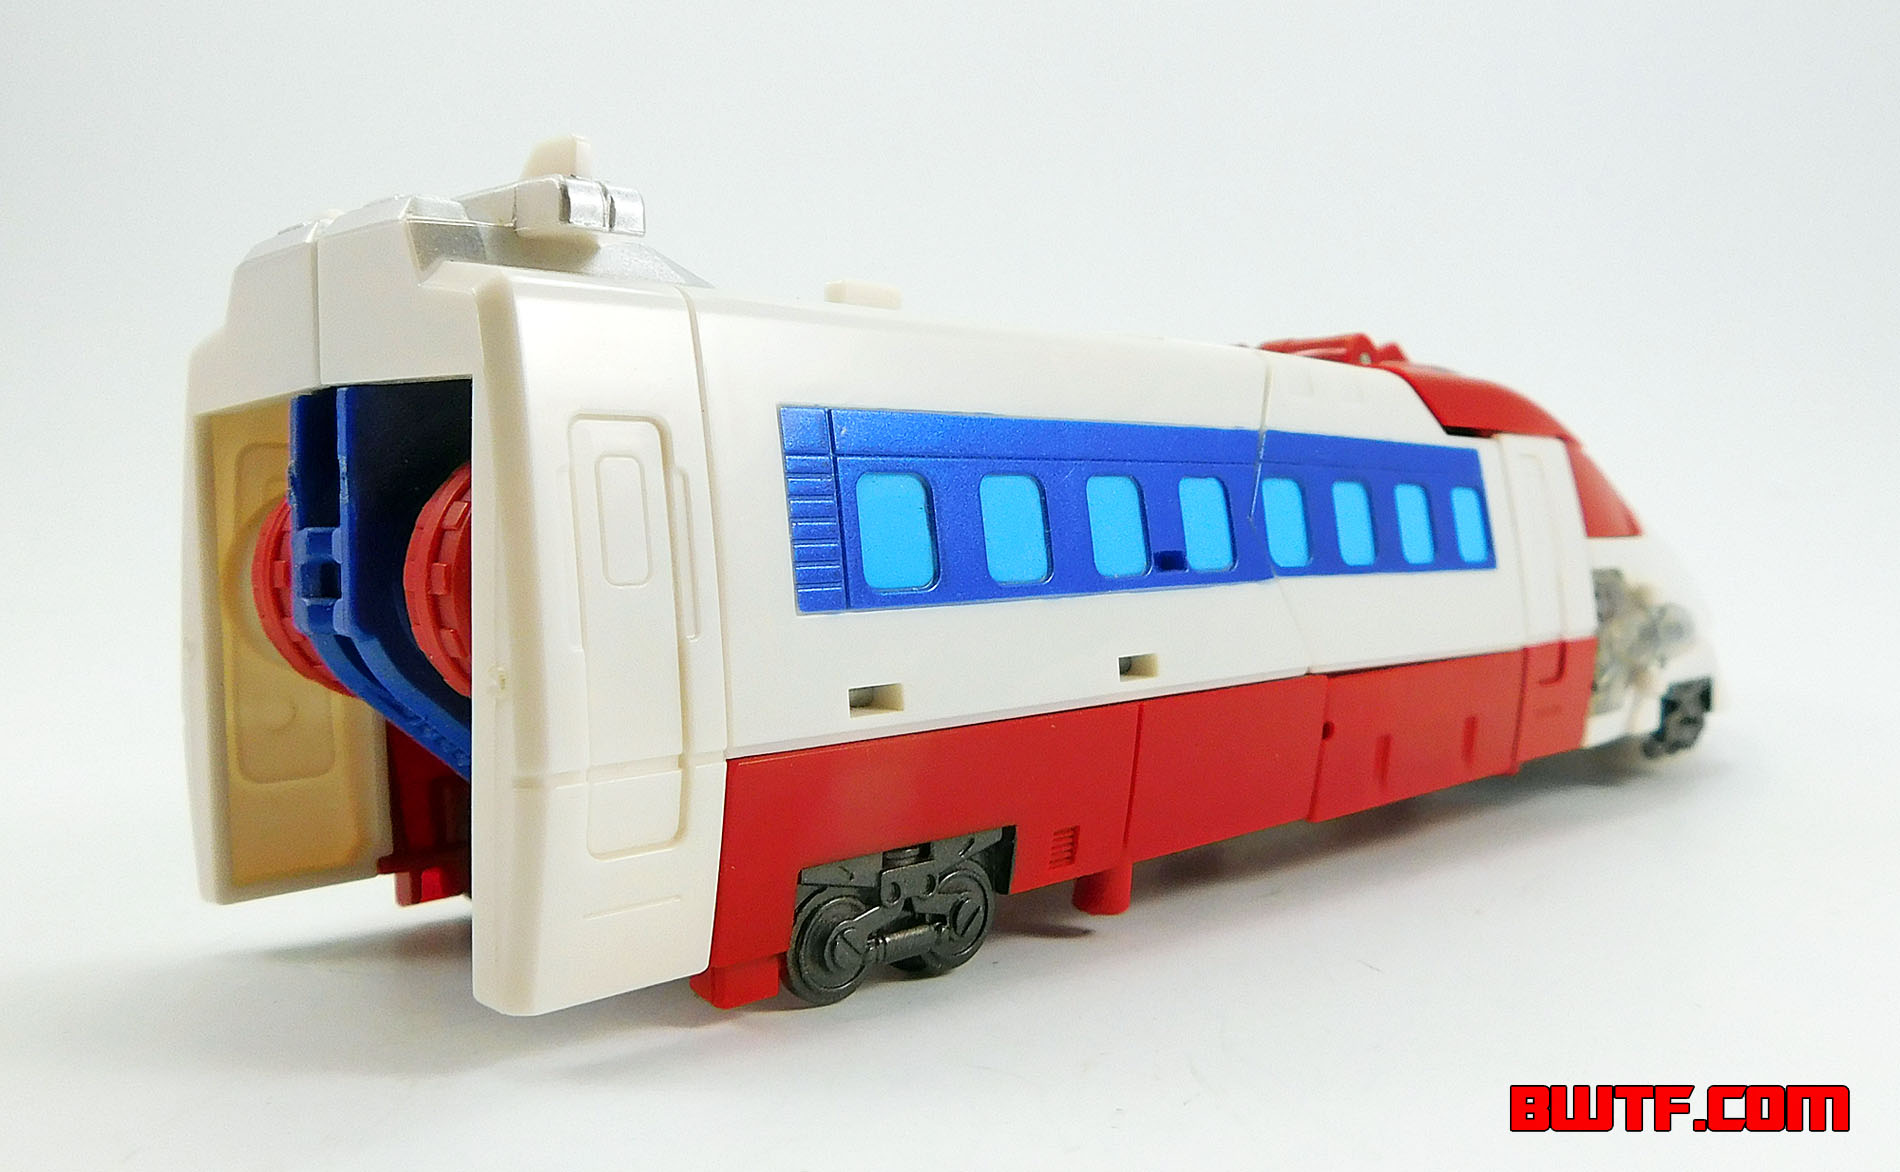
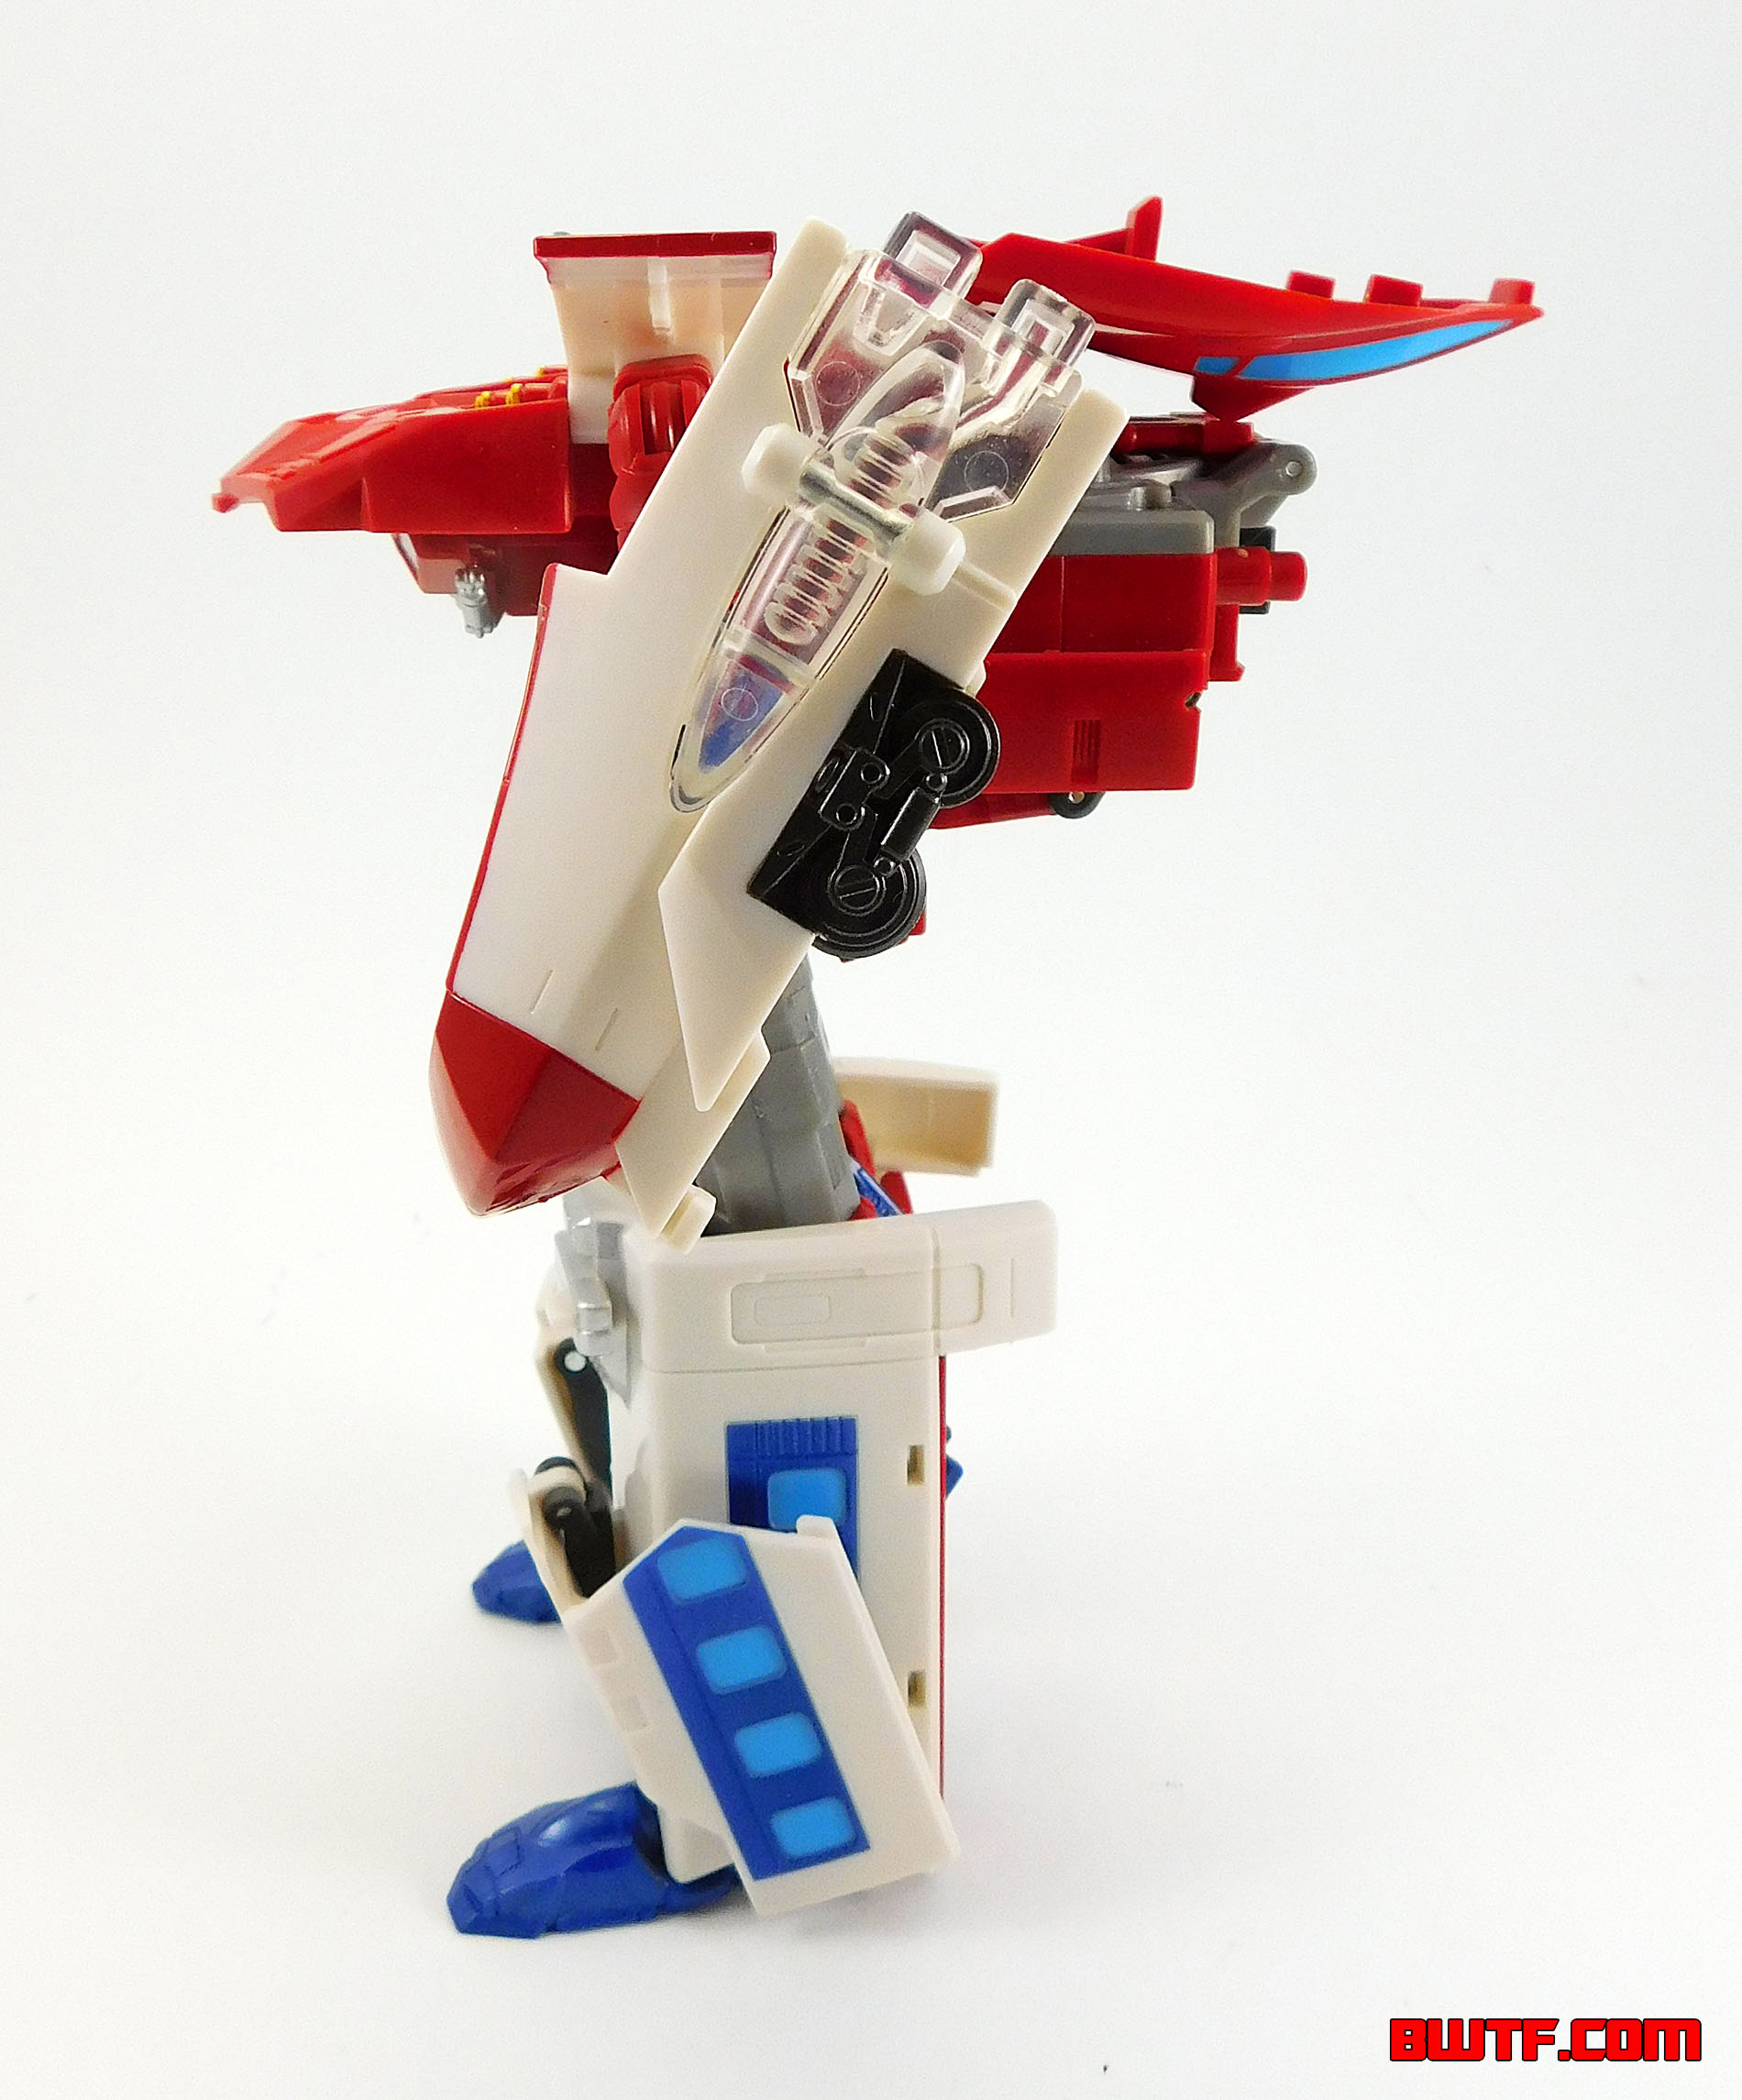
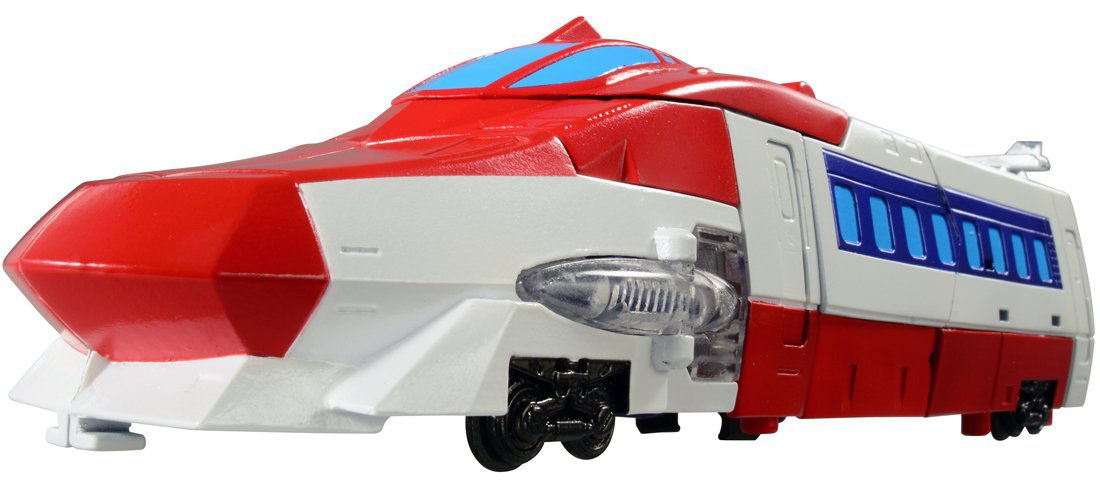
Perhaps for the first time in the character's history Optimus Exprime transforms into a high speed bullet train! I am not a train expert by any means, but to me this vehicle mode looks like a stylized version of the N700 Series Shinkansen, but of course due to trademark reasons the designers did not go and create an exact replica of any existing train. The vehicle mode has all the staple design elements of a bullet train including a sleek front end that angles up to a driver's section. Running along the sides are narrow, rectangular doors and a series of rectangular windows. A small, angled piece sticks out of the top in the front, which likely represents the antenna (standard equipment on a bullet train). At the back is a slightly raised section that is likely meant to be the Pantograph, a device that collects power through an overhead line. The sides also have two sets of train wheels, one pair in front, another in the back. The sculpt is not super complex, but its streamlined nature is what makes it appealing.
For those wondering about size, this figure does not firmly fit into either a Voyager or Leader Class slot, but rather it feels like something in between. From nose to back the train is 9 inches (about 22.8 centimeters) long and about 2.25 inches (about 5.7 centimeters) wide. He definitely has a nice, chunky heft to him, no doubt thanks in part to the electronics in the figure.
The vehicle mode is cast in white, red and clear plastic with some dark grey plastic peeking out on the top and back. The windows in front and on the sides are all painted light blue. The rectangle around the side windows are painted blue. Silver paint is used on the Pantograph. The wheels are gunmetal grey. The clear plastic appears on the sides towards the front and they look kind of like cannons. This clear plastic is part of the electronic features on the figure.
Look on top of the vehicle and you will see a sculpted Autobot symbol near the antenna. Press it and it activates one of a series of sounds and lights! Press the button once and the figure cycles through a series of sounds (the ones with asterisks* play when Optimis combined with other members of the team):
- "Transform!"
- A dragon roar (with a very dramatic echo)
- "Watashi ha Optimus Exprime." (I am Optimus Exprime)
- "Watashi ni ii kangae ga aru." (I have a good idea)
- "Soodobotto! Renketsu Sanjou Gattai da!" (Swordbots! Linked Tri-Vehicle Fusion!)
- "Shuppatsu shinkou!" (Roll out!)
- "Sono kokoro, uketometa!" (I accept your heart!)
- "Yatte yaru ze!" (Let's do this!)*
- "Oretachi ha itsudemo kimi no soba ni iru ze!" (We'll always be by your side!)*
- "Daigekisou, sanjou da zee!" (DaiGekisou is here!)
As each of these sound files play, the clear plastic parts on the sides glow red. Now, if you hold the button down a different sound file plays with Optimus calling for Gekisoumaru, Kenzan and Optimus to combine. After the names are called out, music plays as purple and red lights glow on the sides! These sounds are one of my favorite parts of this figure. It adds a whole different level of play and "life" to the figure.
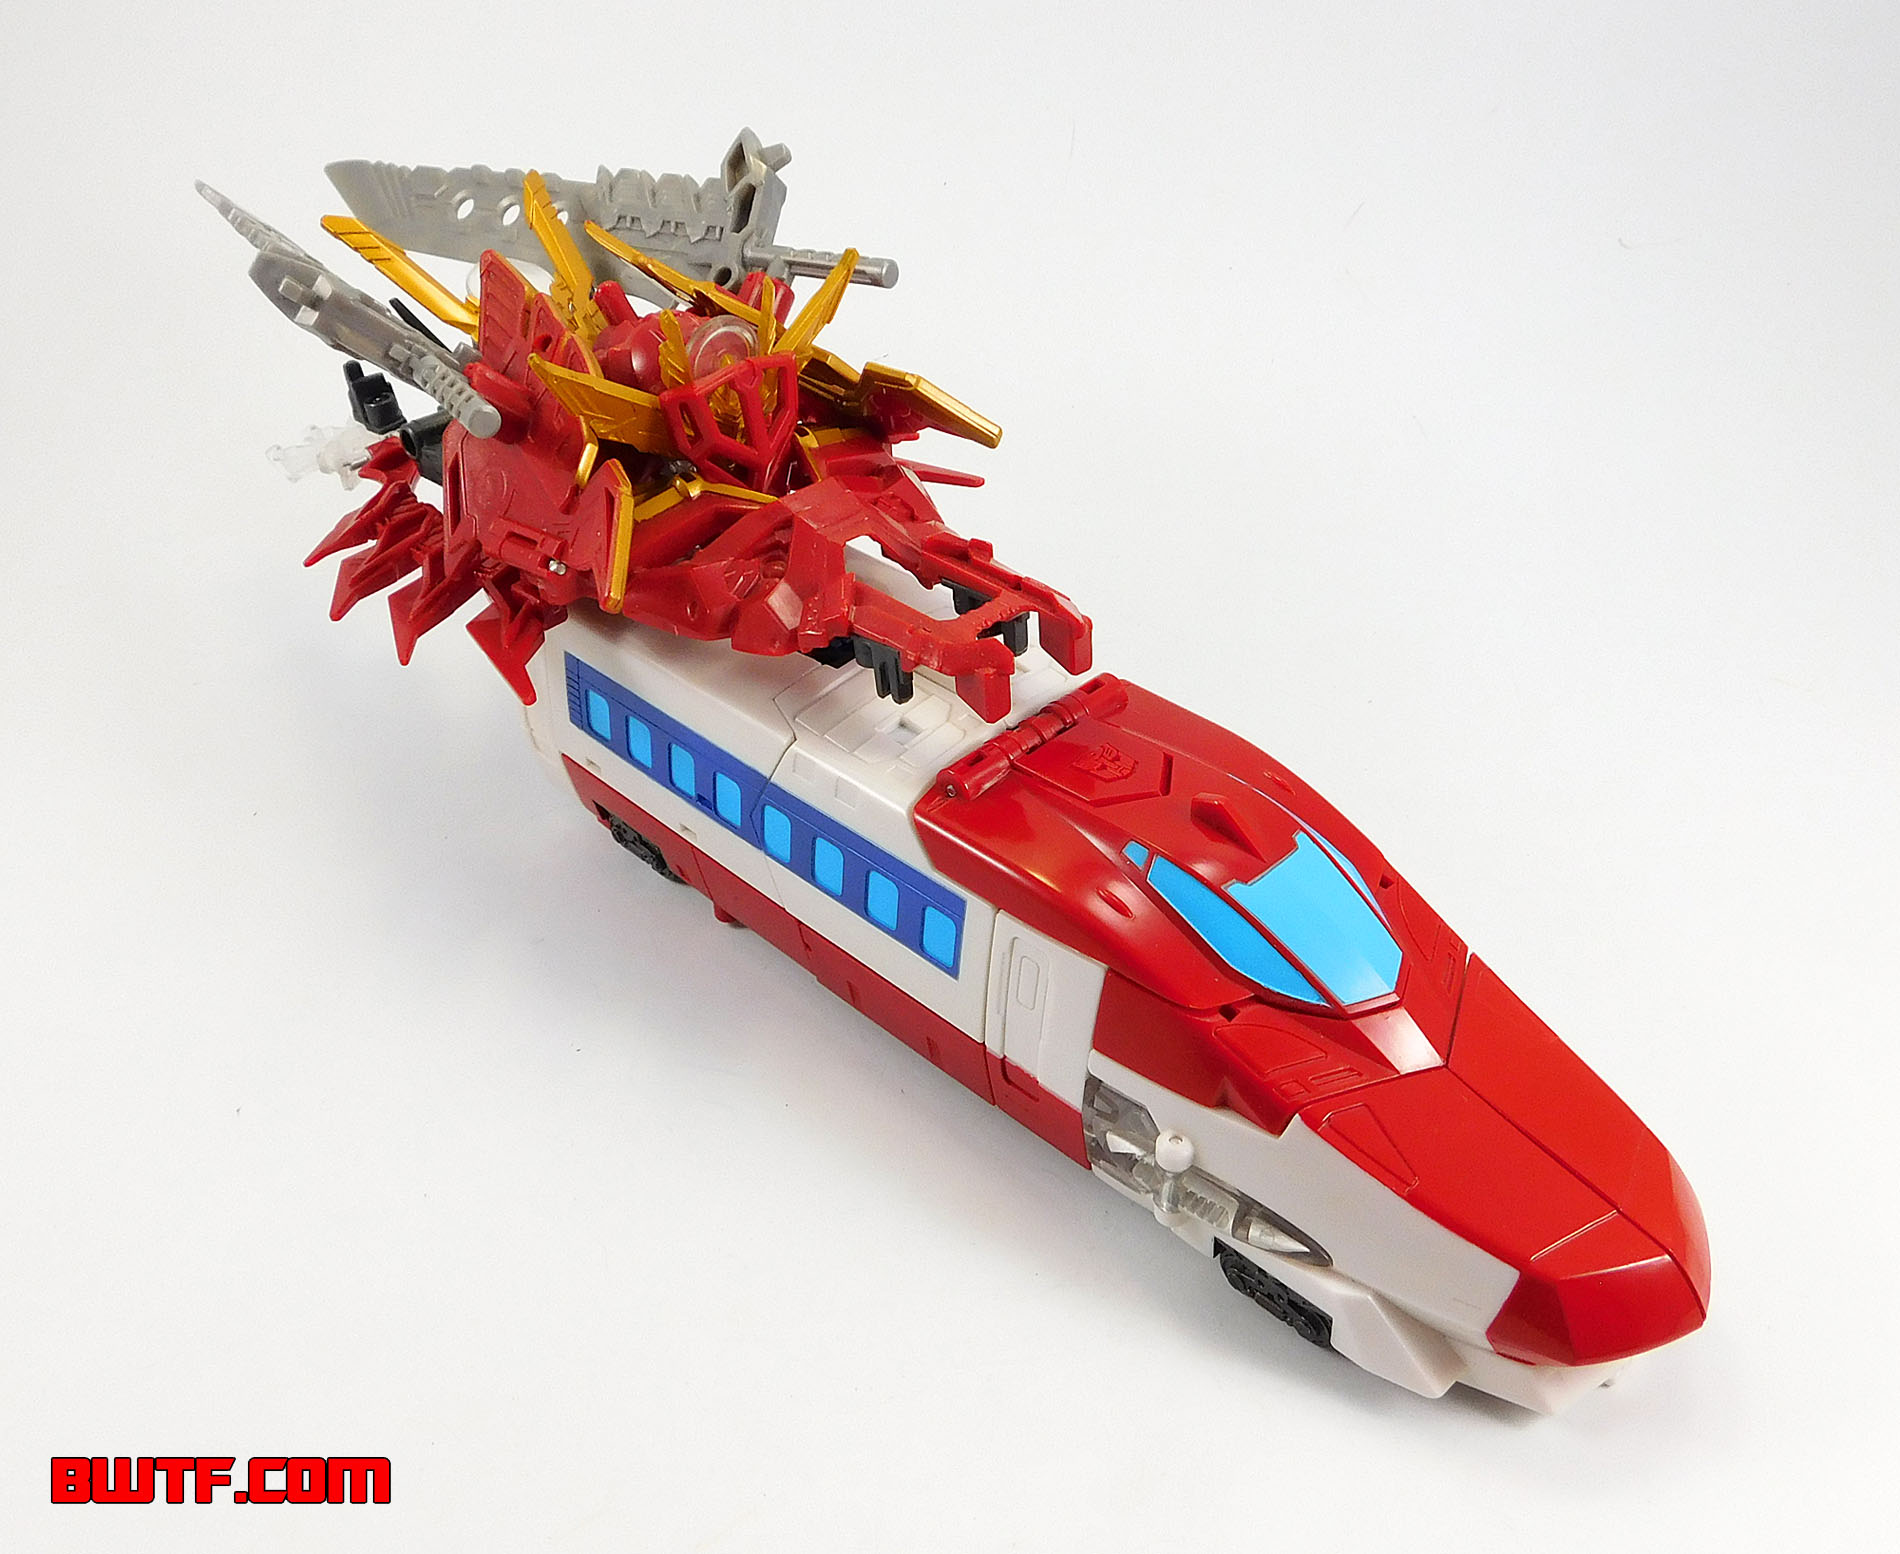
If you wish to integrate the accessories into this form, you can combine the shields and then attach them to the top. This is accomplished by connecting the white tabs on the Pantograph section to corresponding grooves on the dark grey sections on the DaiGekisou helmet piece. You can then attach the swords to the sides of the DaiKenzan section. This winds up looking oddly sleek and cool but a bit unusual (to say the least).
Transformation to Beast Mode:
- Take the helmet/armor section that forms DaiGekisou's head and swing the dark grey bars back and swing the claws so they point towards the back.
- On the DaiKenzan armor piece, swing the chest armor "wings" out a bit so they are set vertically.
- On Optimus, swing the panels that form the middle of the vehicle and swing them back, then tab them into the sides.
- Swing the rear sections back, then push the red panels with the train wheels on them down.
- Swing the driver's section panel back.
- Split the front end of the train.
- Swing the halves of the front end up.
- Rotate the halves of the train's front end around, then swing it back.
- On each half, swing out the clear claw pieces.
- Attach the DaiGekisou/dragon head piece to the front of the train by connecting the peg at the base of the dragon neck to the open port at the very front of the train.
- Tuck the dragon "claws" from the DaiGekisou/dragon head piece under the panel that formed the driver's section.
- Connect the DaiKenzan armor to the tabs on the underside of the panel that formed the driver's section.
- Connect the swords to the sides of the DaiKenzan armor.
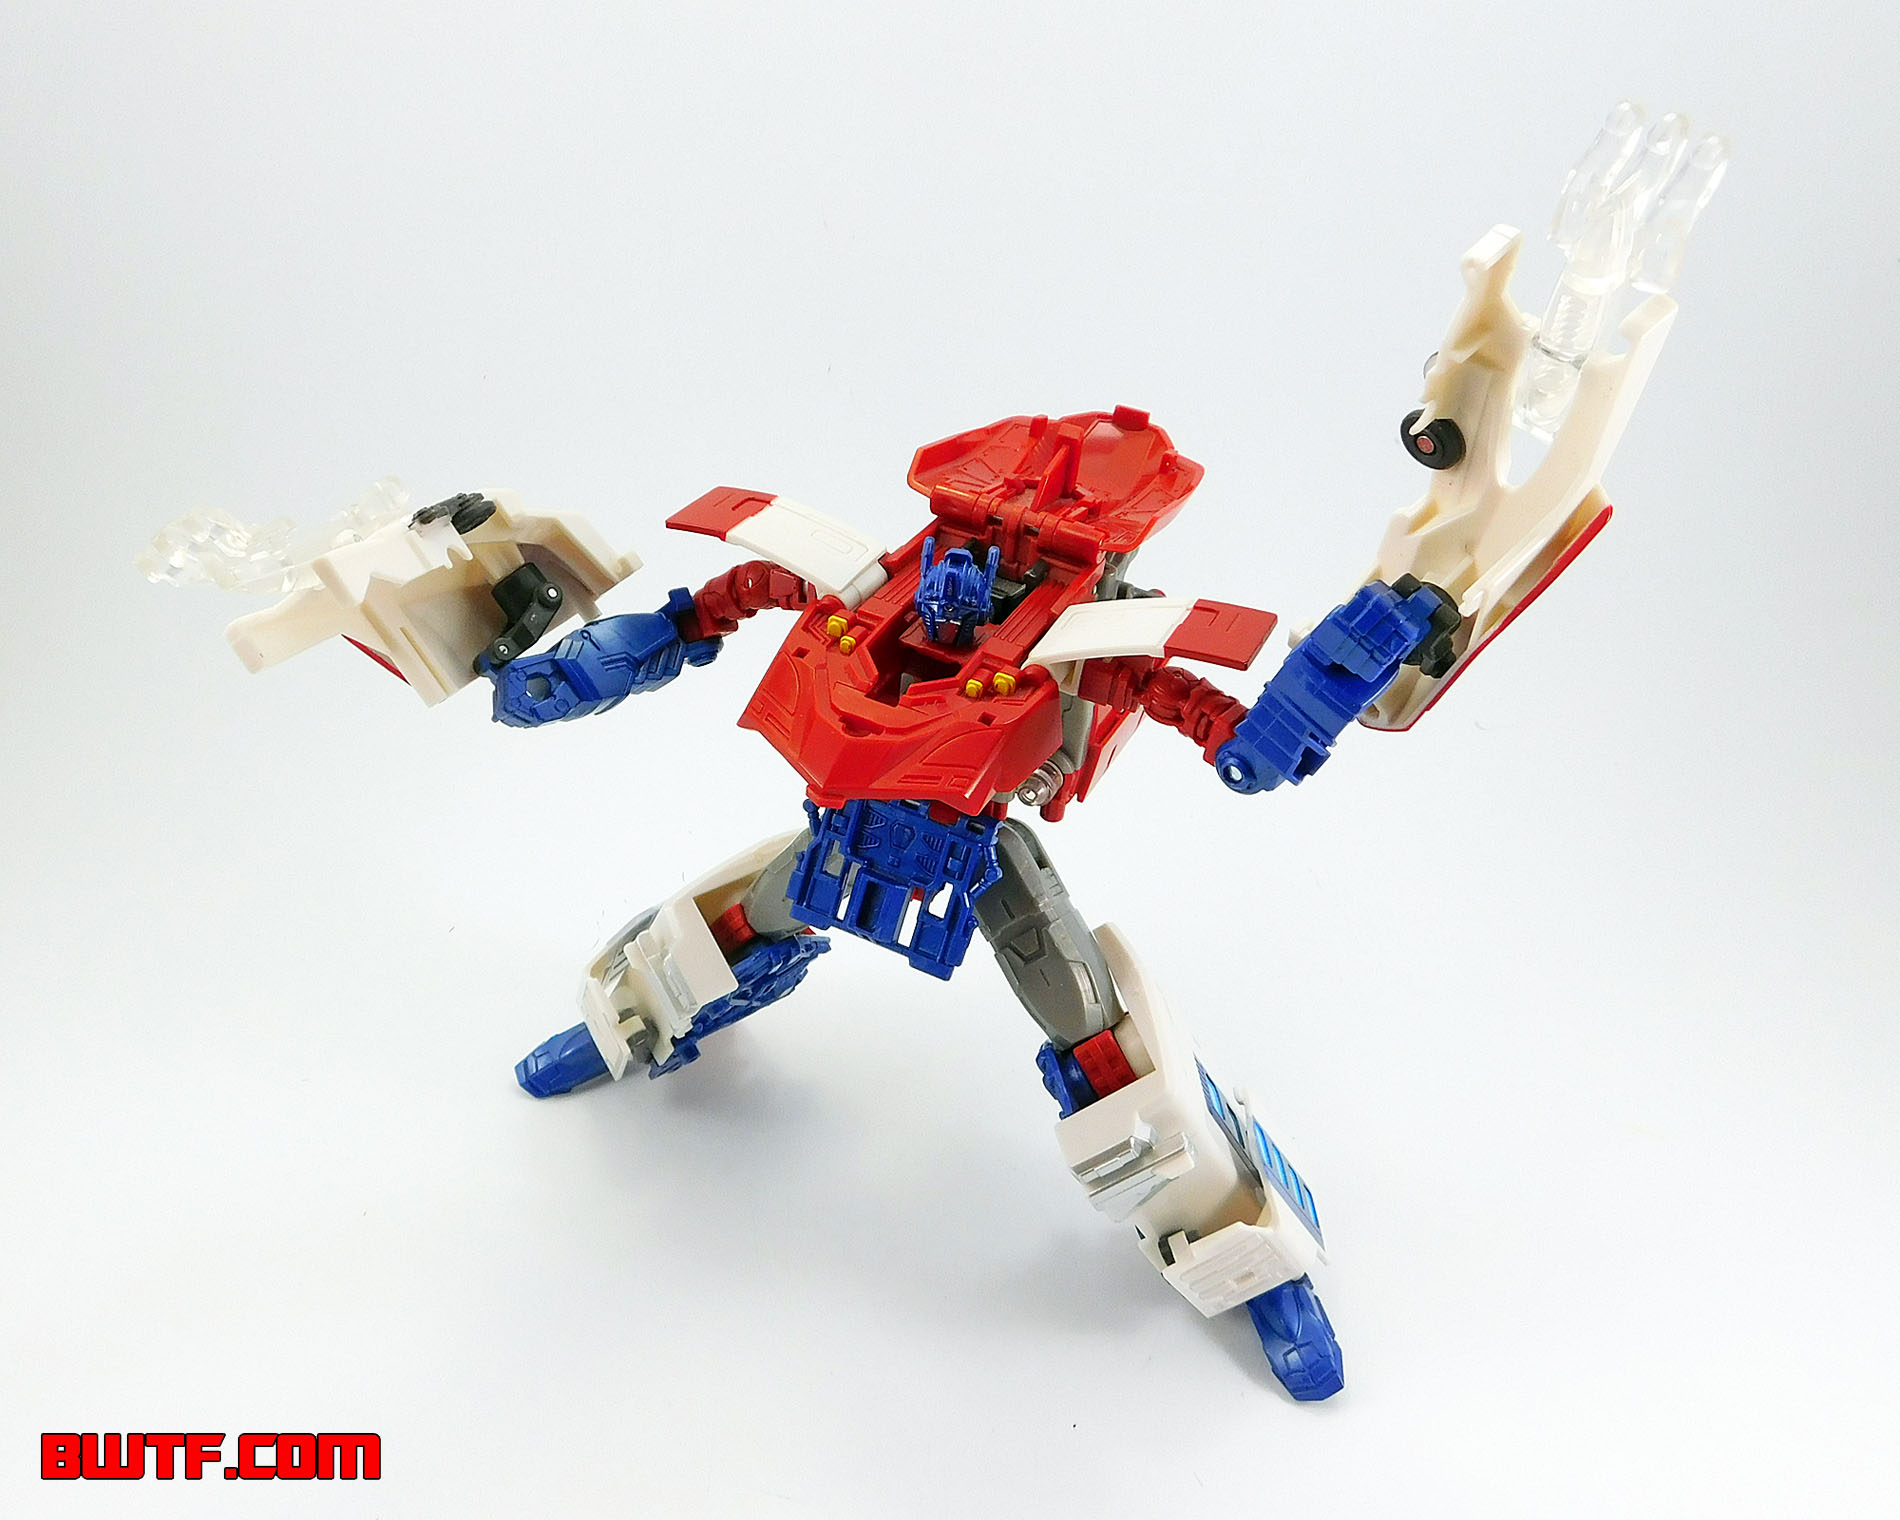
Beast Mode:
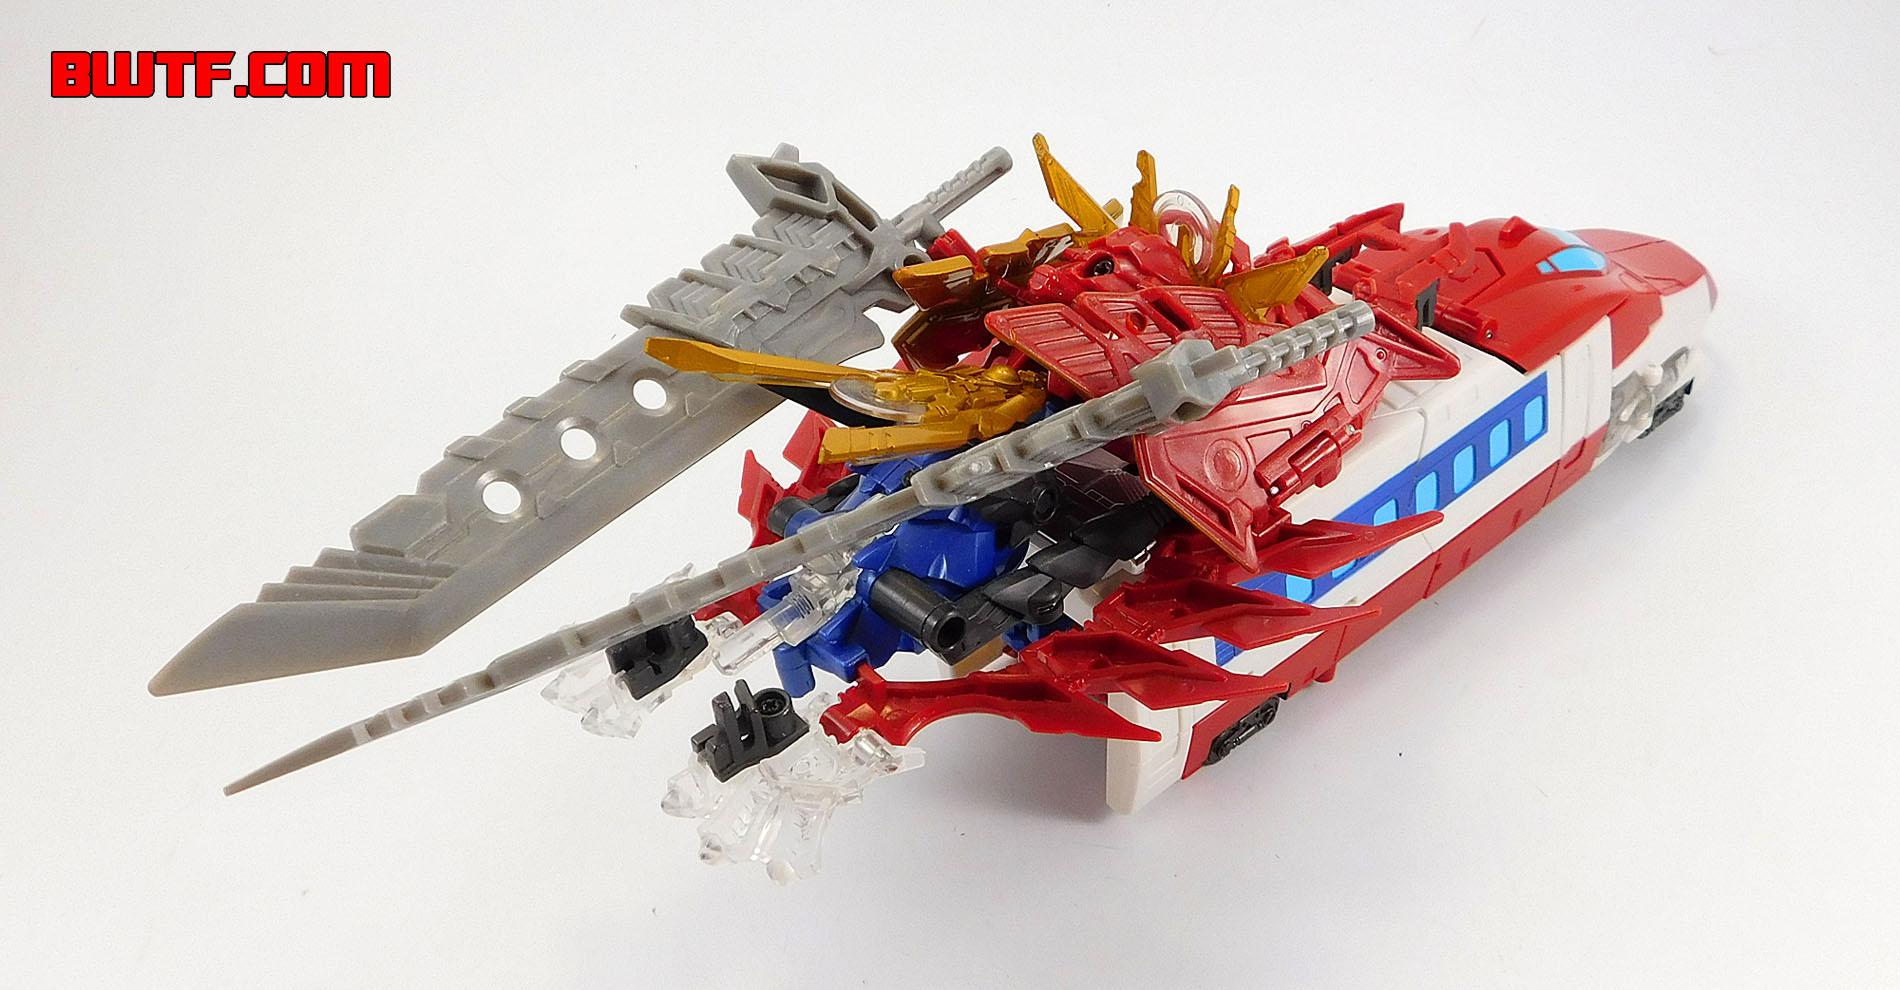
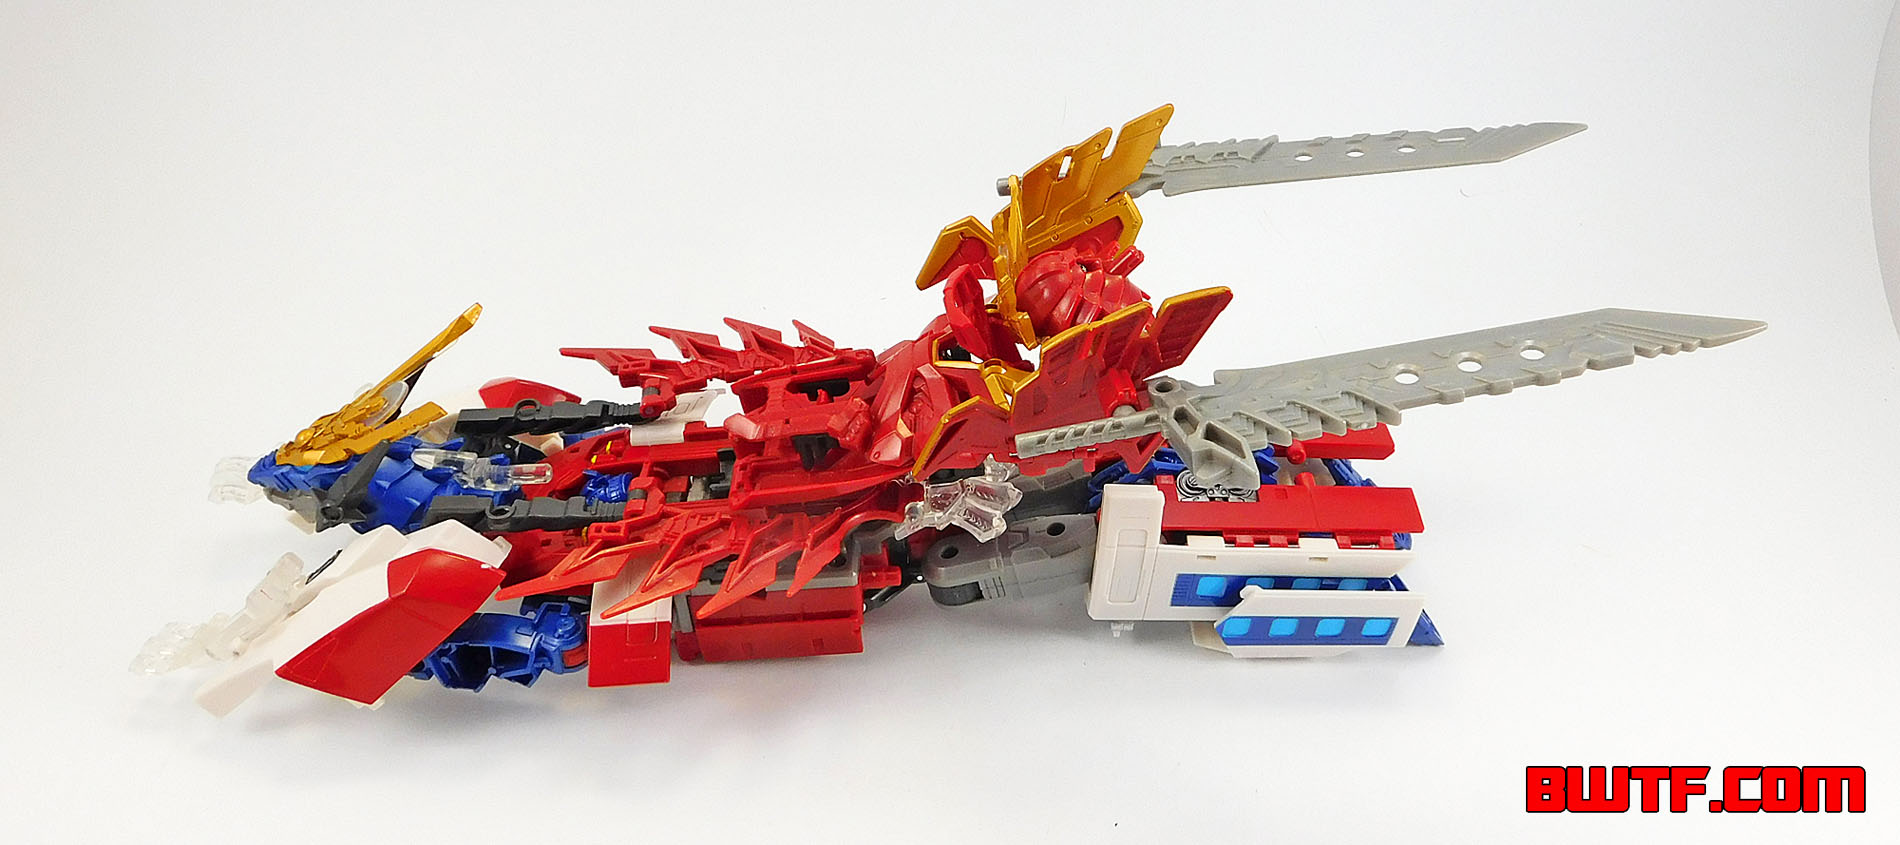
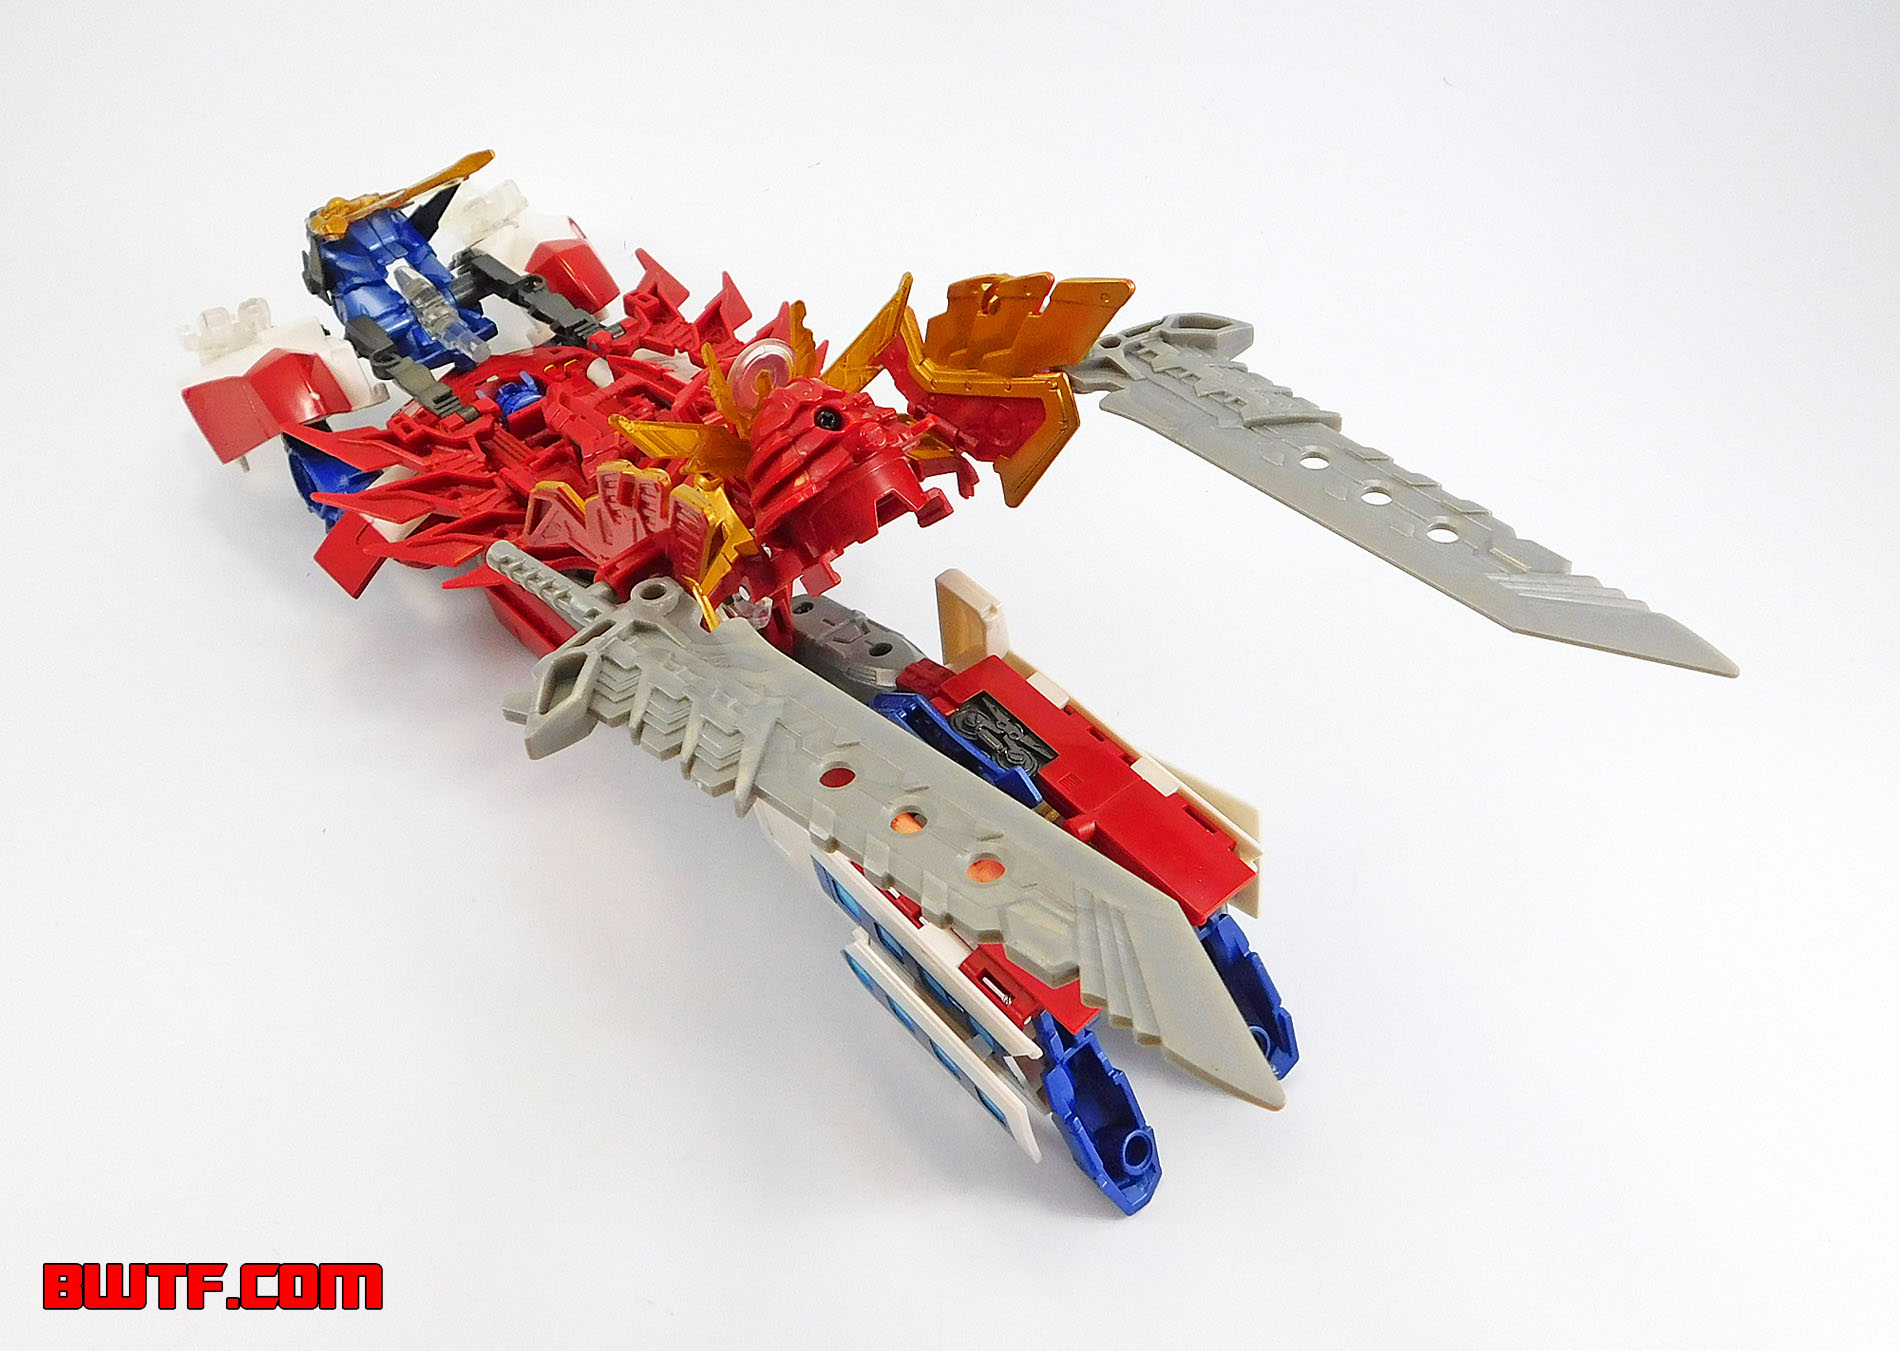
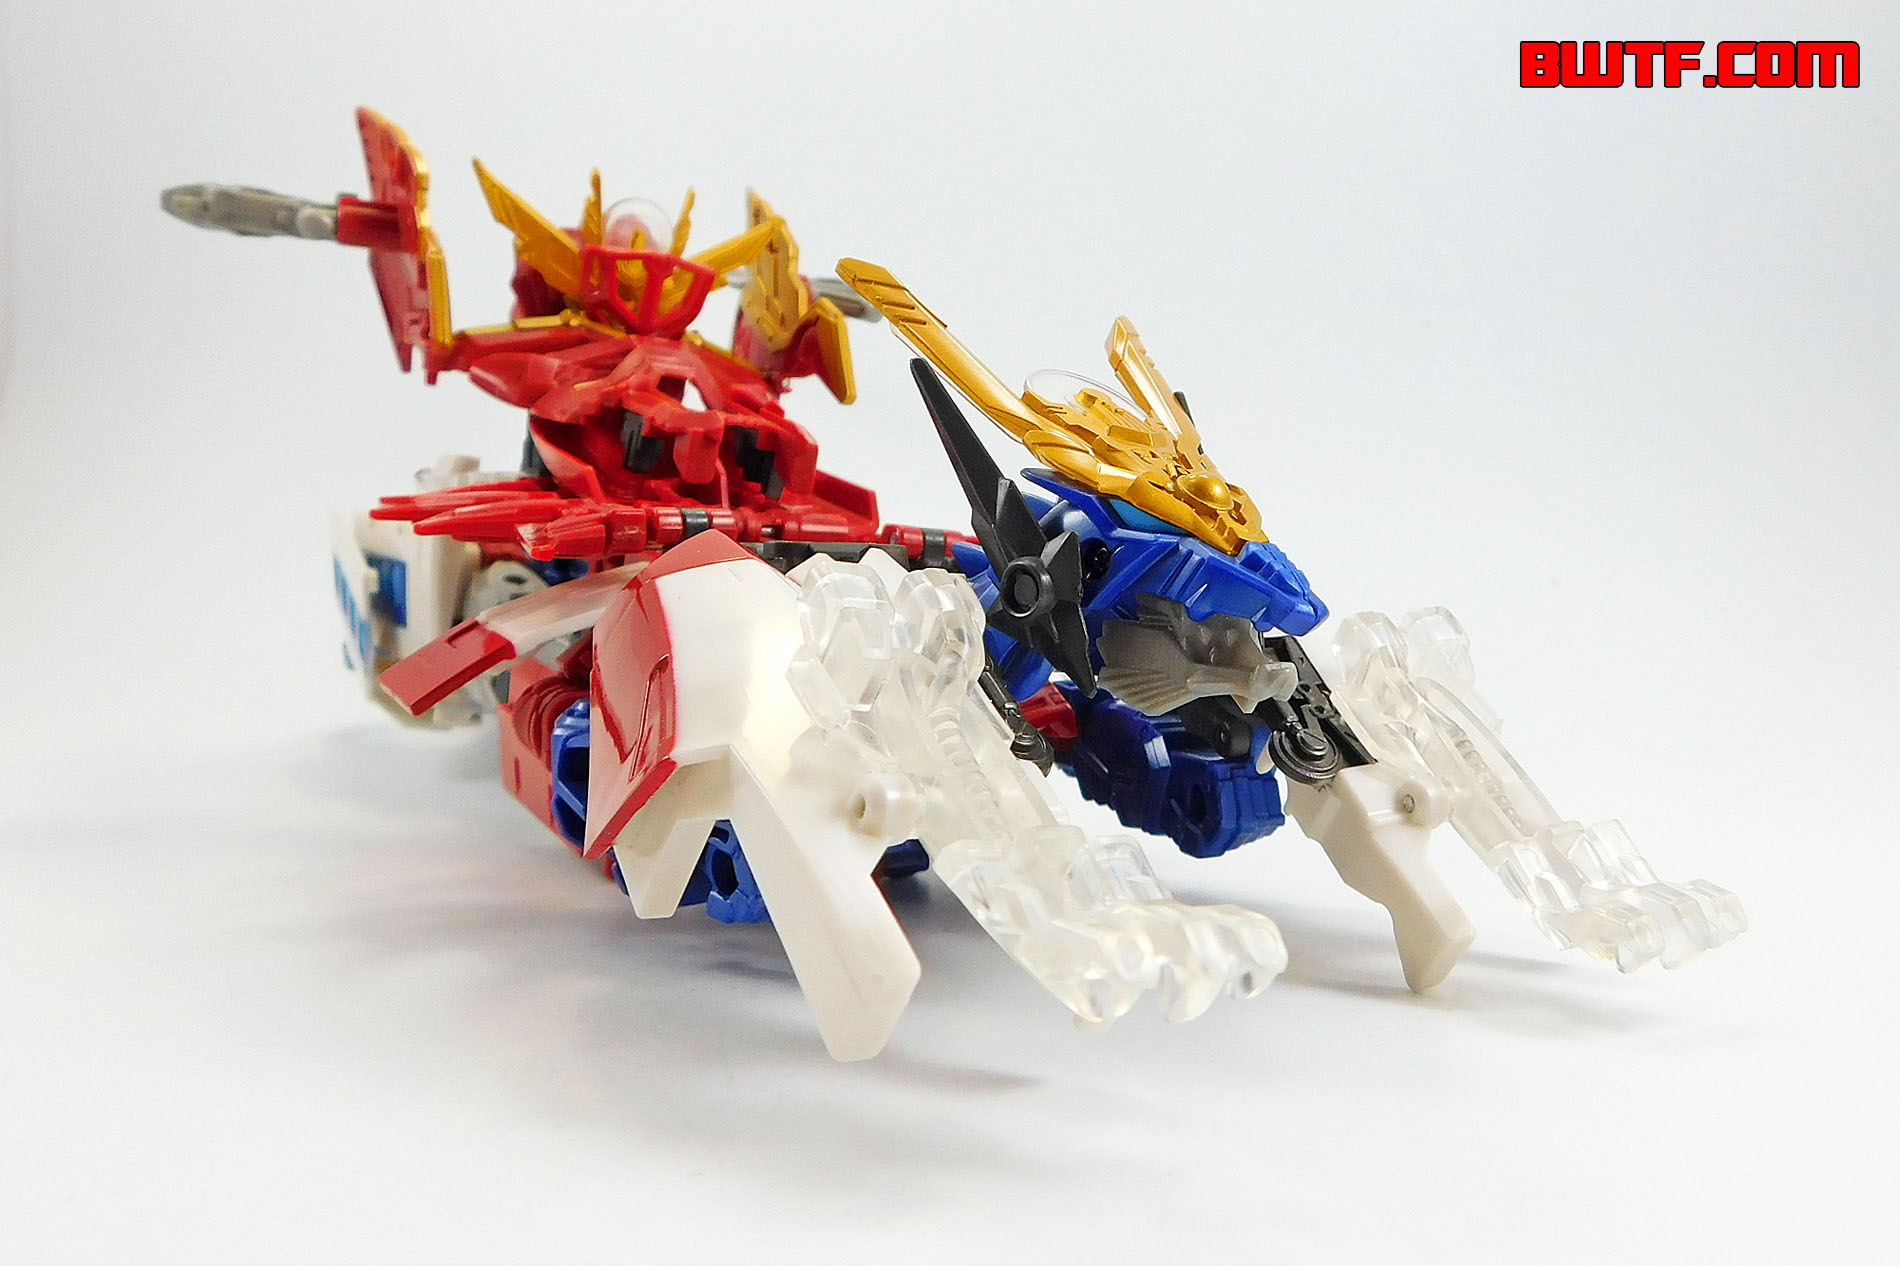
Okay, so I am sure some of my readers are looking at the photos of this dragon mode and thinking "That's a stretch." and yes, it totally is. Optimus's dragon form looks good in the front. The dragon head looks great and it is pointed forward like it is flying at an enemy. There are claws that stick out in the front and the armor on his back looks like flames coming out the sides. So far so good. Where things kind of derail (pun totally intended) is the rear half. There some details such as the swords attached to the armor on the back look really cool, but the beast mode's rear legs just end towards the middle and then suddenly you have (essentially) the robot legs sticking out the back. I cannot objectively say "This is a great beast mode!" but I can say that there is a very Generation One-ish charm to it. It looks like something that could have come out in the latter era of G1 instead of 2014. For some people that will be a turn off, for others it will be a fun feature. Either way, I find it appealing in an oddball way.
The only newly revealed bits here are the robot legs and the front dragon claws. The claws are clear and feature blunted claws at the end for safety reasons. The rest of a parts are mostly made up of the Kabuto helmet pieces and parts you could already see in vehicle mode. Technically you can open and close the dragon mouth, but go too far and you just wind up revealing DaiGekisou's face!
Transformation to Robot Mode (Starting in Beast Mode):
- Detach the swords and set them aside for now.
- Detach both Kabuto helmet/armor pieces and set them aside for now.
- Split the rear half of the beast mode to begin forming the legs, then swing up each robot foot.
- Swing the blue panel on the bottom of the beast forward.
- Holding the rear half of the beast mode, pull up the front half, then swing it back and forward on the central hinge.
- Swing down the blue panel that was on the underside of the beast mode.
- Swing down the chest piece (under the front part of the vehicle mode).
- Swing the arms out to the sides then down. Then rotate the beast mode's front arms around, swing the claws in and push them up against the sides of the elbow sections.
- Swing up the robot head.
The accessories can be used in a variety of ways, this is covered below in the robot mode review.
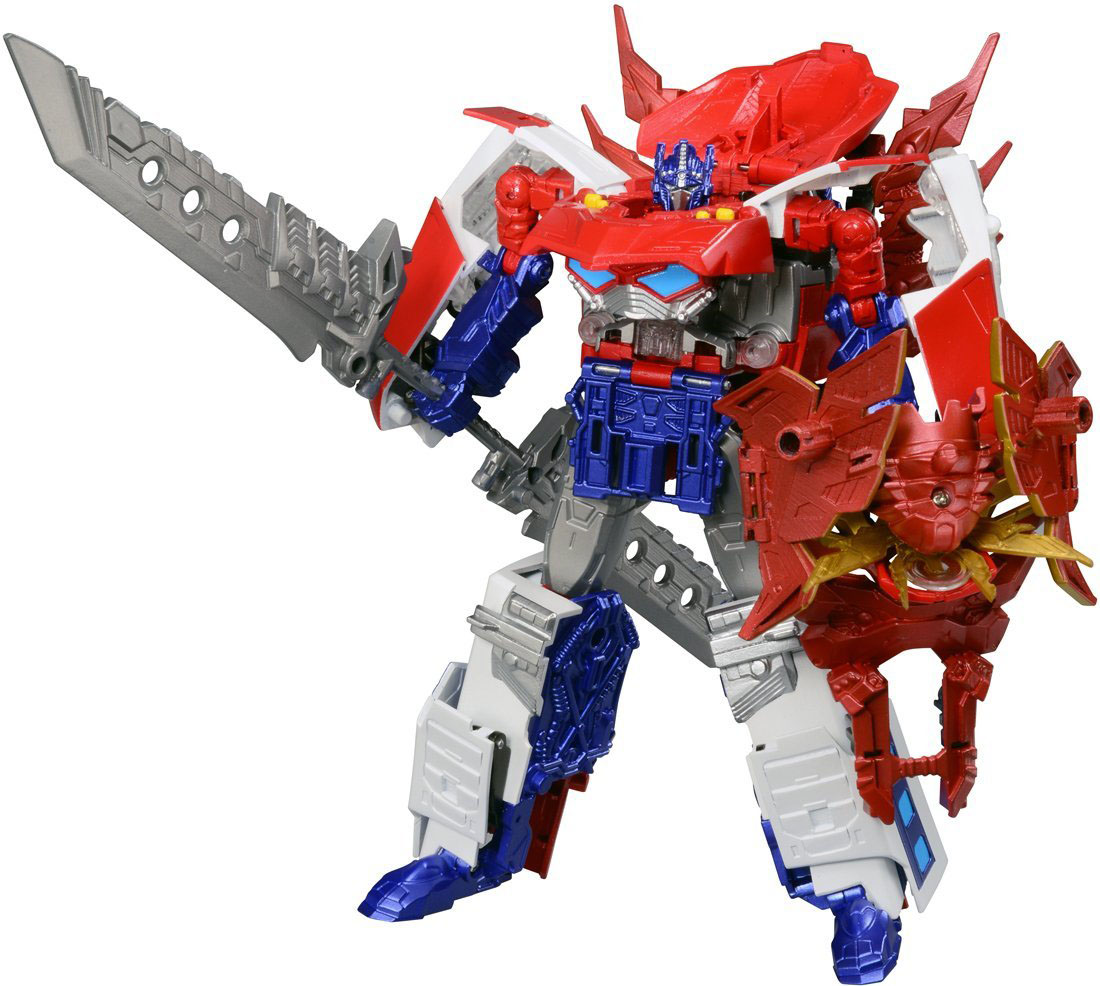
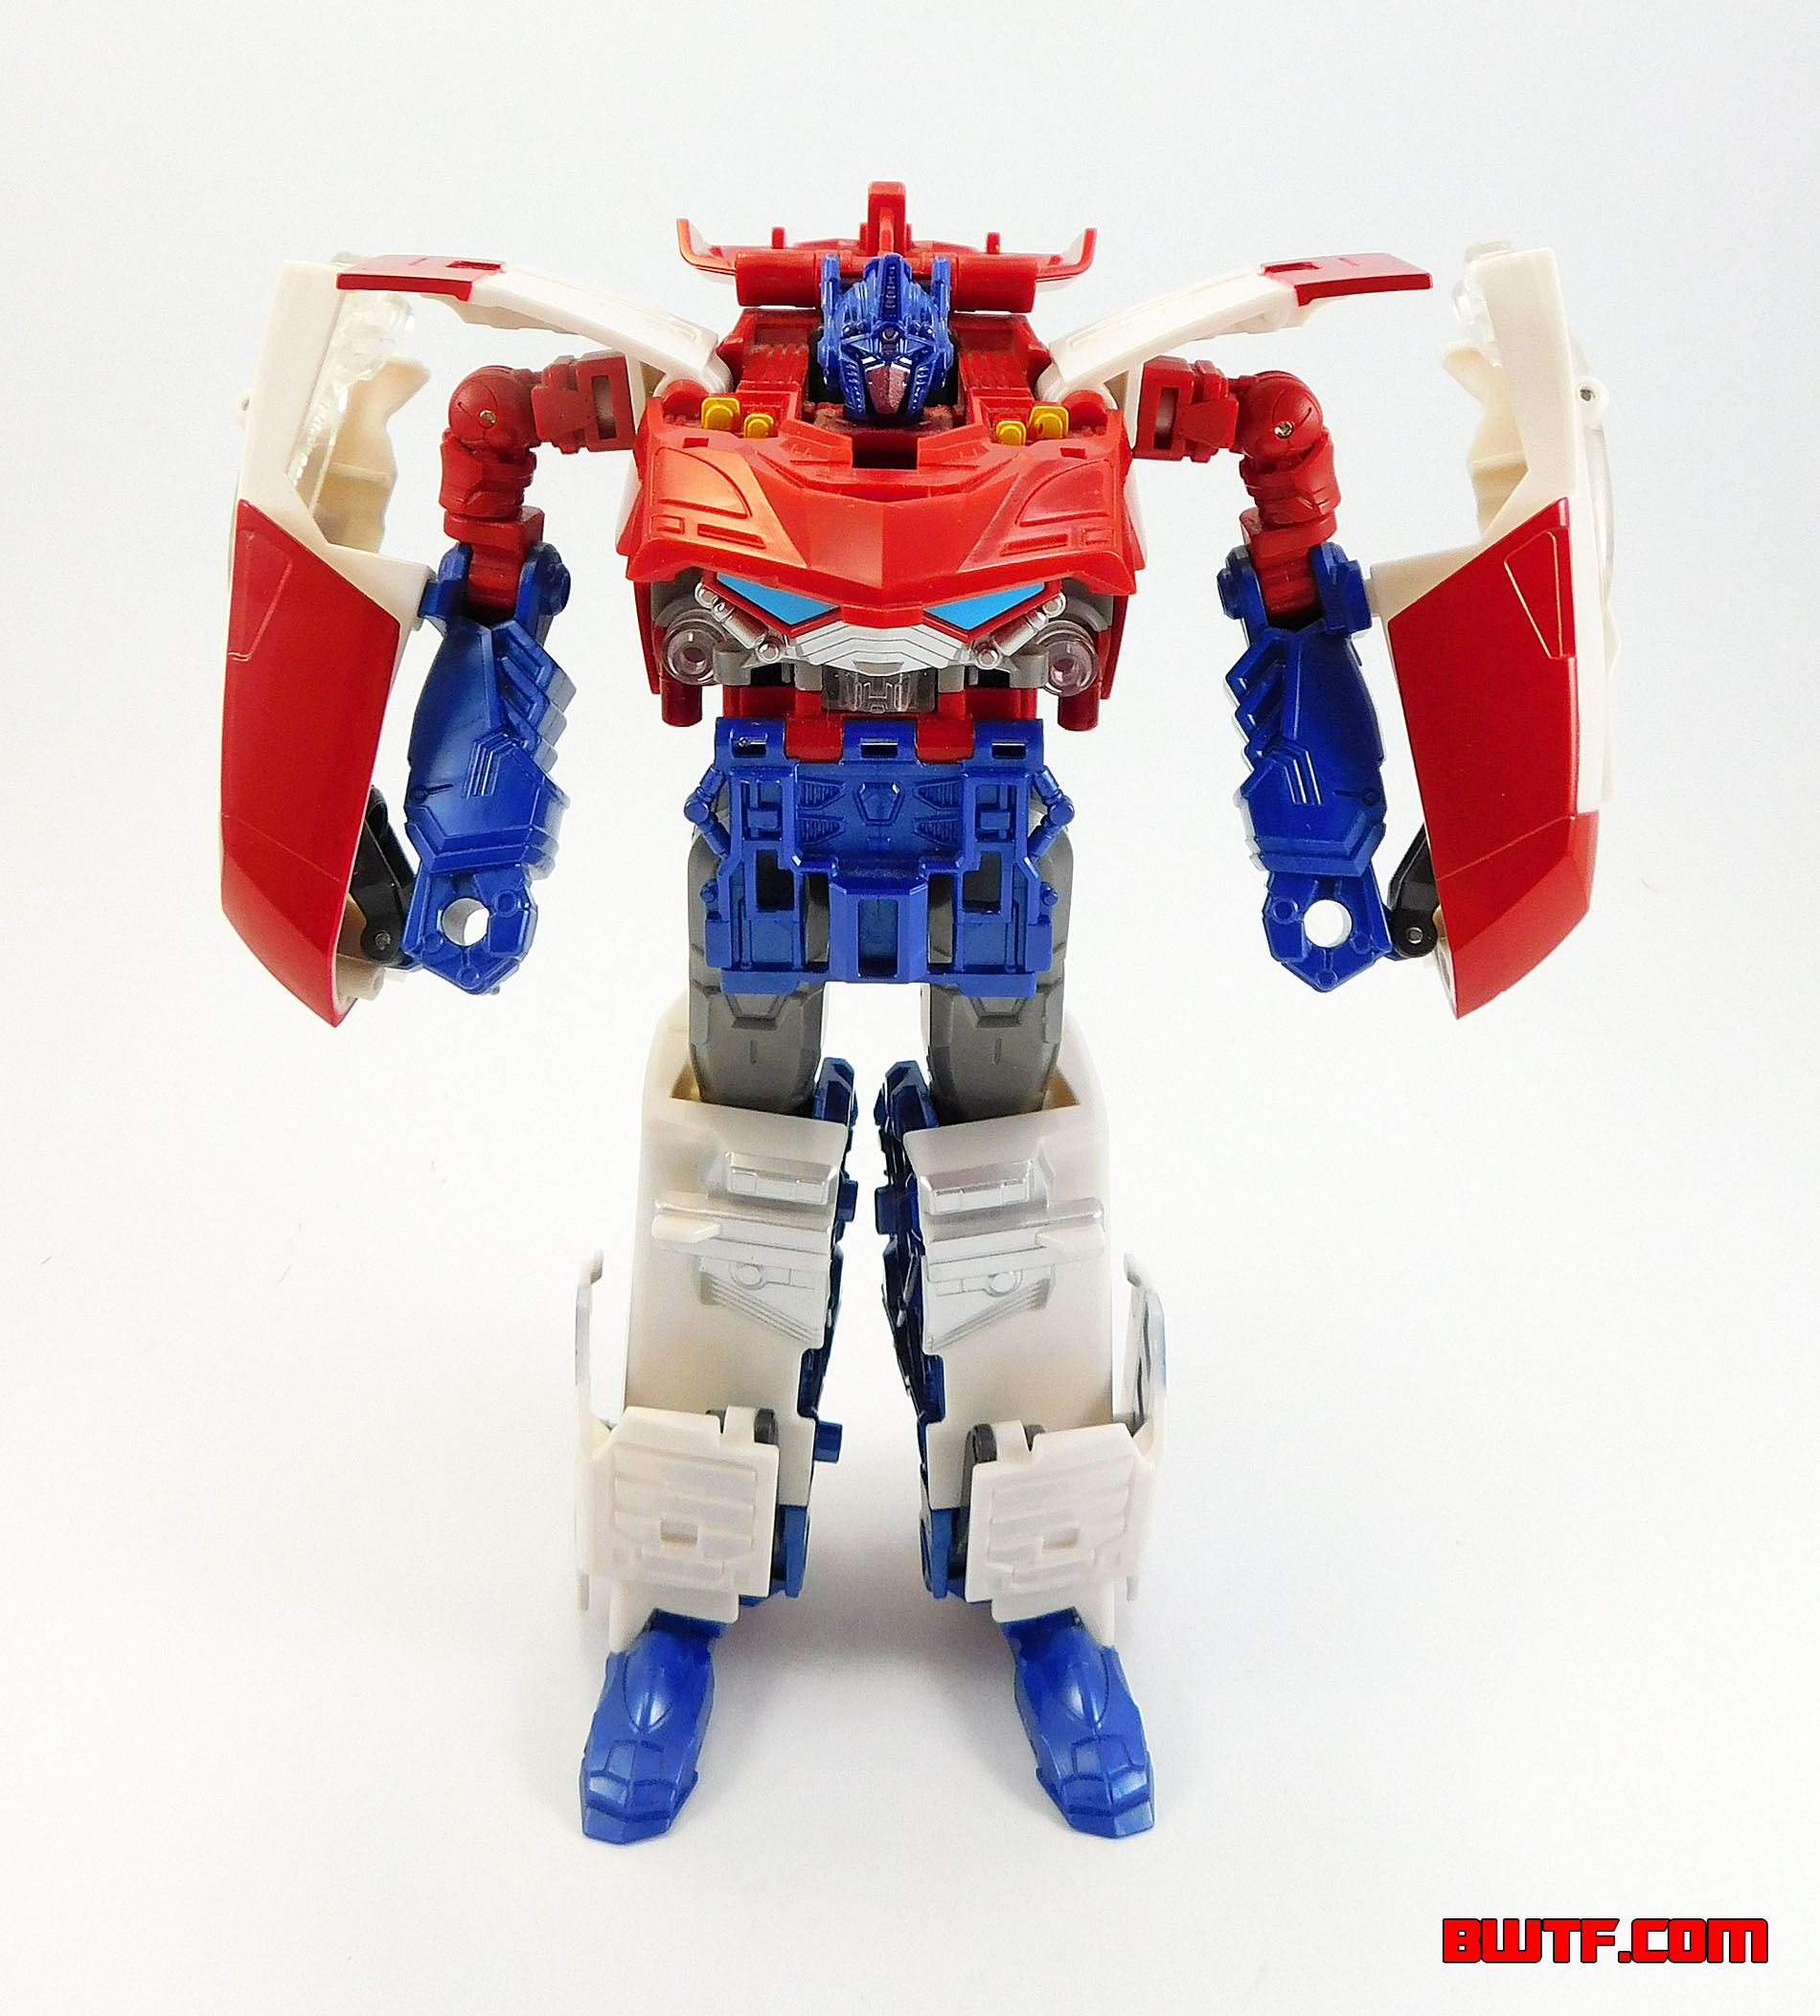
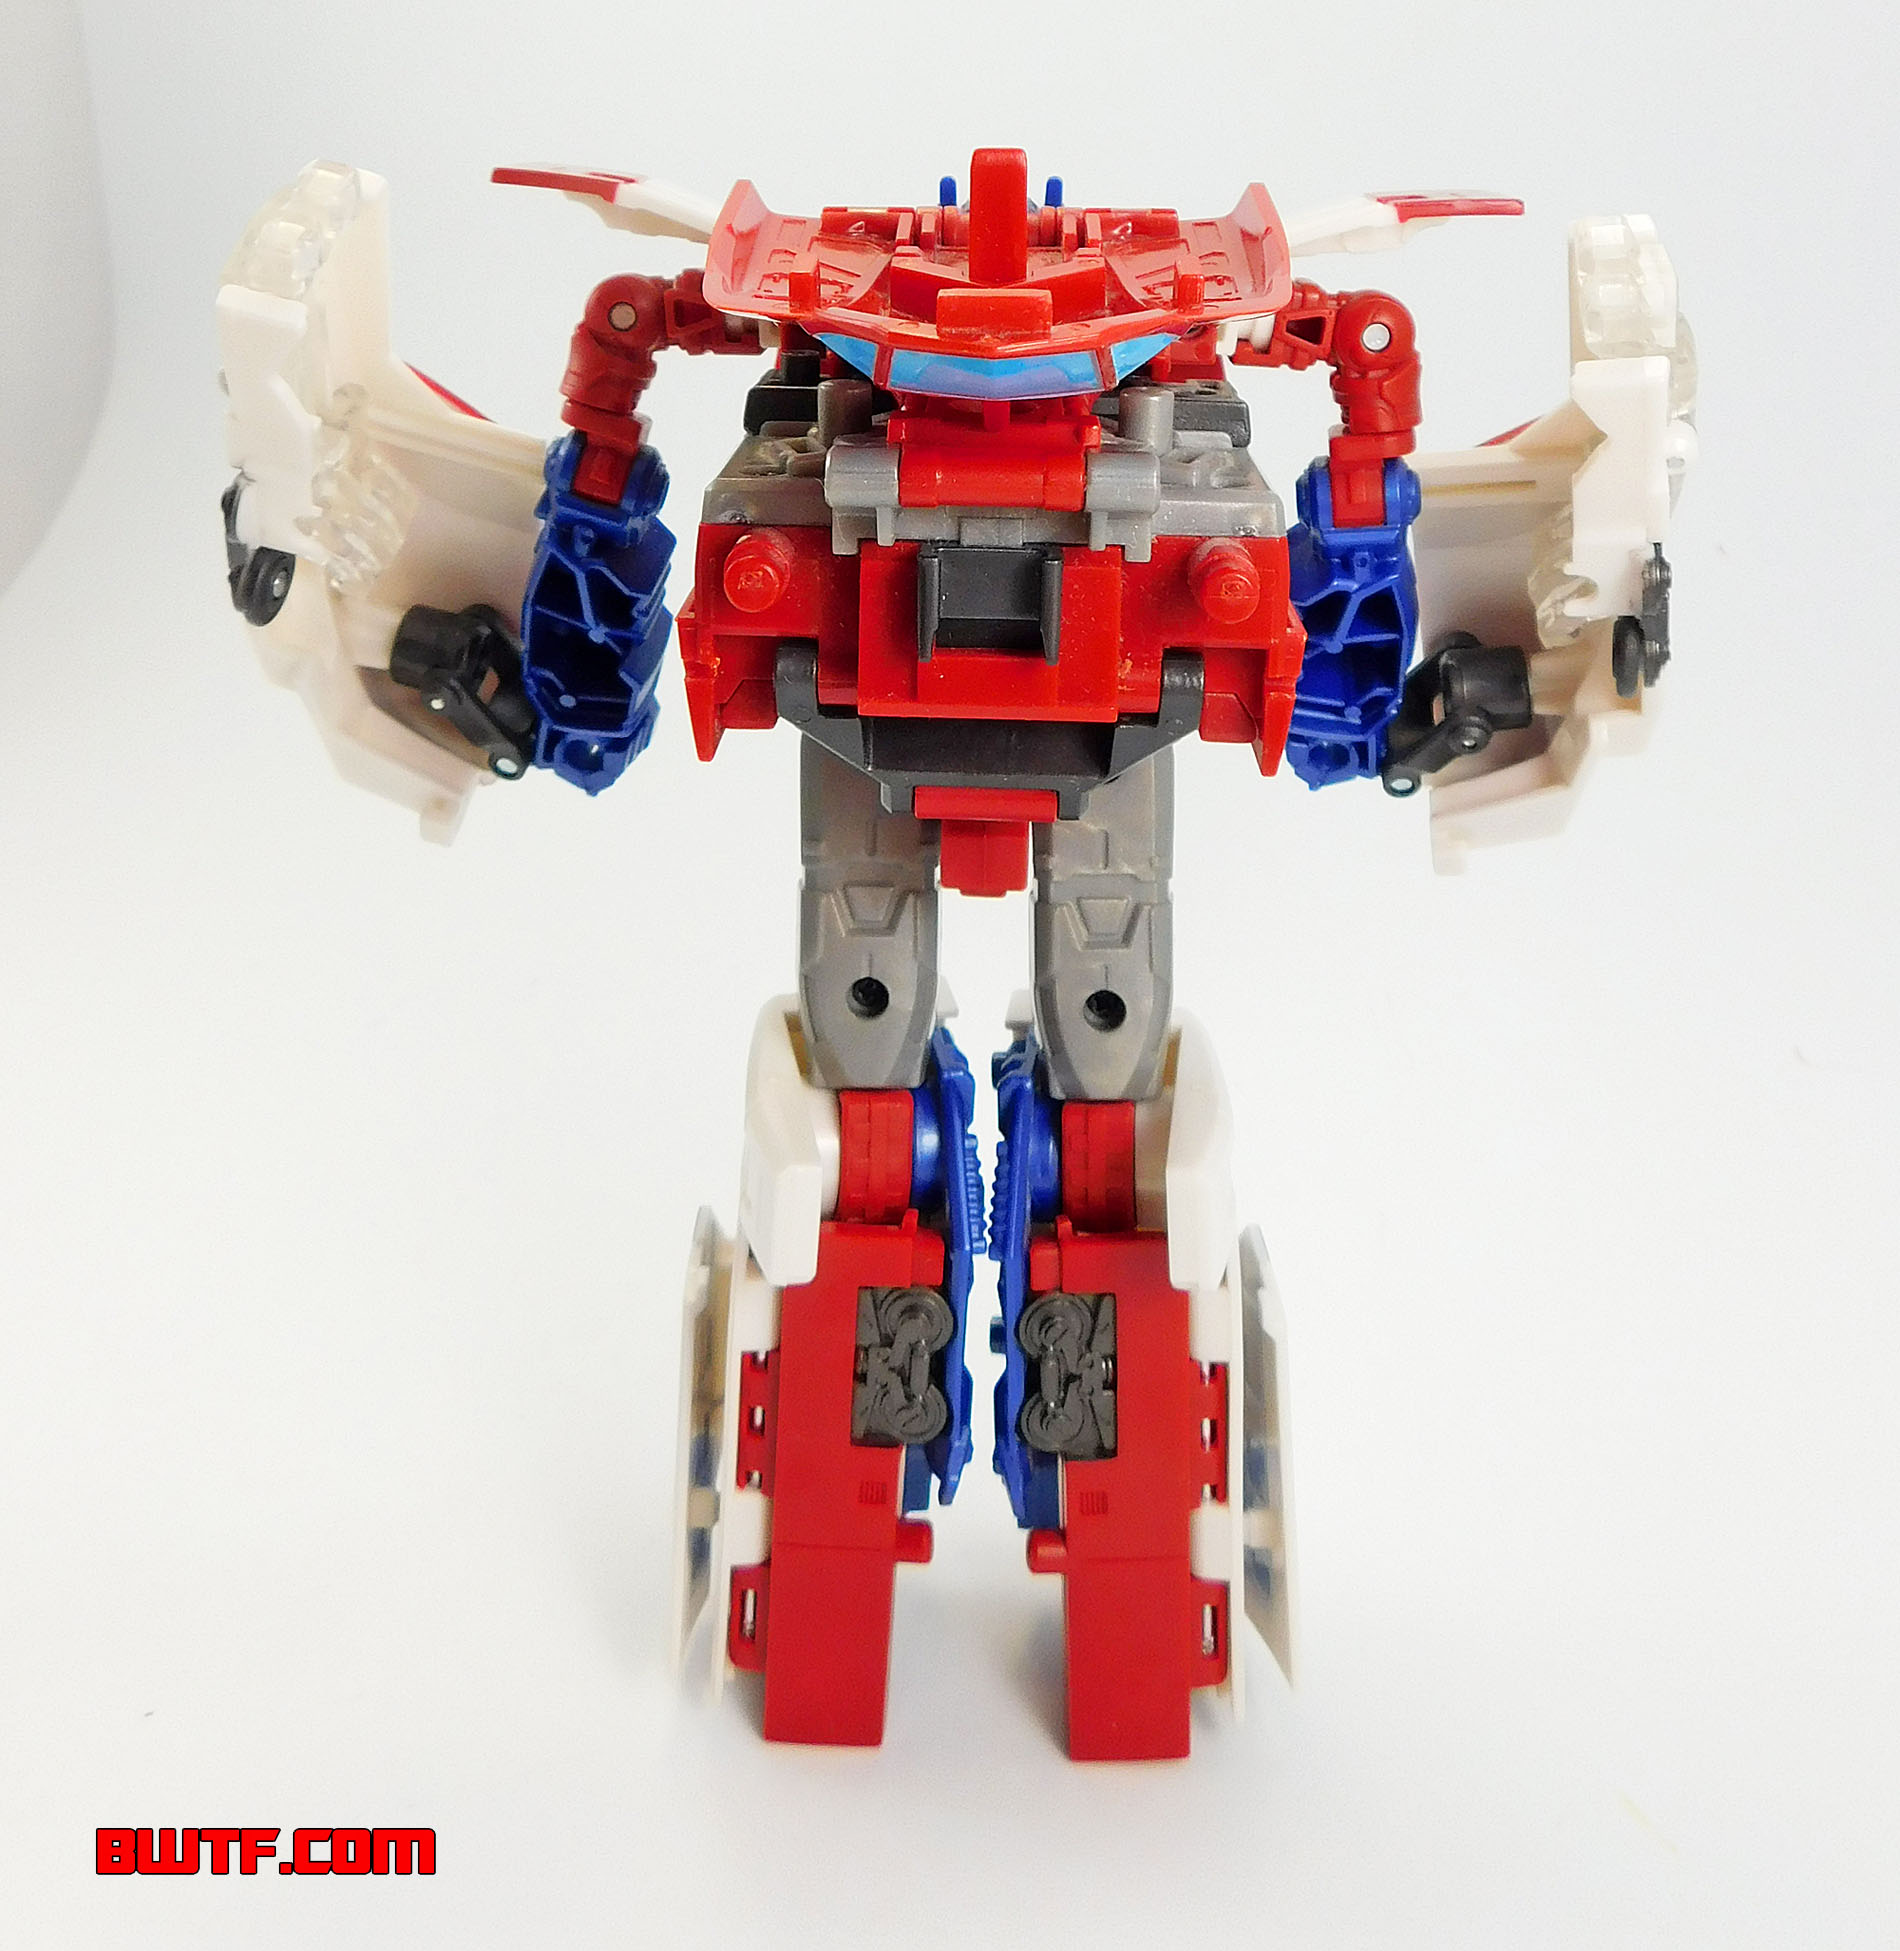
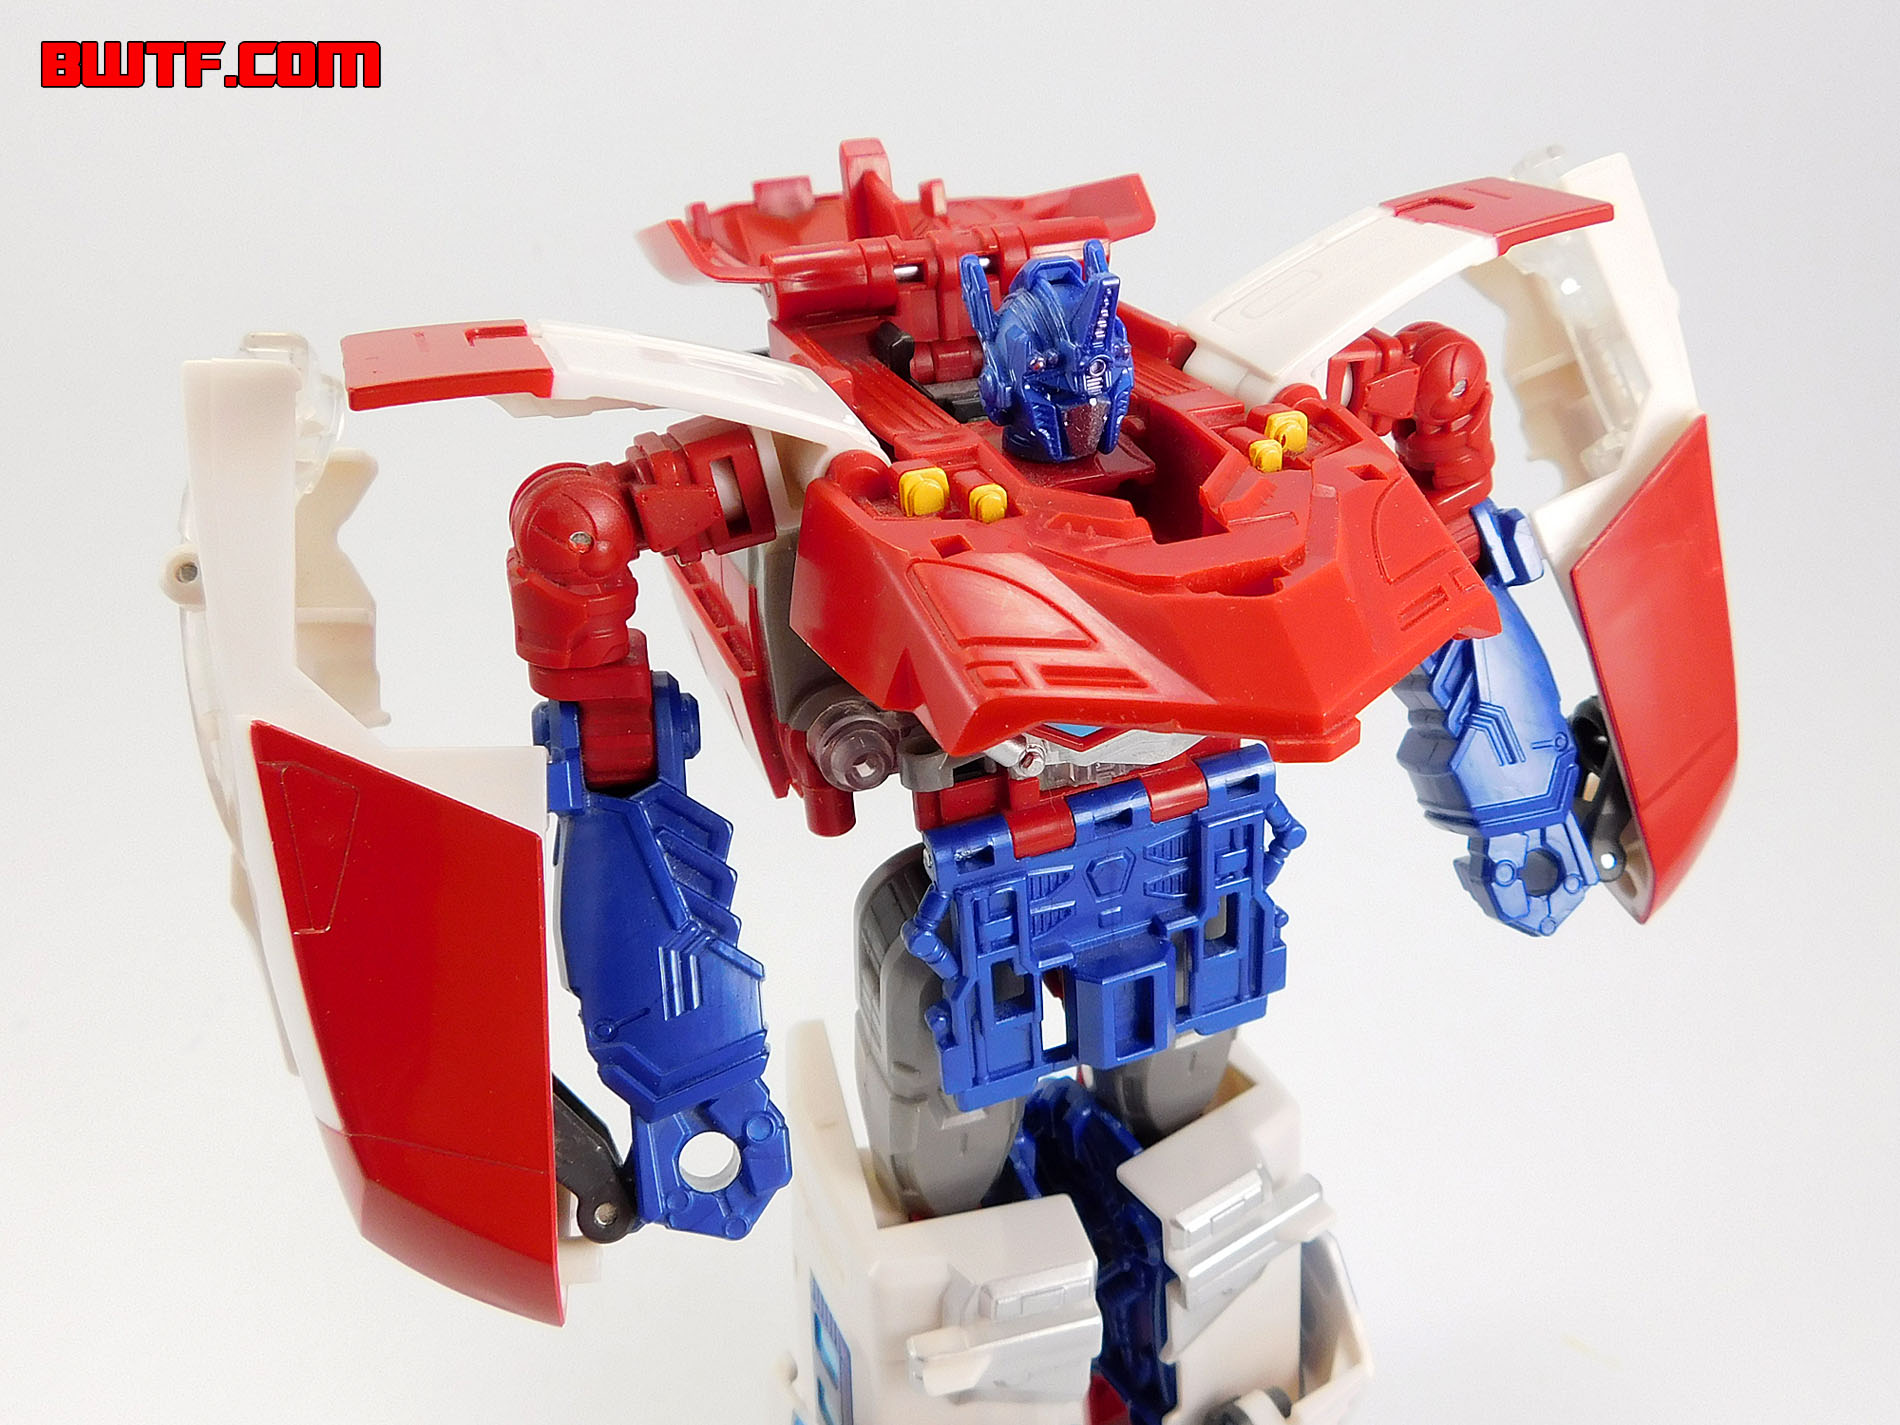
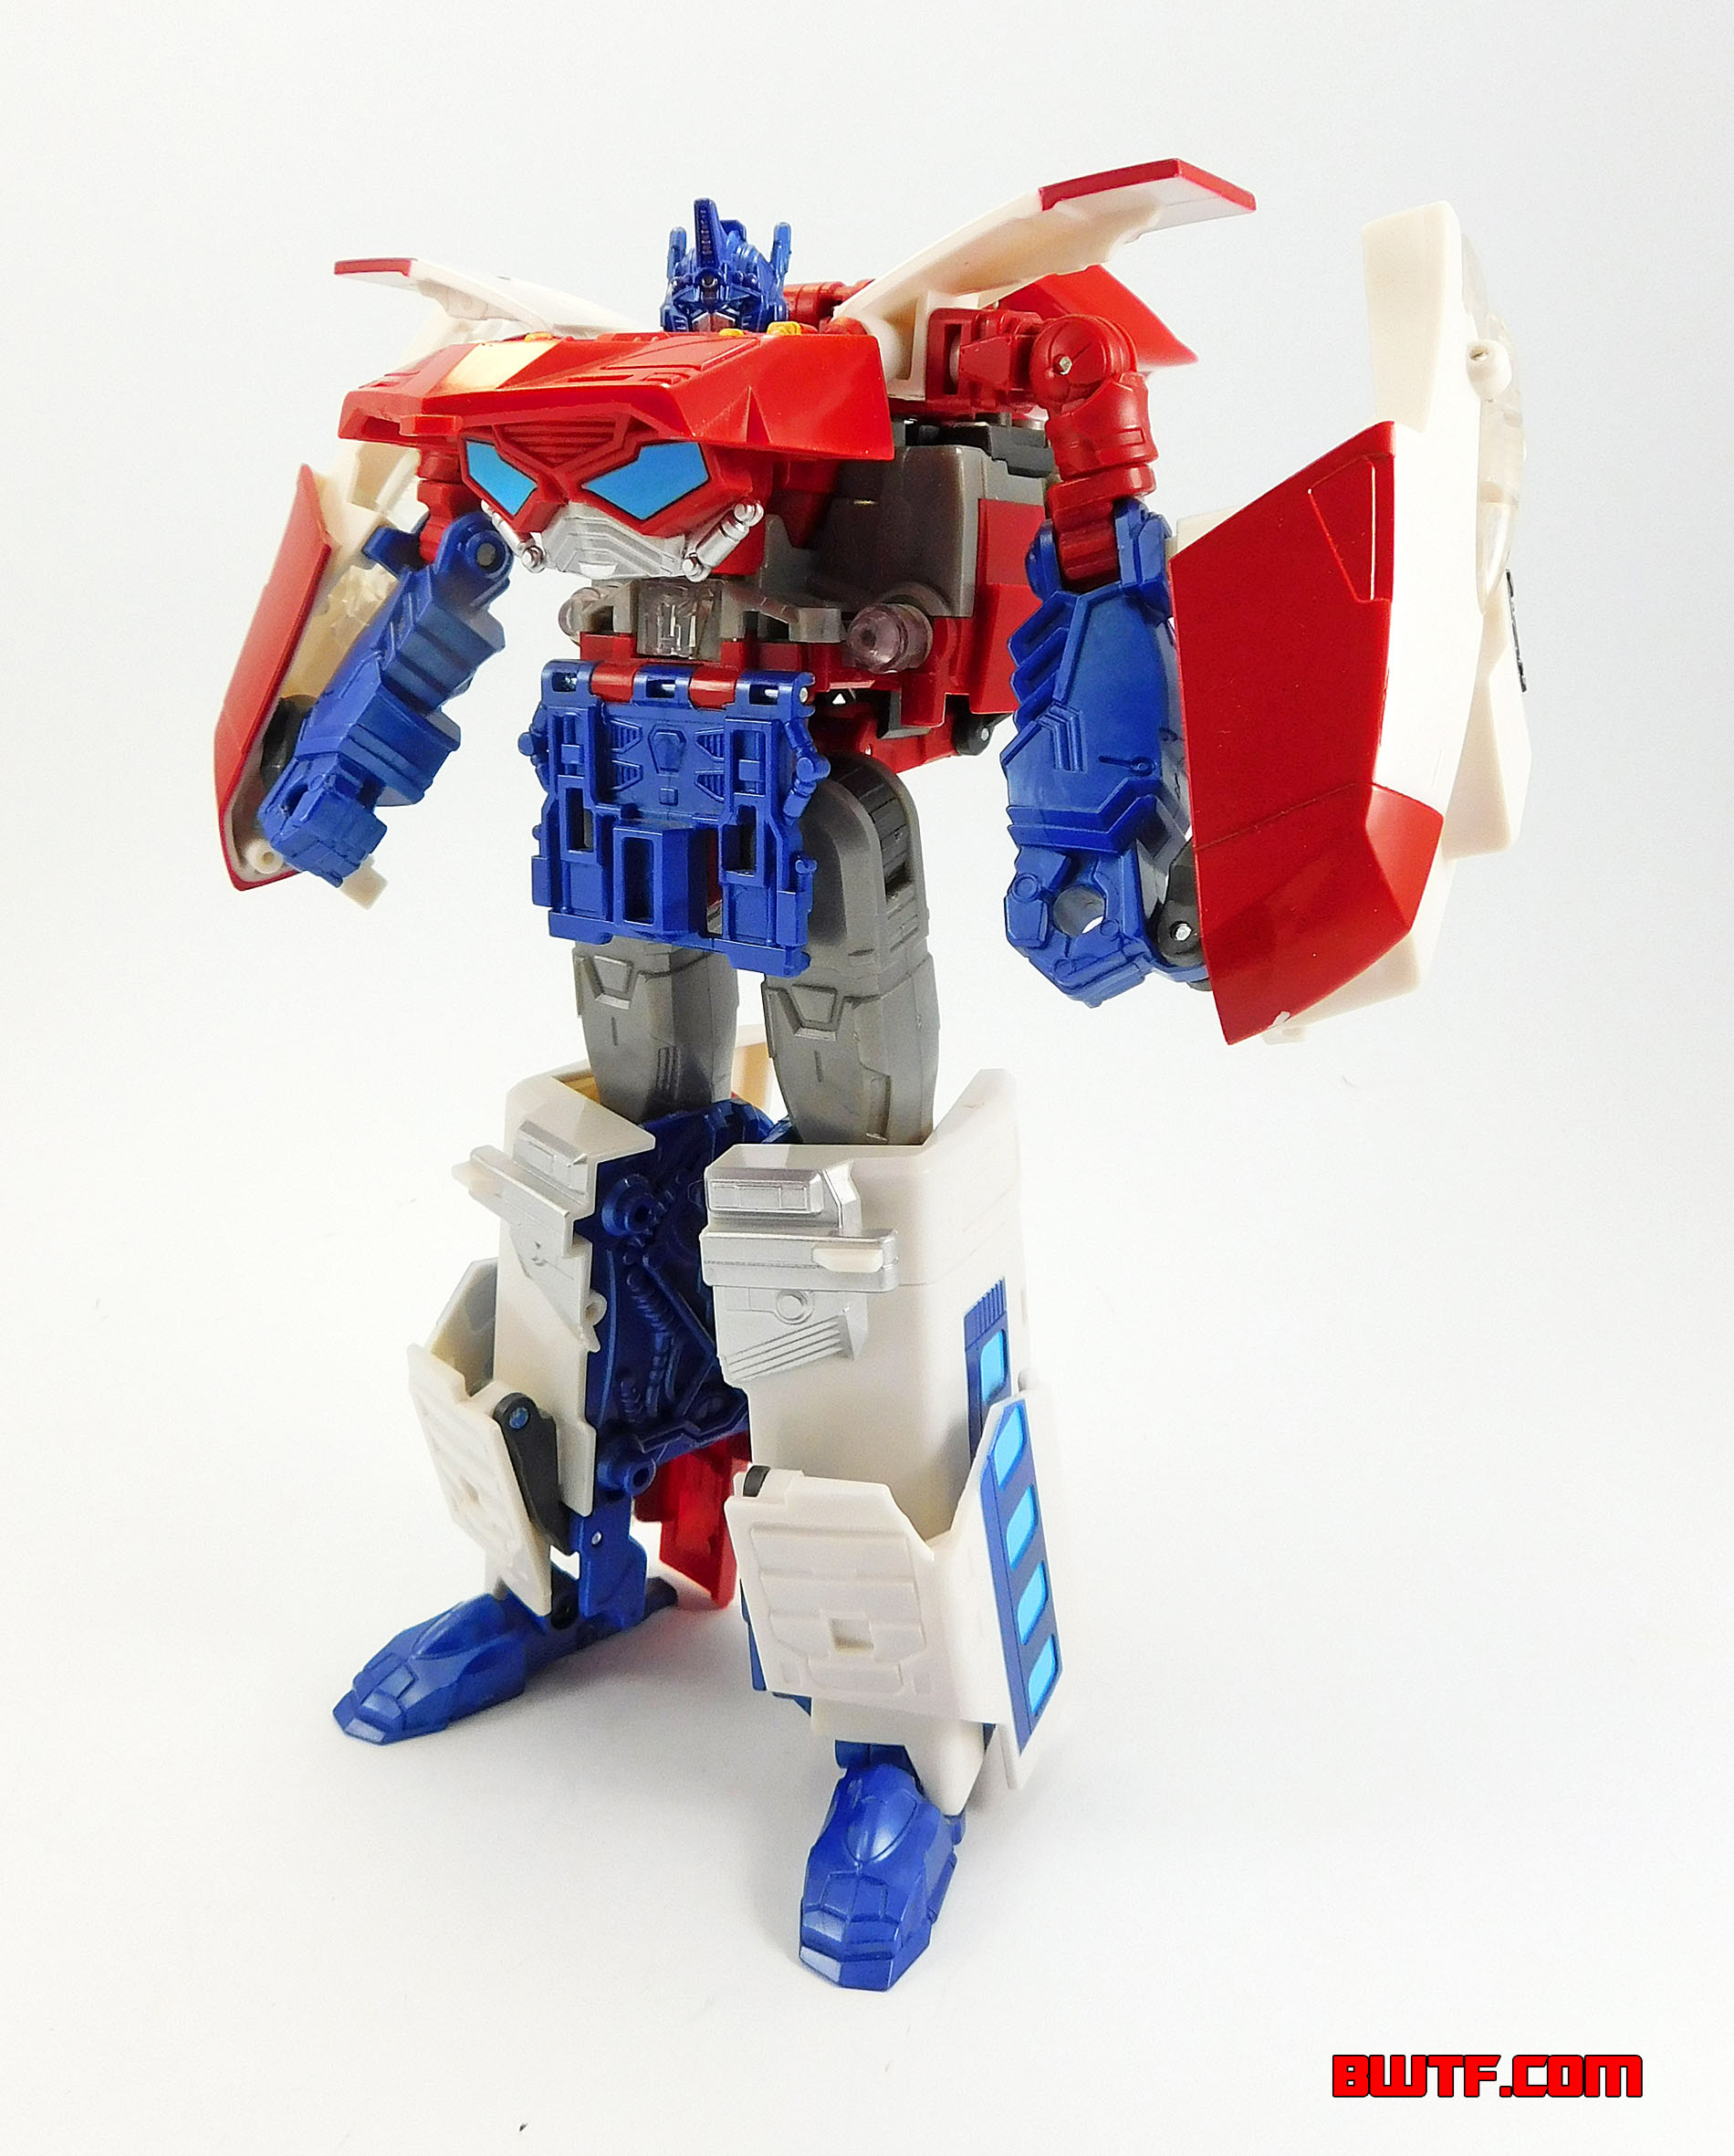
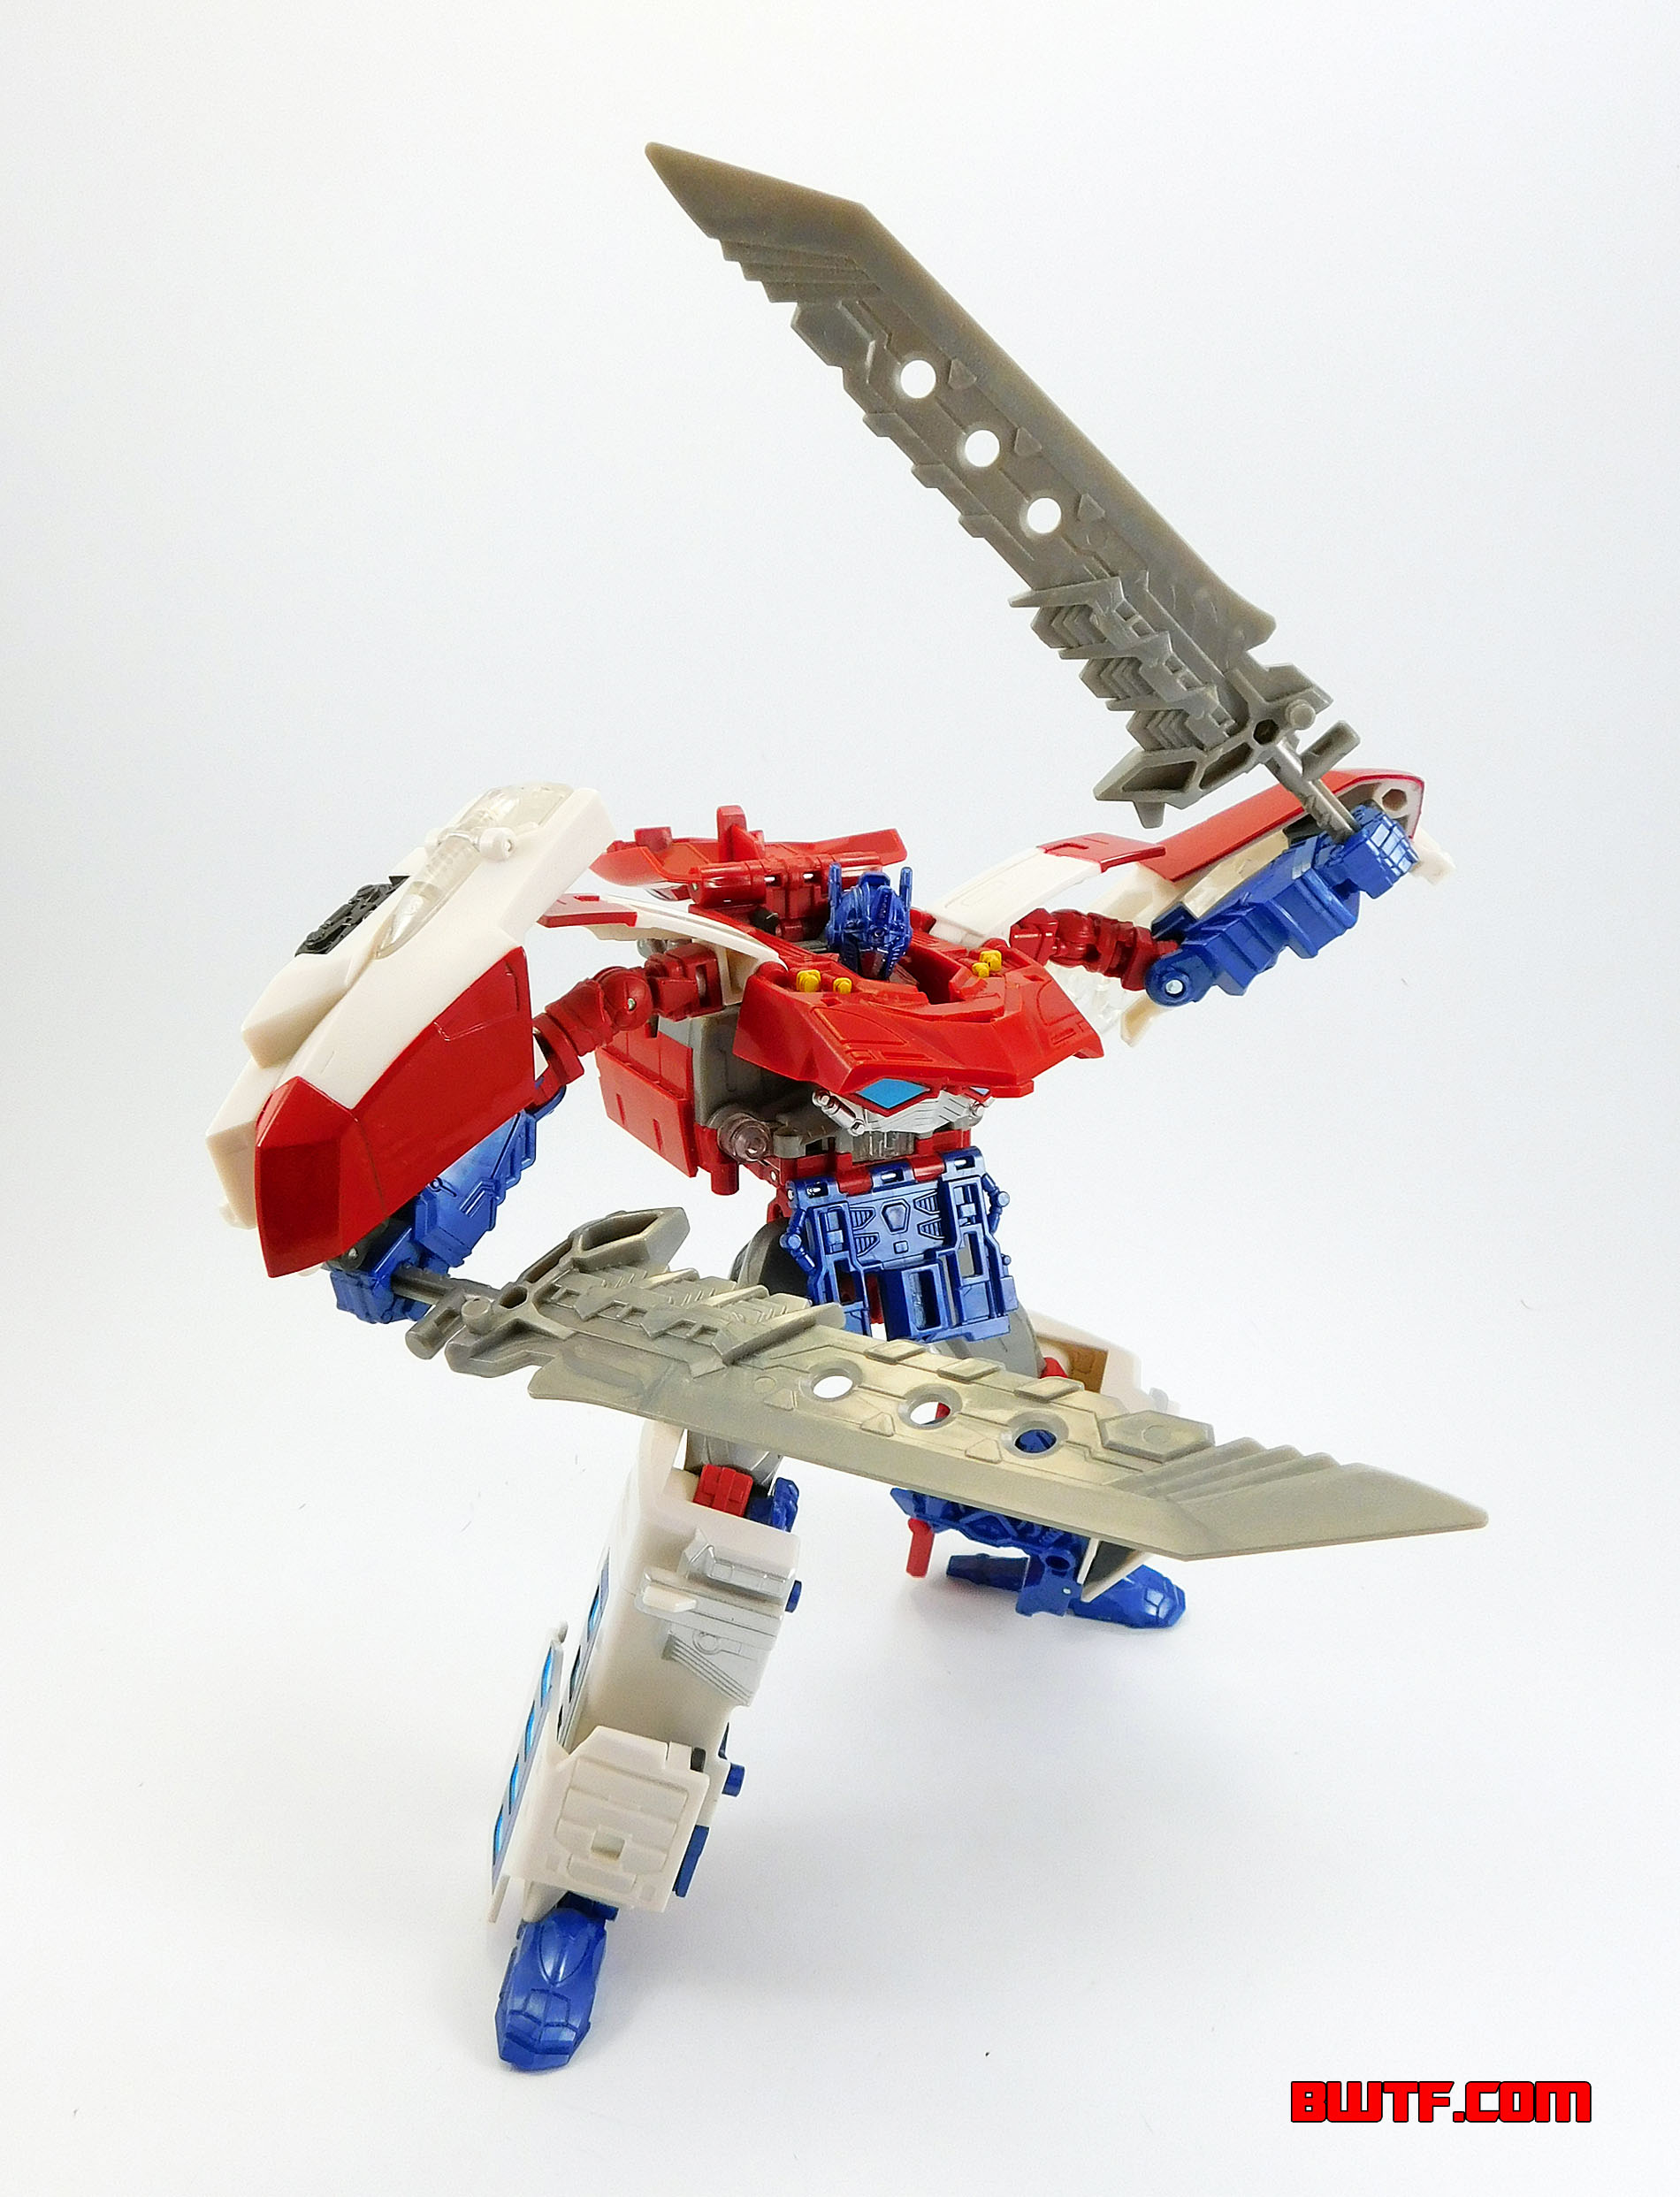
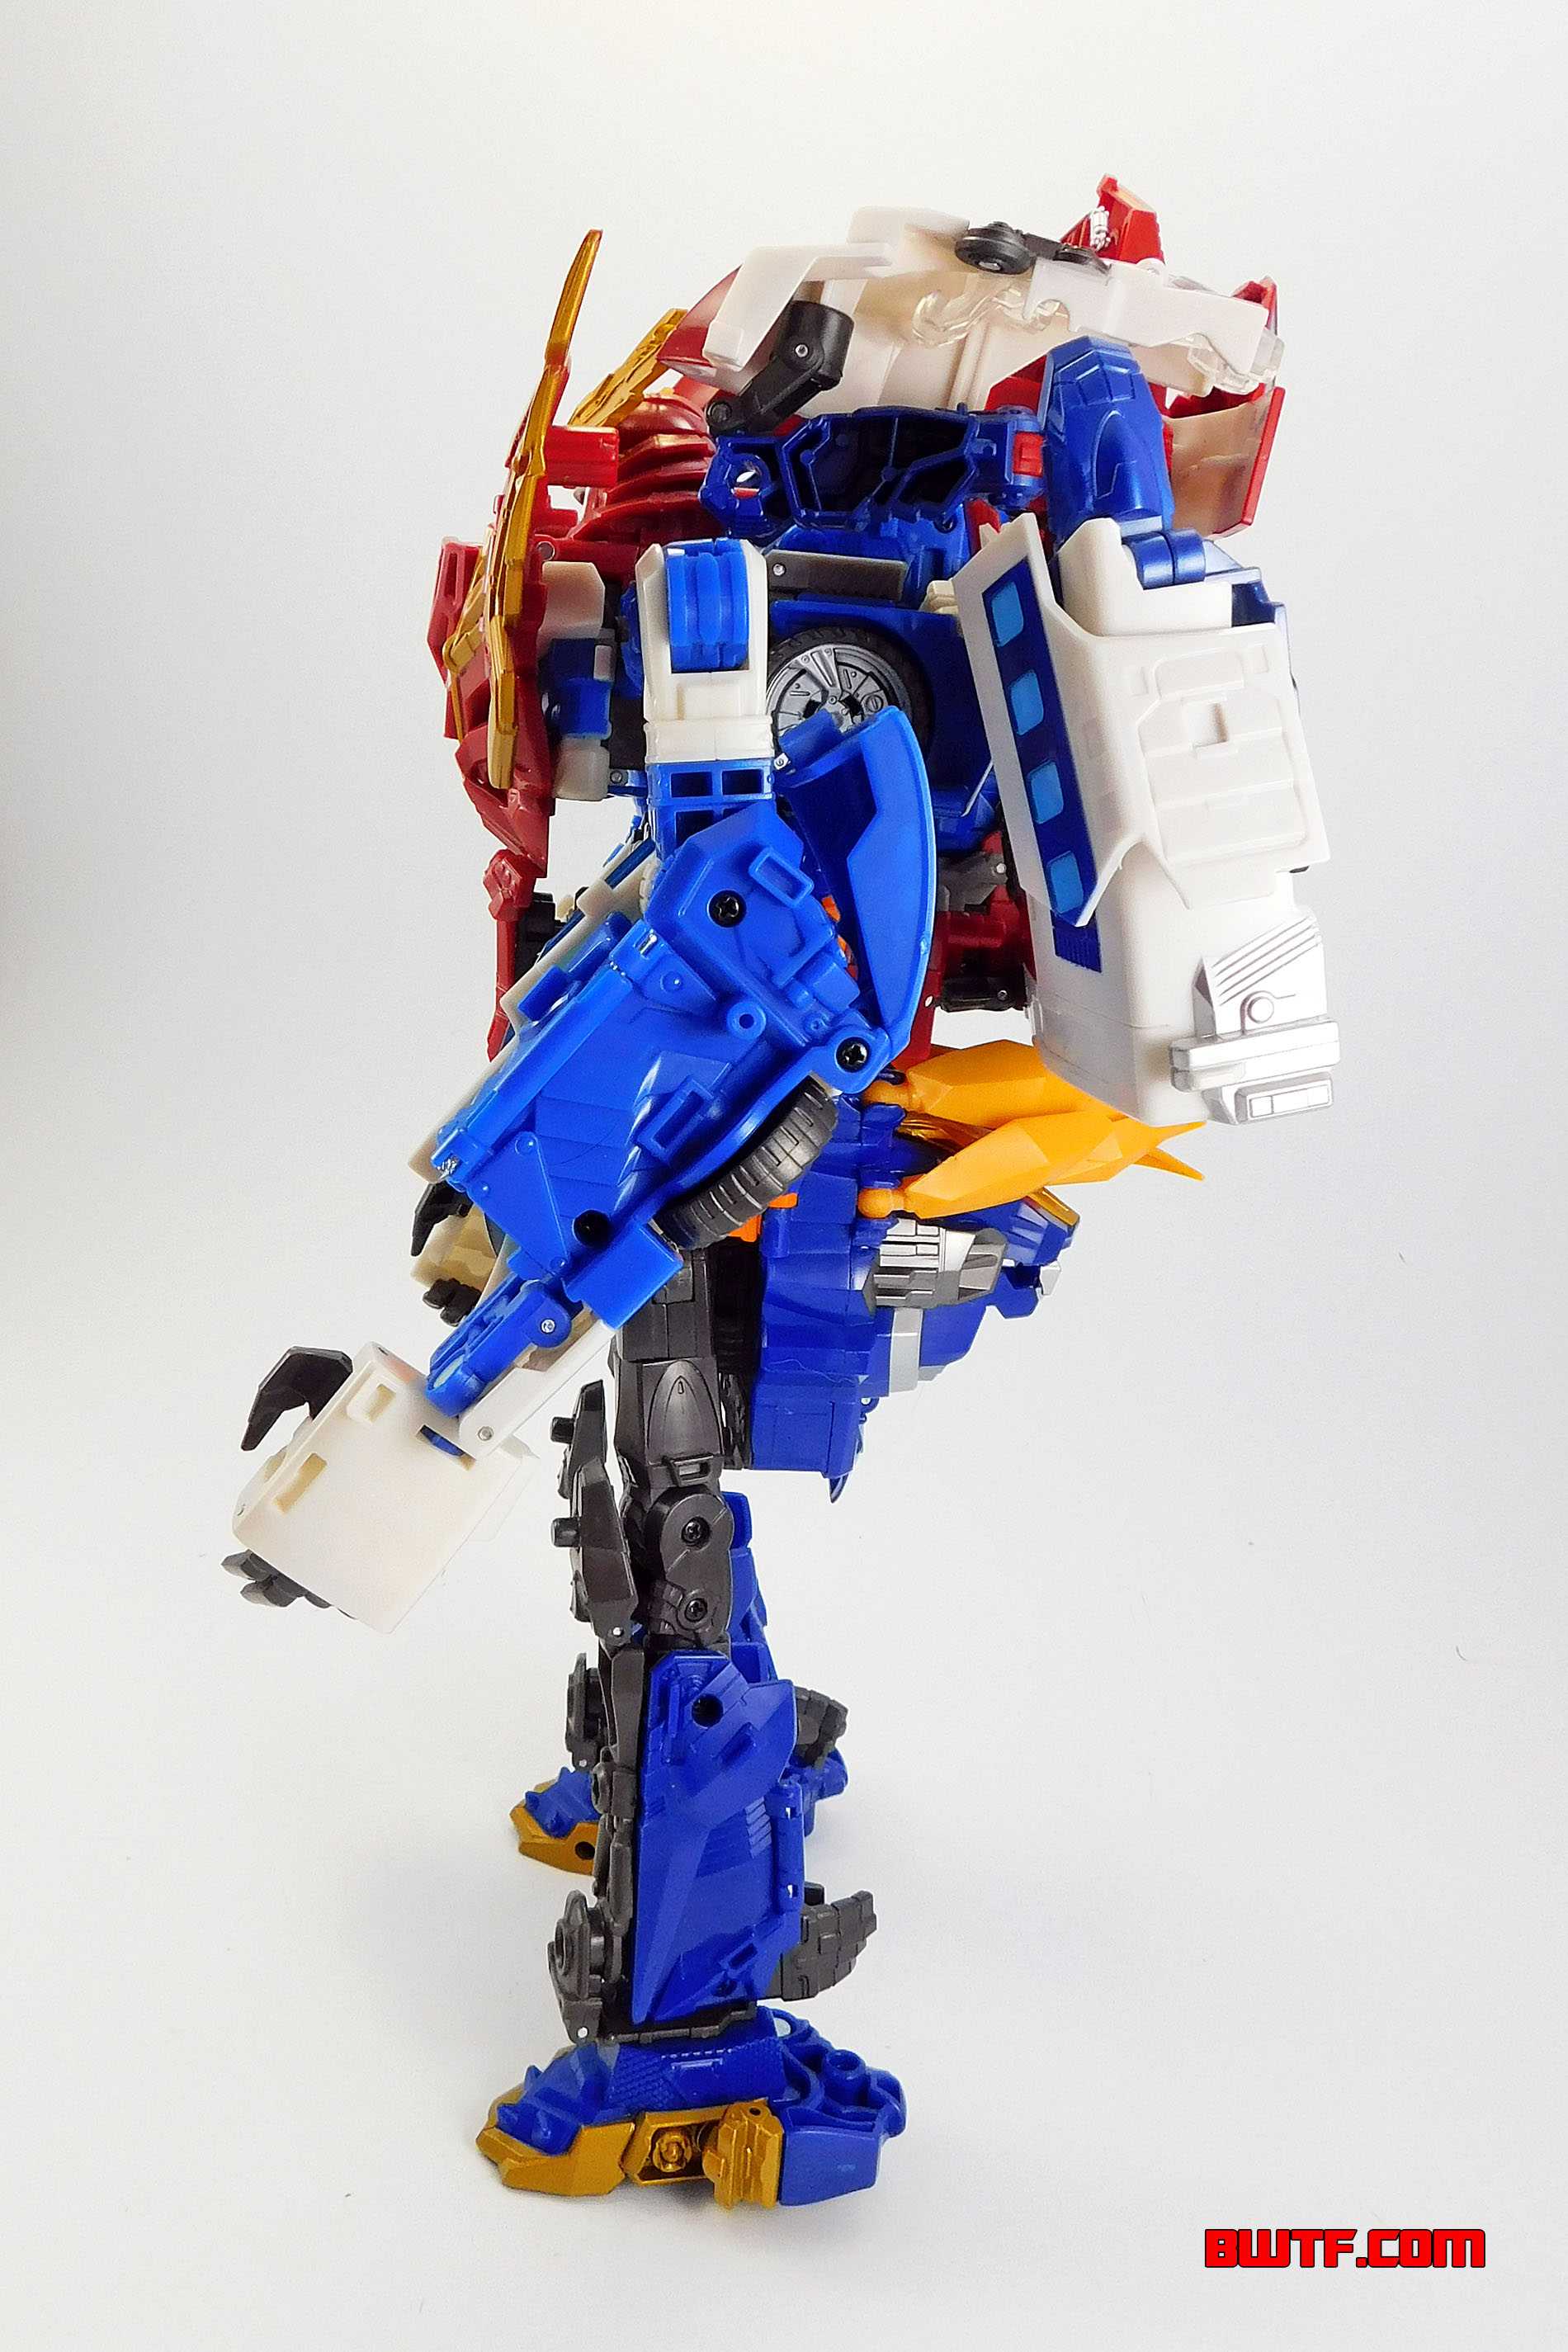
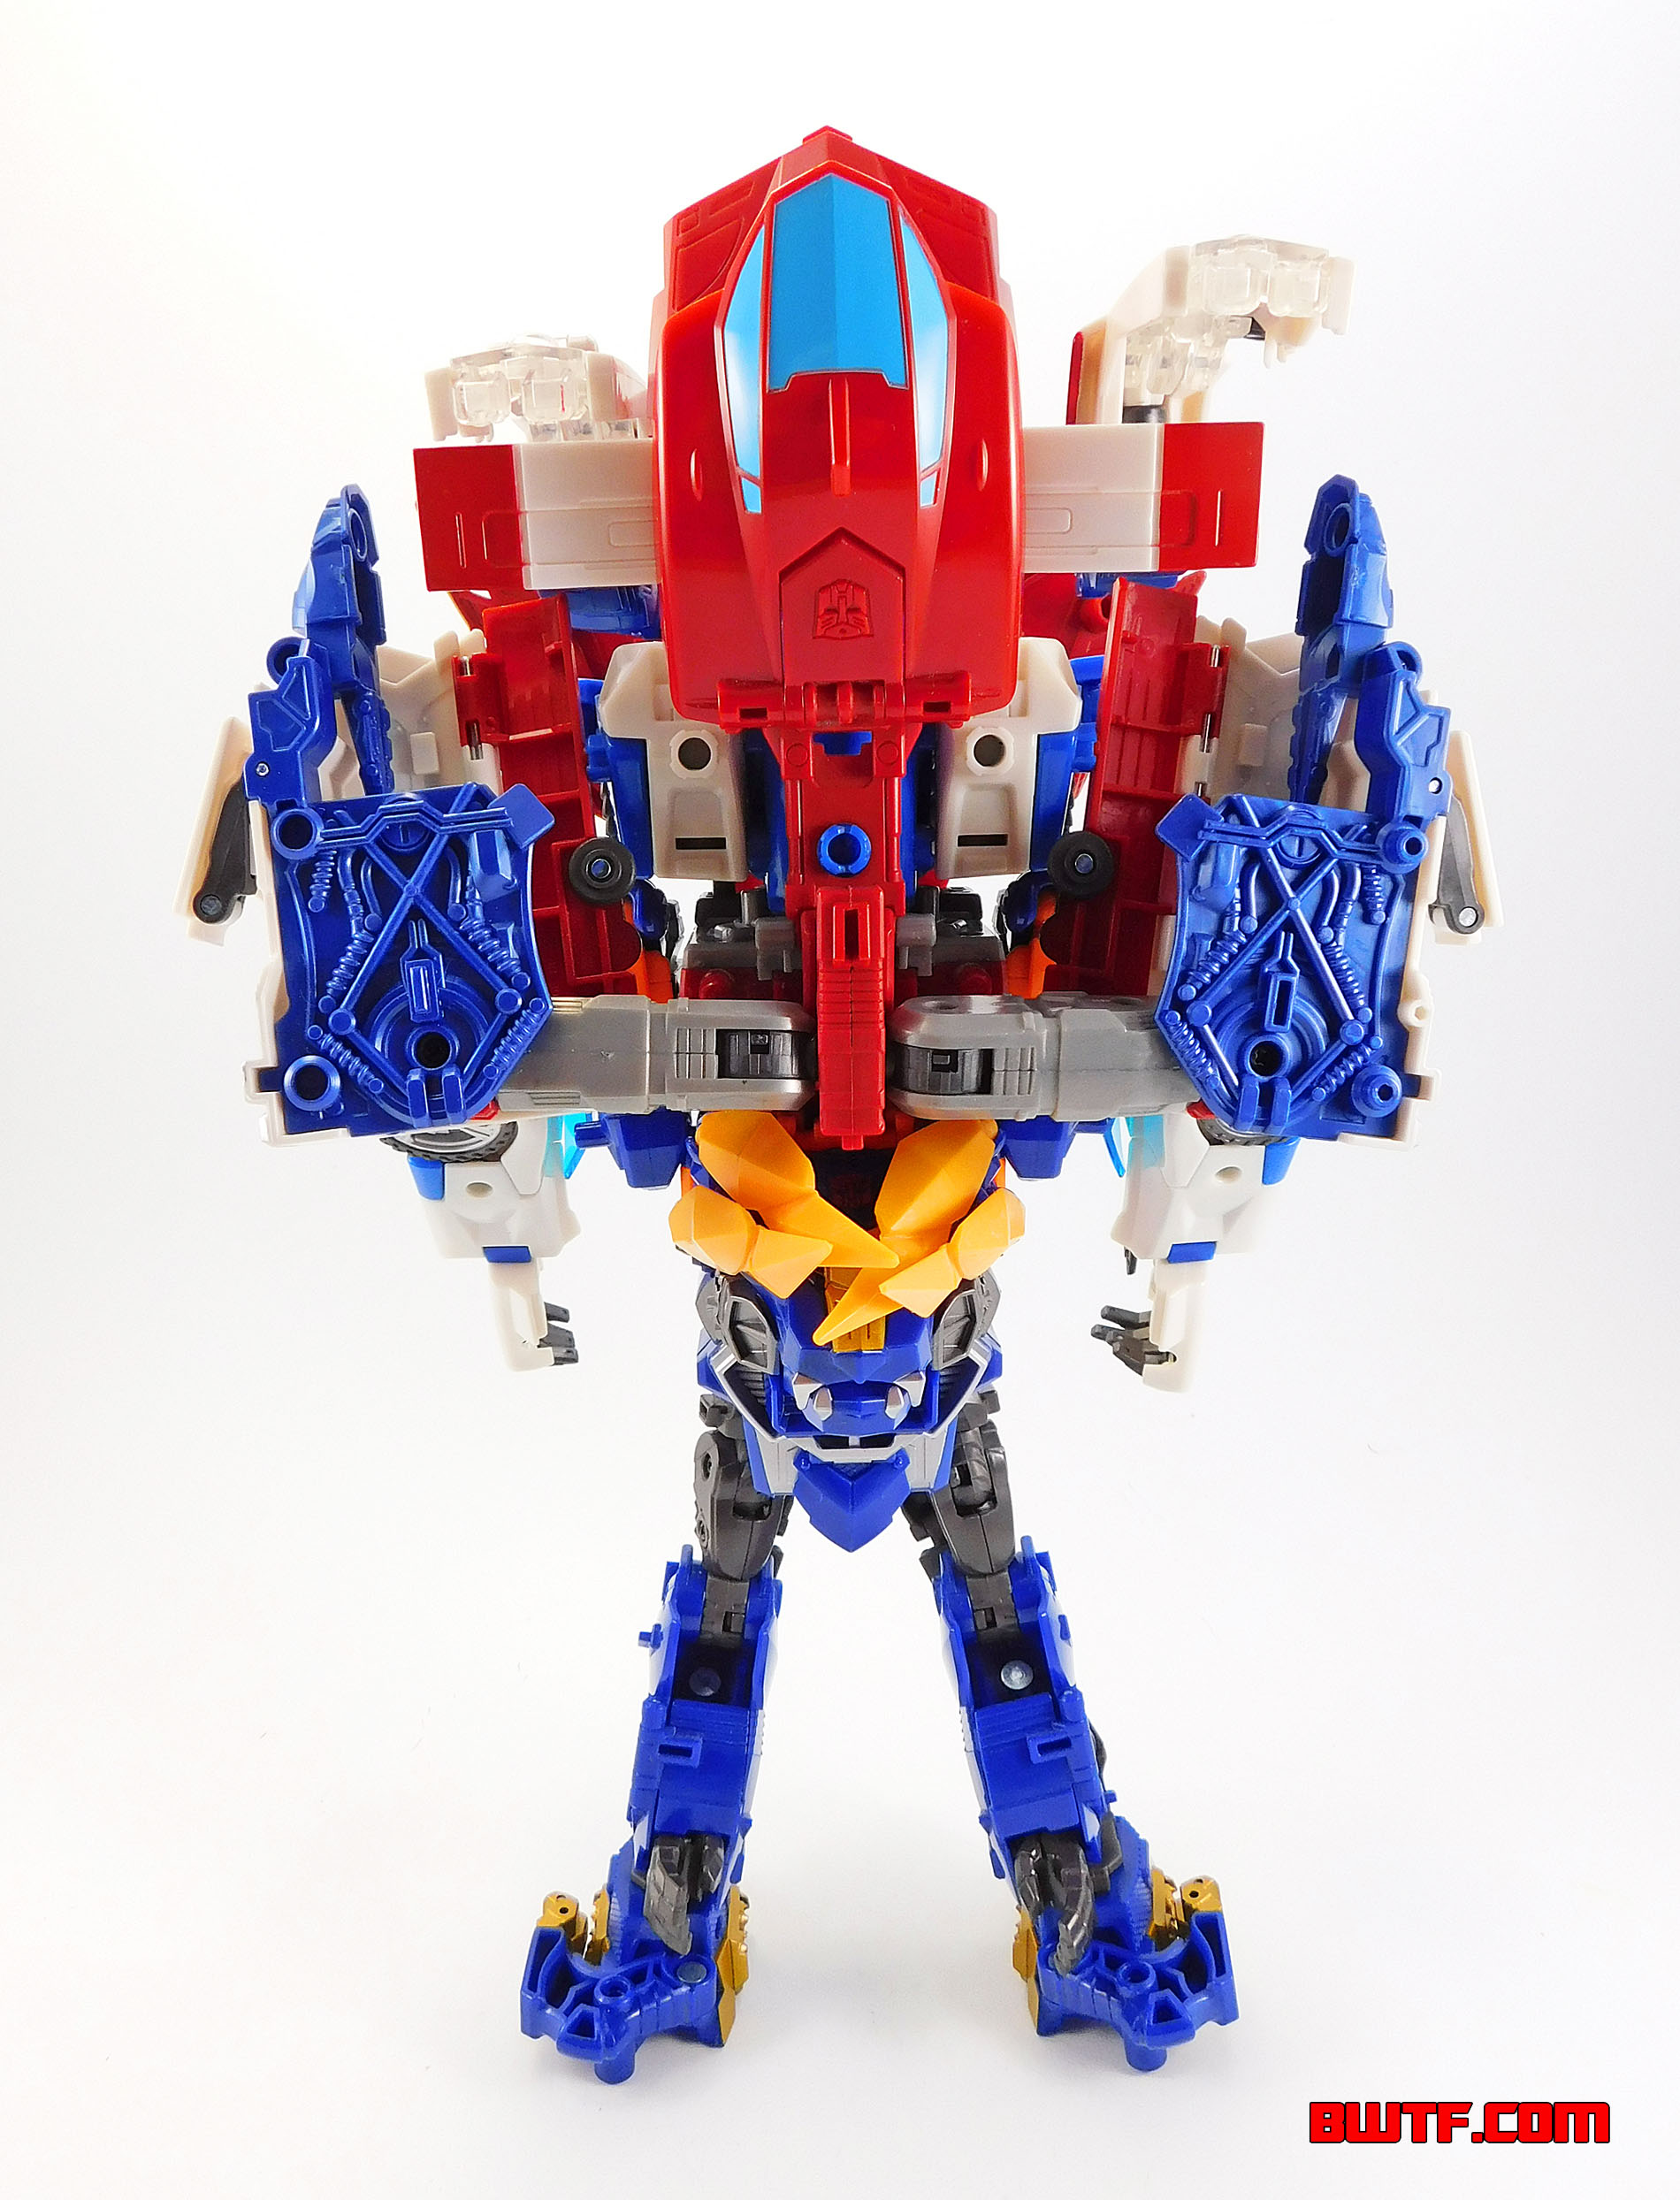
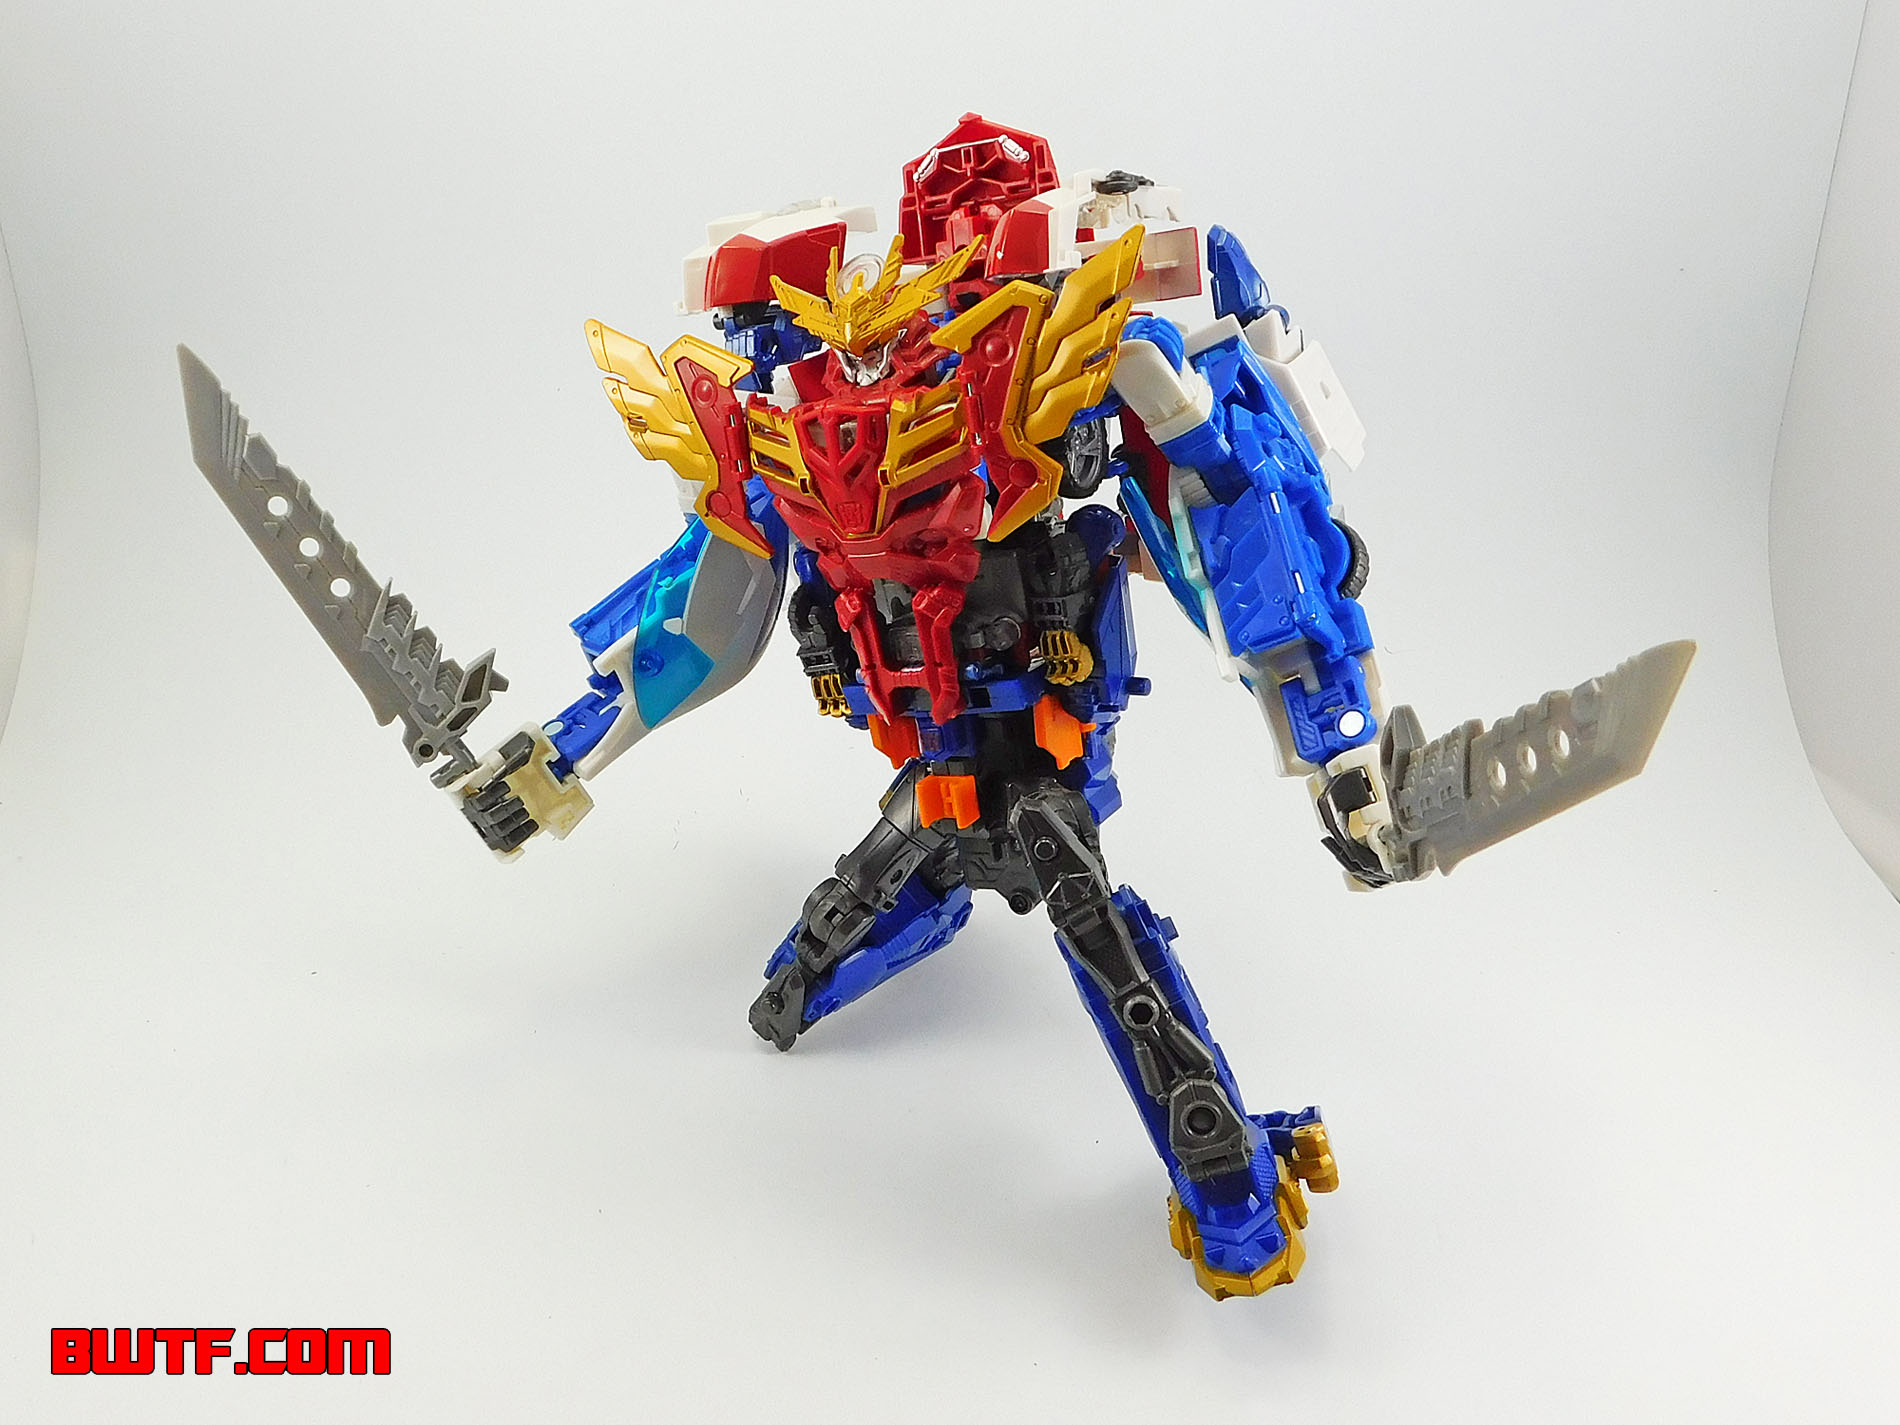
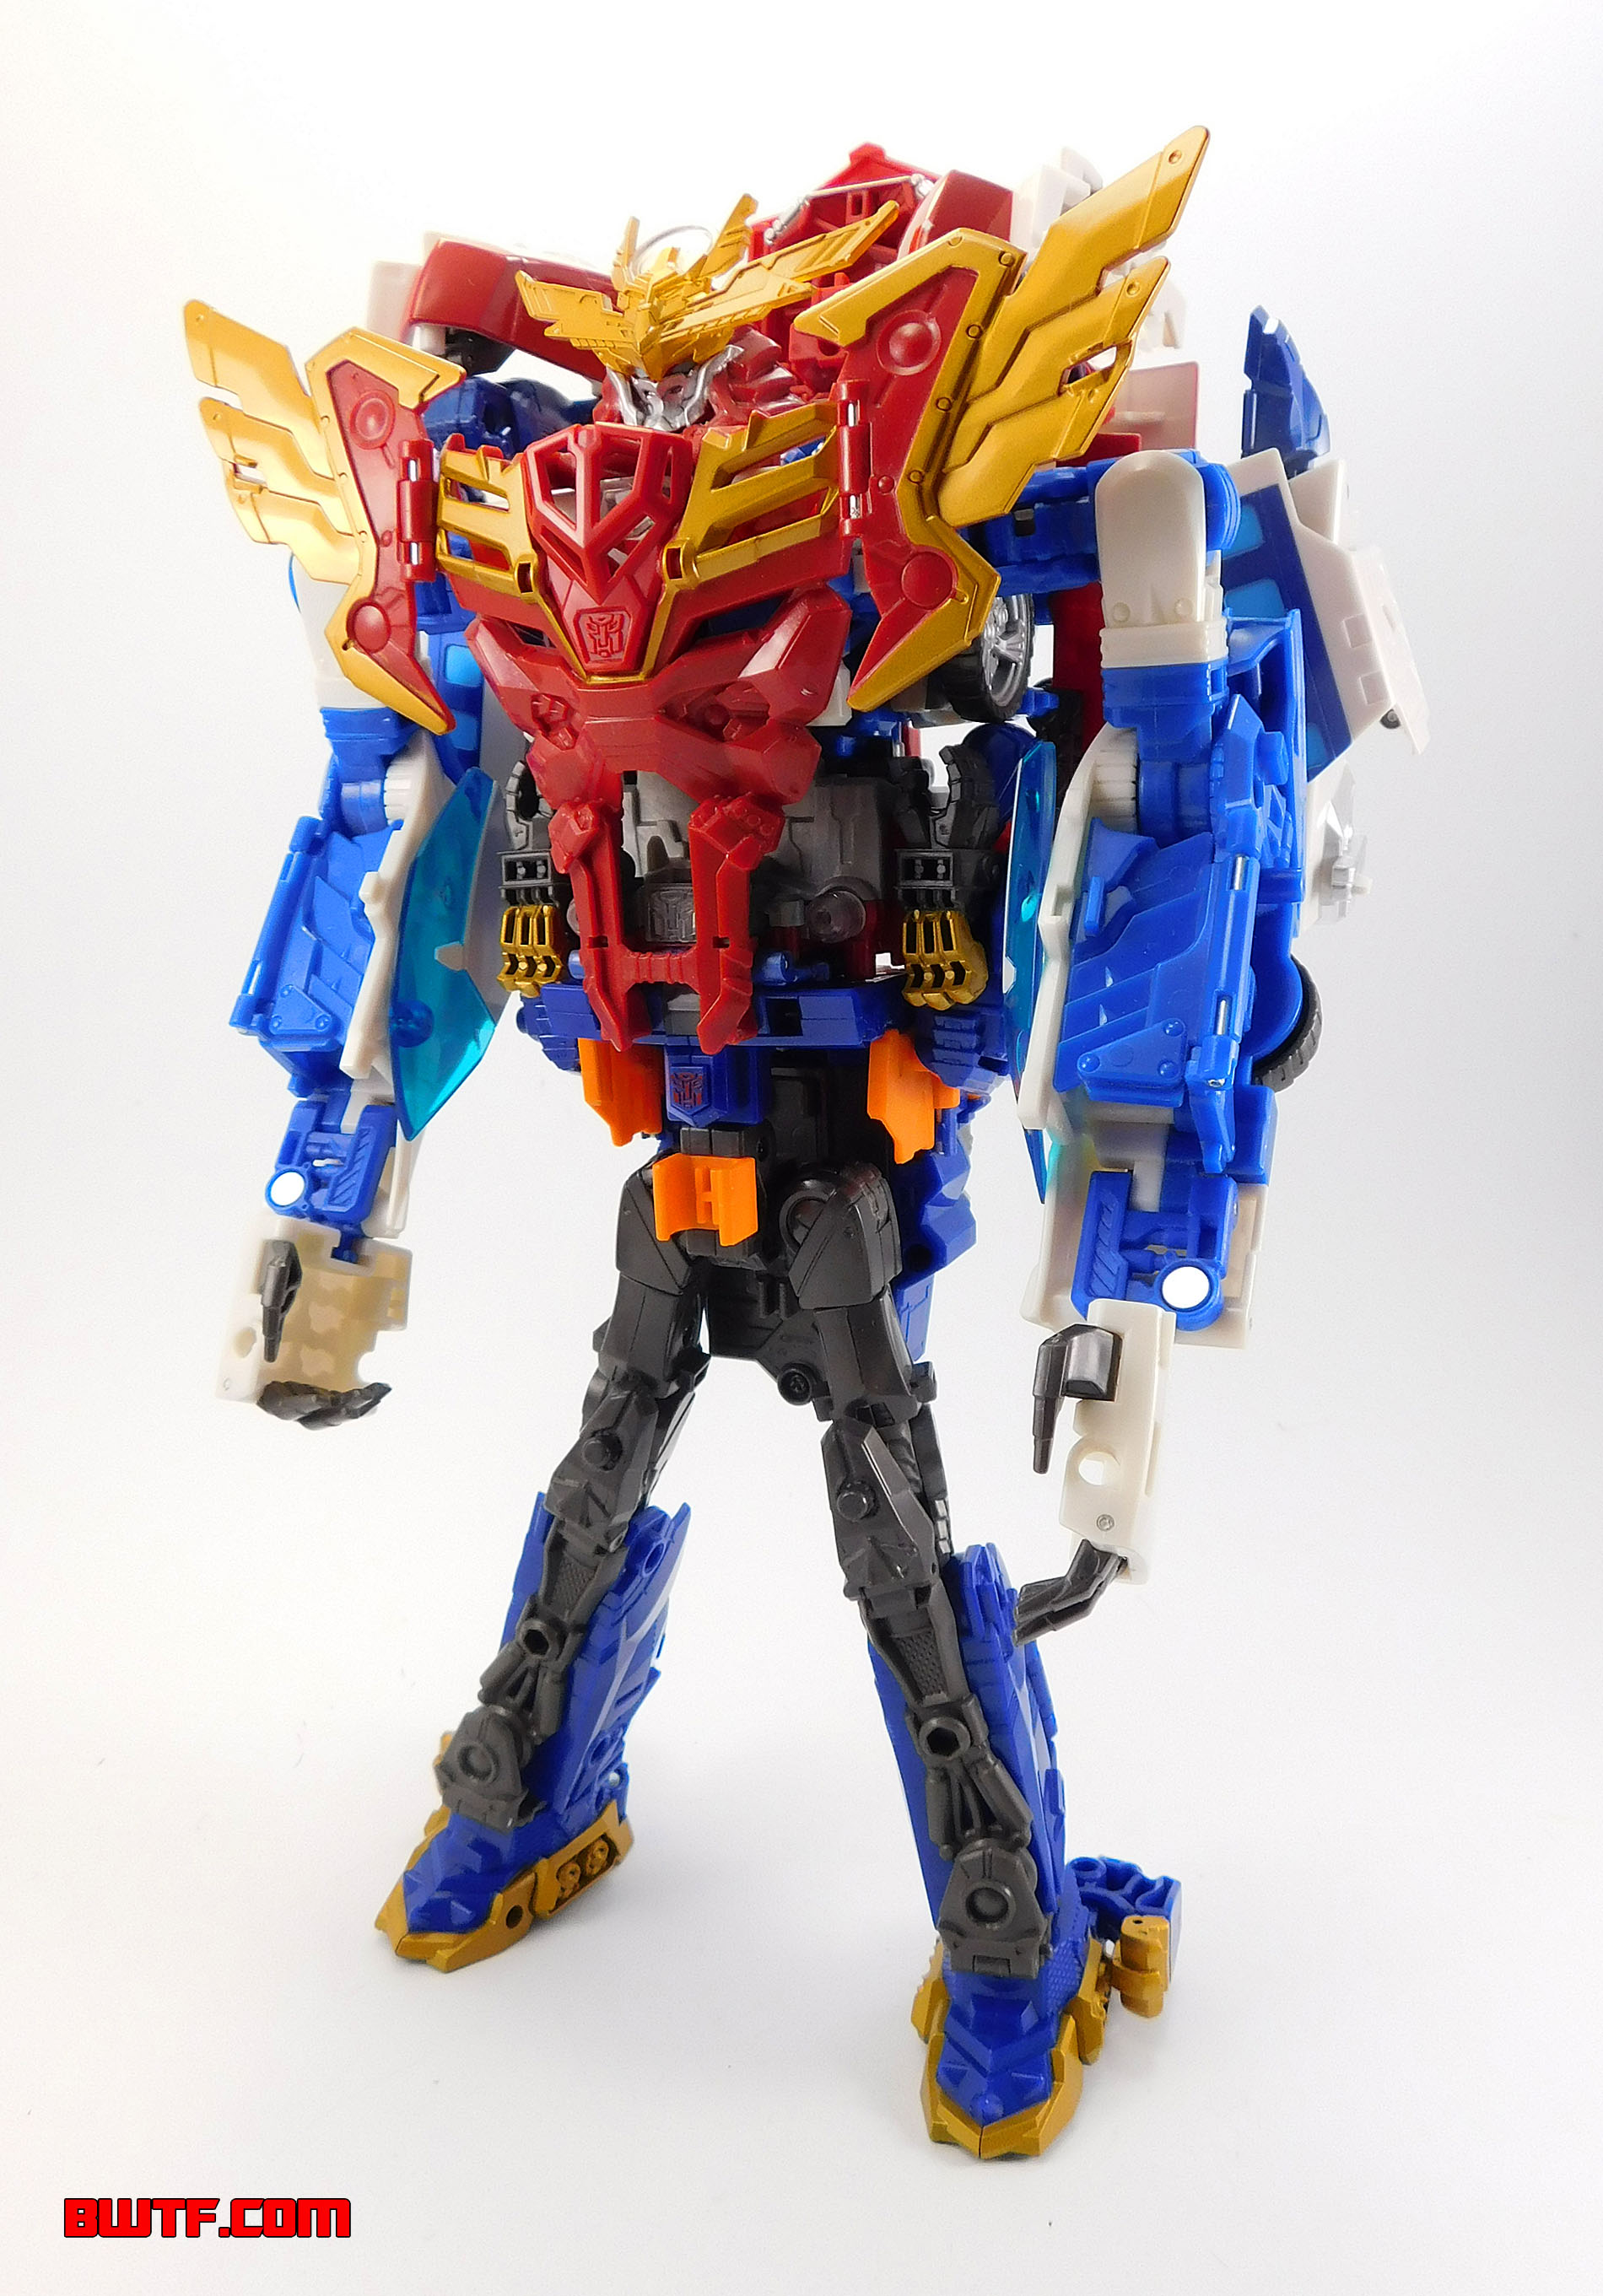
Robot Mode:
So you may think that a bullet train/dragon/torso Transformers figure might not be instantly recognizable as Optimus Prime, but the designers worked hard to make sure that this figure screamed Optimus Prime in both overt and subtle ways. There are some very "Optimus Prime" elements in this design including:
- The head has a high central crest, a mouthplate and antennae on the sides.
- The top of the chest has two lights on either side that call back to the lights from G1 Optimus Prime's vehicle mode, which wound up on the top of the chest in robot mode.
- The chest panel has chest "windows" and even a "grille" section.
- The waist panel has six designs sculpted into it that are based on similar designs on G1 Optimus Prime's animation model.
- The lower legs each feature a series of vent-like panels on the front, a callback to a classic G1 Optimus Prime design element.
While Optimus Exprime has these "classic" details, they have been modified to look more modern in many respects. The most notable examples of this are the head and chest. The crest on the head is higher than your typical Optimus figure and it comes out towards the front at an angle, looking almost like a horn. There are some additional greebles like circles around the helmet area as well. In the case of the chest panel, the windows have five sides and are shaped with sharp angles instead of being squares or rectangles. The grille is also angled and on either side are pistons (an allusion to the pistons on the wheels of the vehicle mode). I love these extra design touches. They make this figure unique while still paying homage to the classic Optimus Prime design.
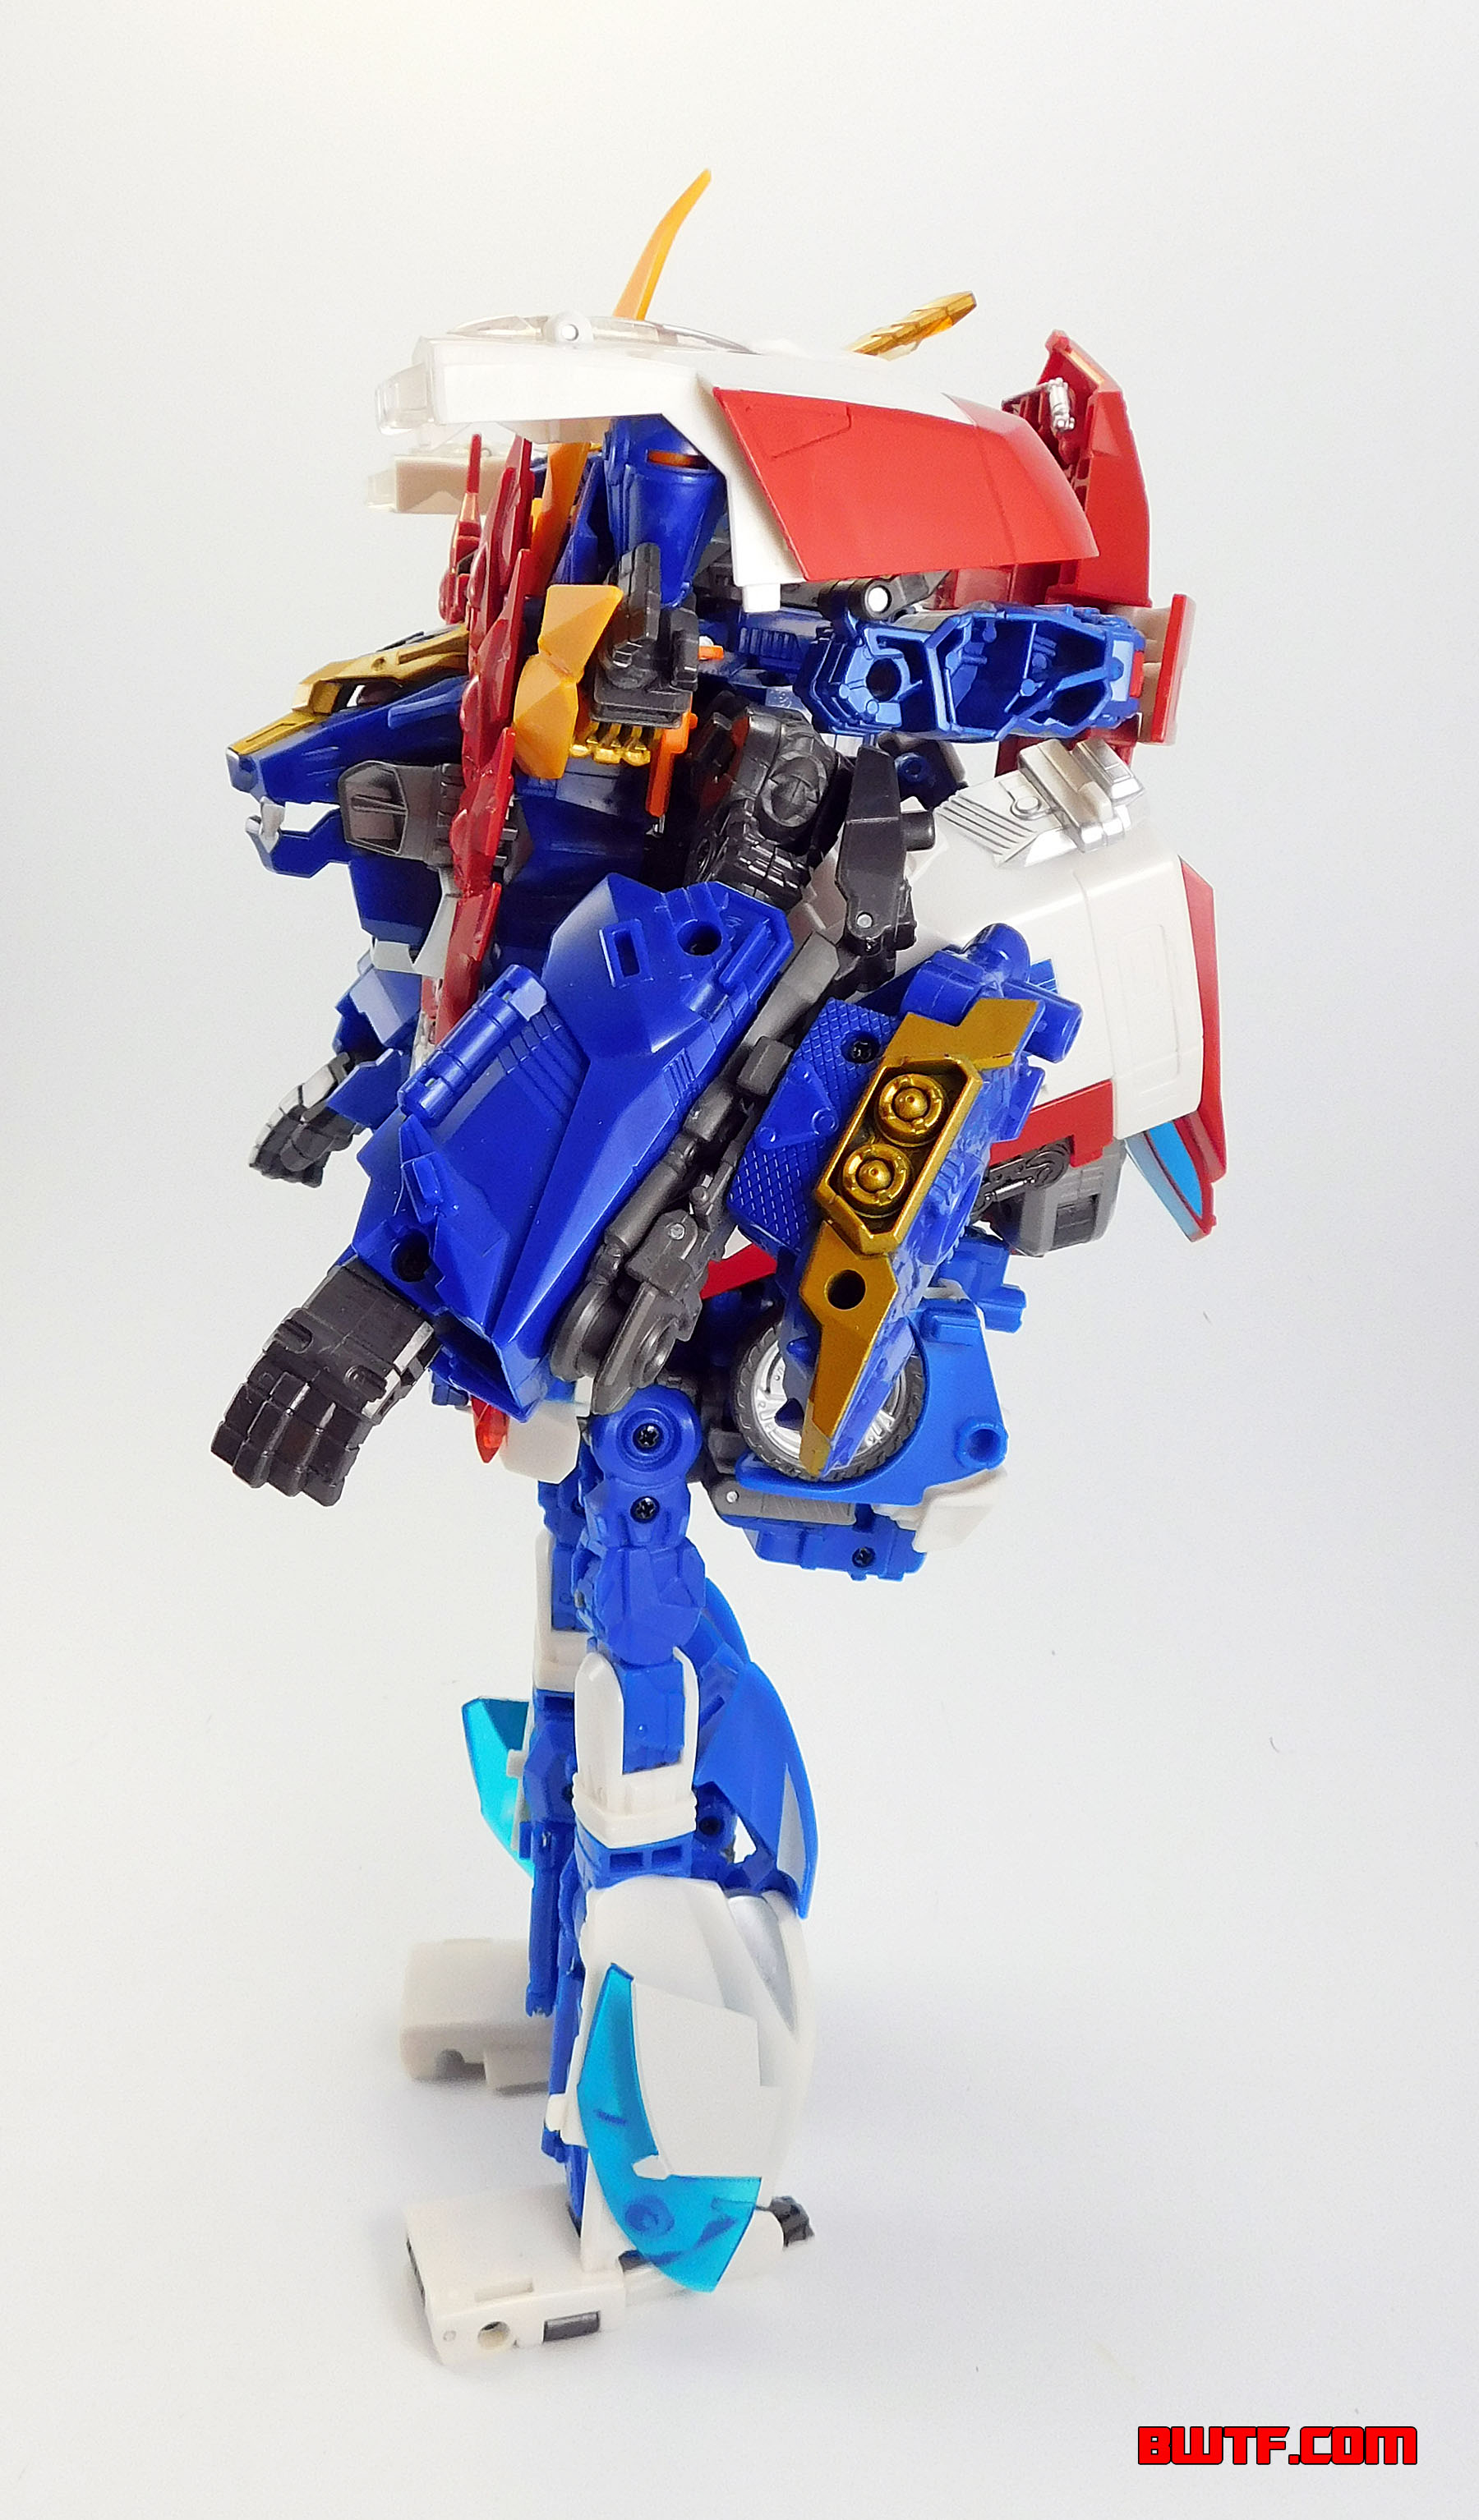
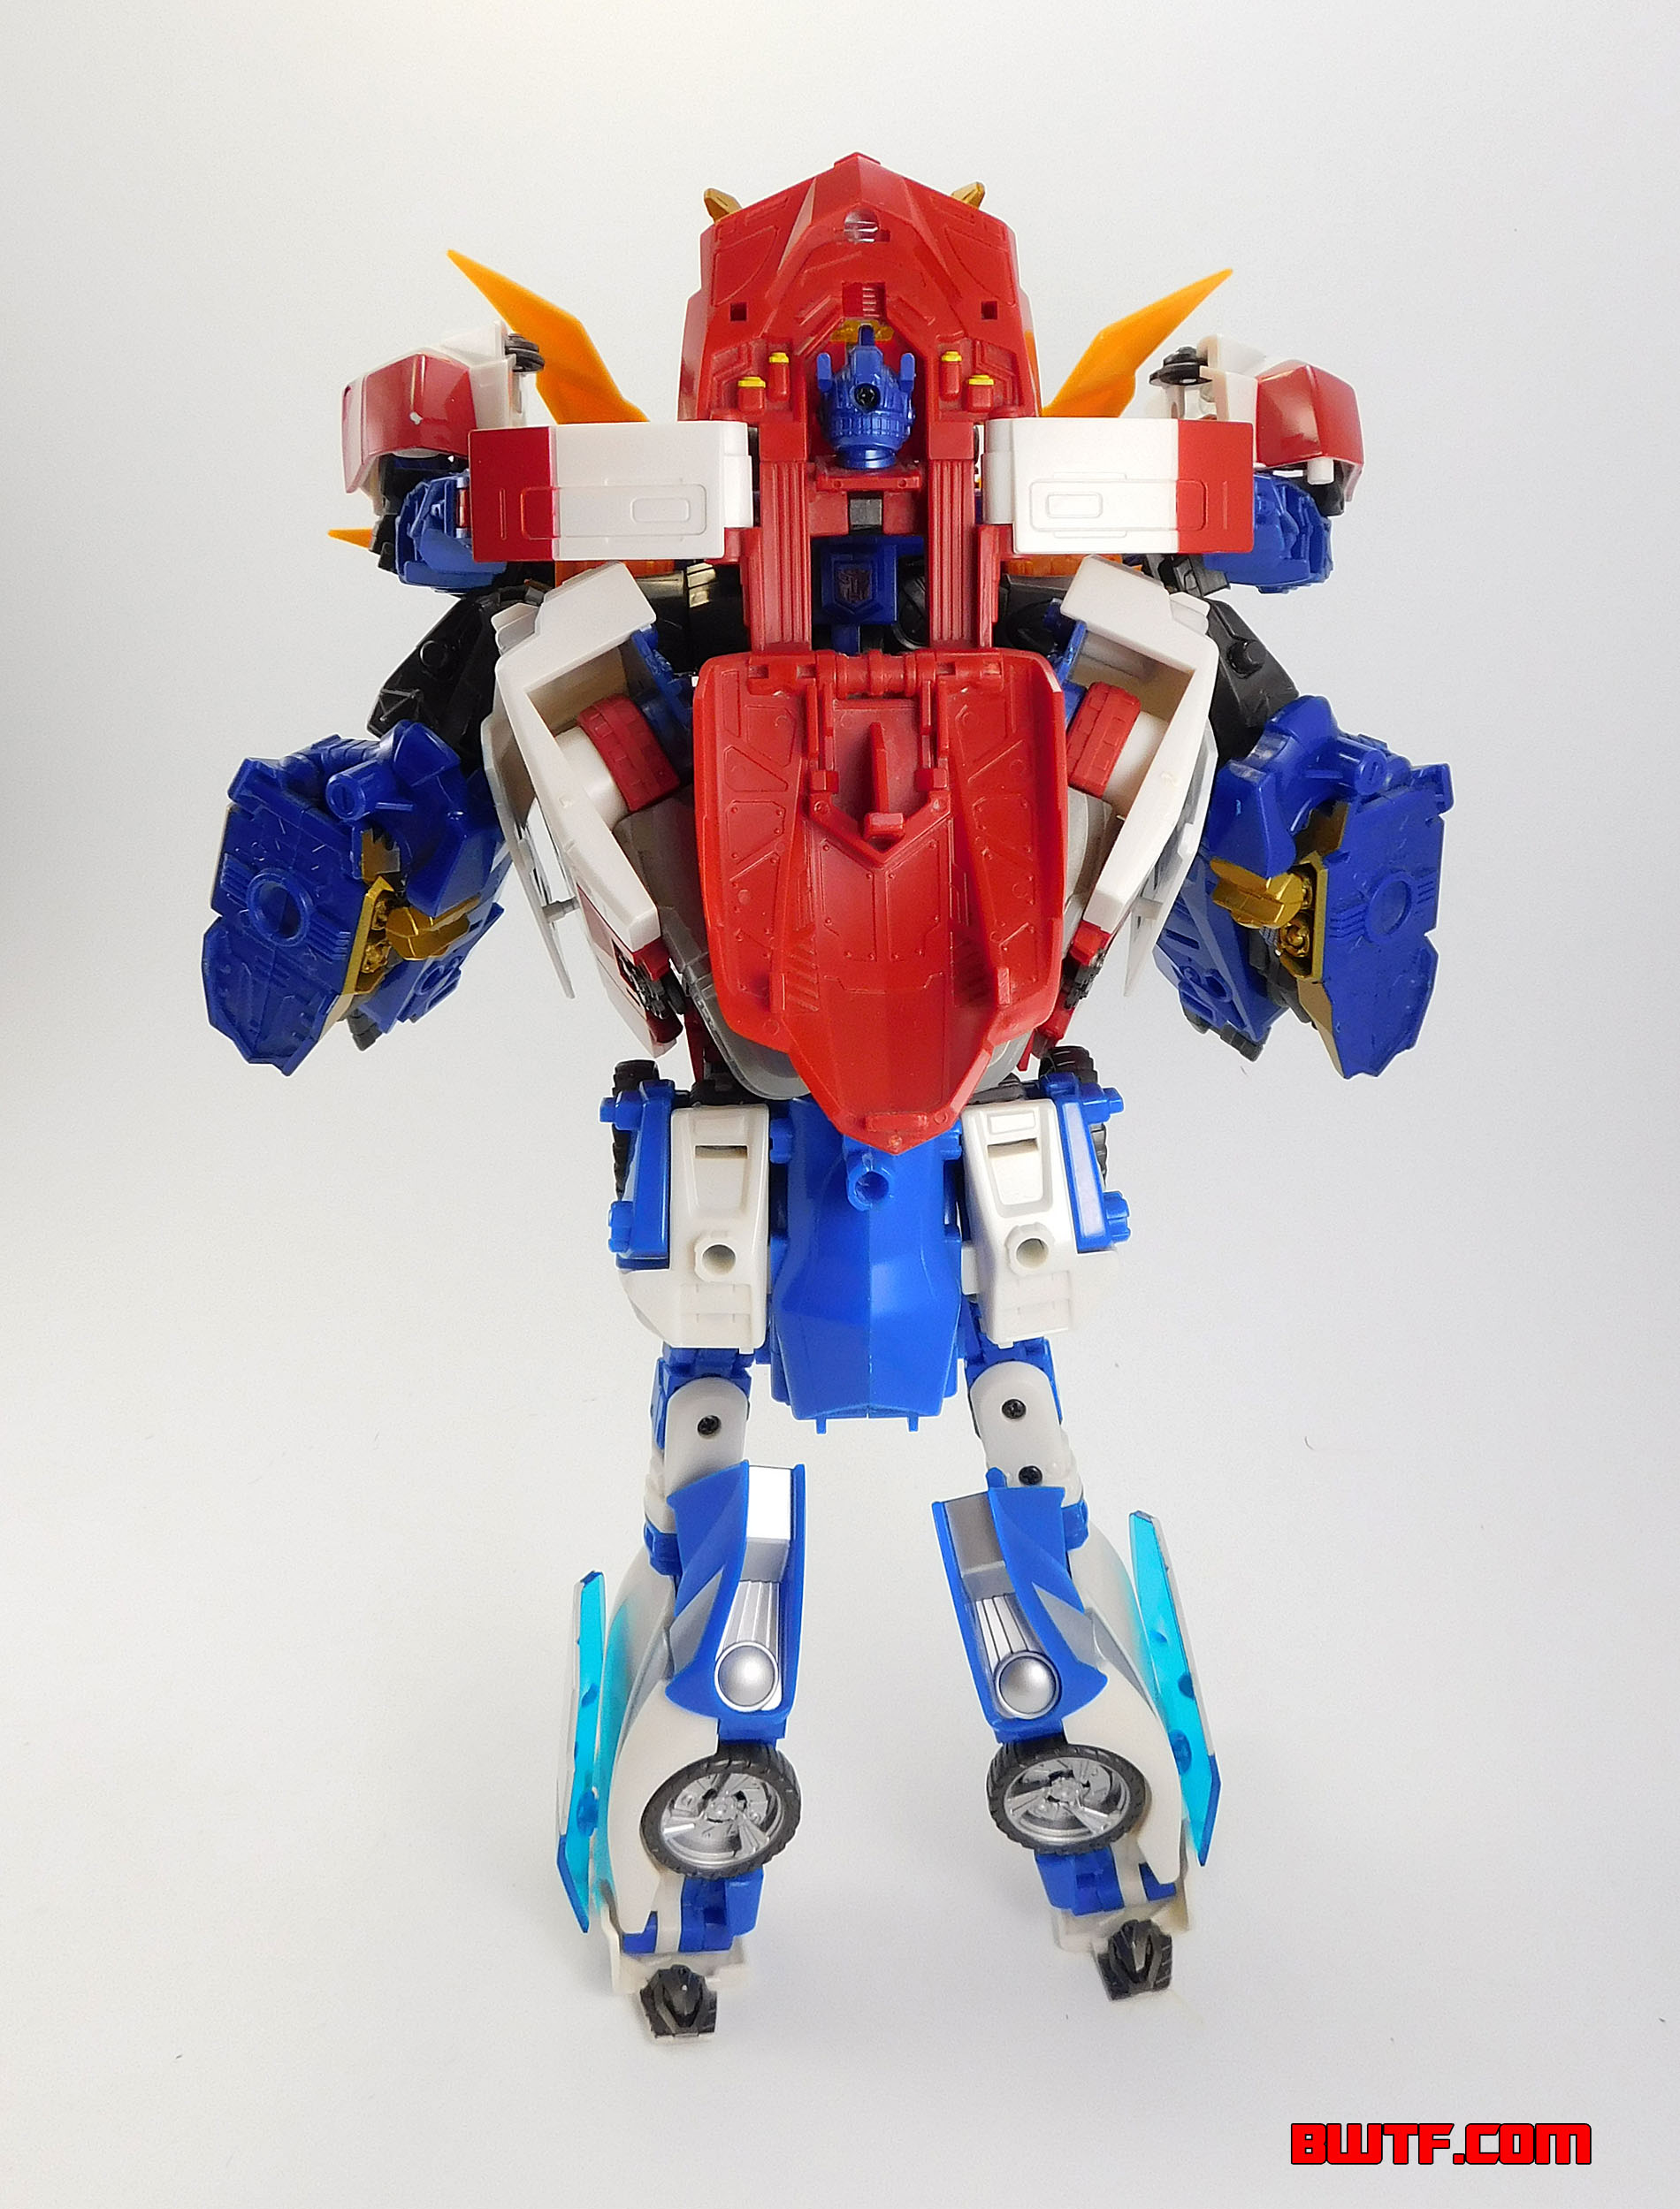
While full of cool little details, Optimus Exprime is a rather chunky Autobot. His legs are thick, the front halves of the vehicle mode really bulk up his arms and his back has a big chunk sticking out in the back. All that said, I cannot say he looks bad at all. I actually like the way he looks quite a bit. He has proportions that remind me of some mecha in Anime, especially with his relatively small head and torso section with large arms and legs. These exaggerated style proportions work for my personal aesthetic, but I can see how some fans may not dig it.
This form shows off classic Optimus Prime colors including red, blue and silver. He also has several white parts. Silver, yellow and light blue paint are used to provide detailing. There is not a lot of paint on this figure, but the way the plastic is laid out, the colors alternate in such a way that the figure never looks dull.
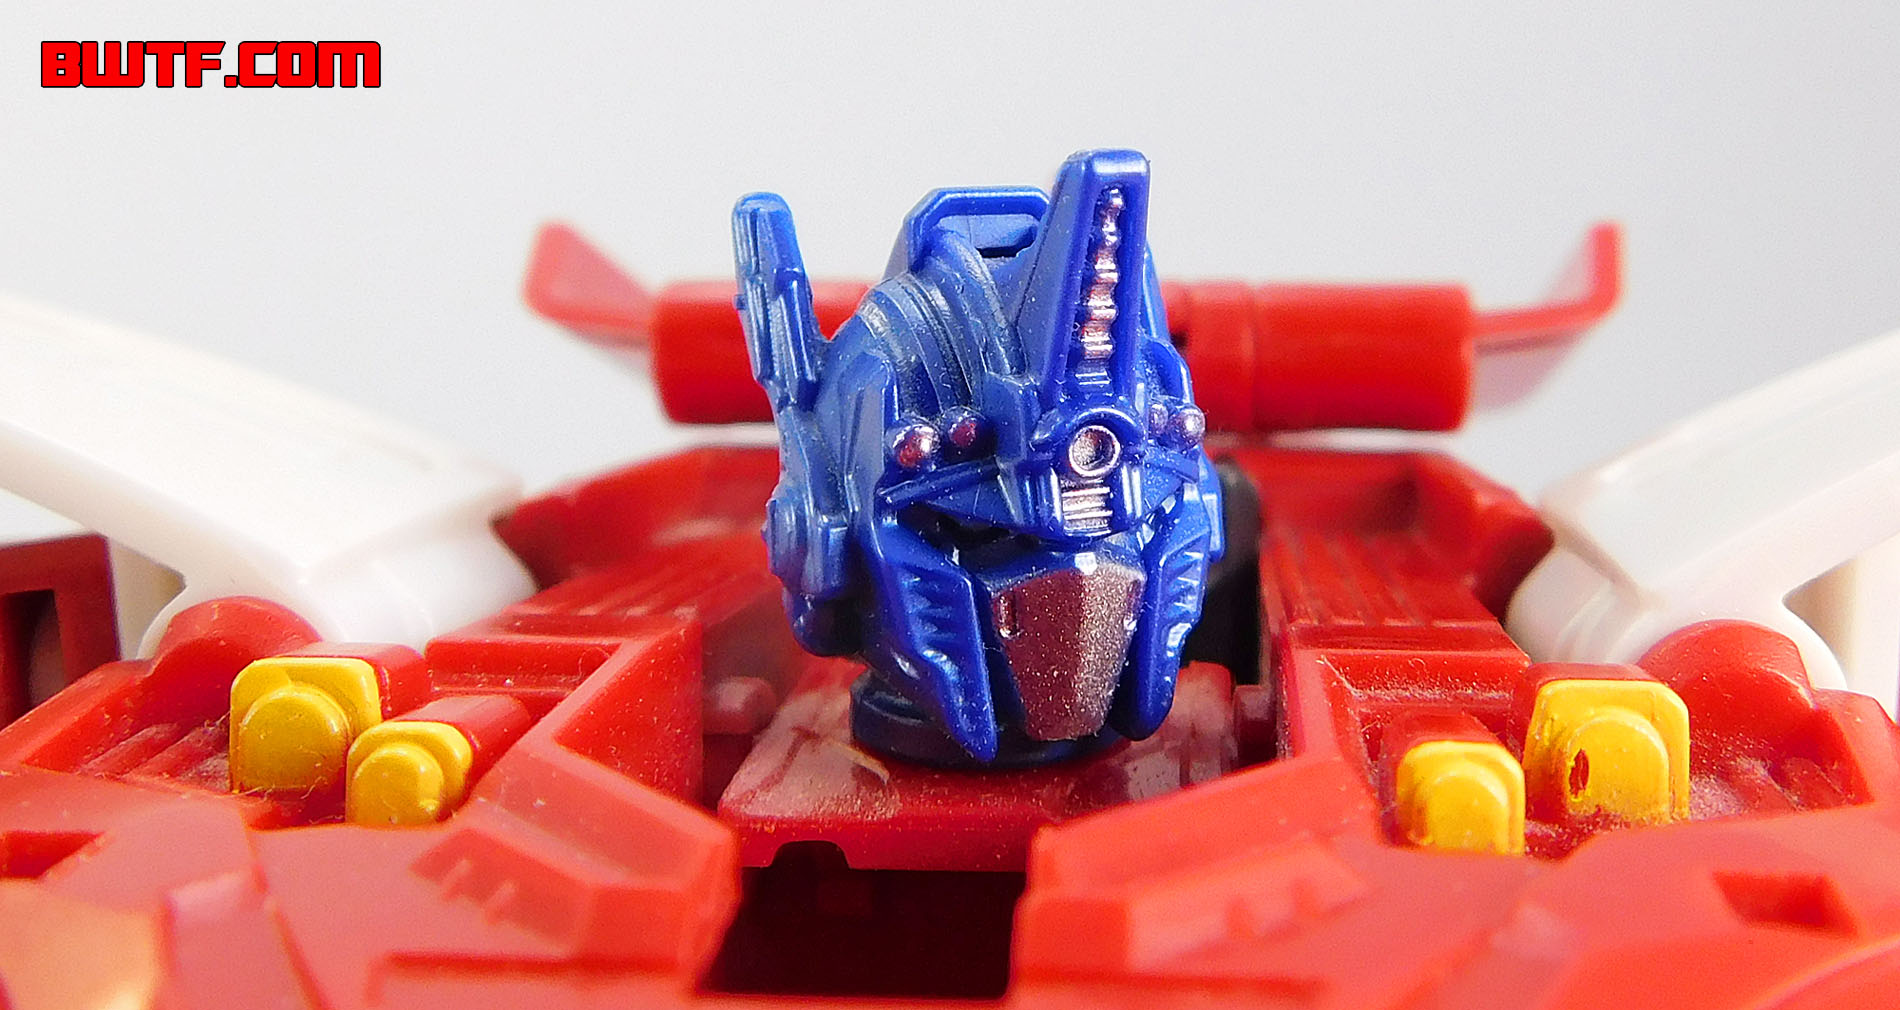
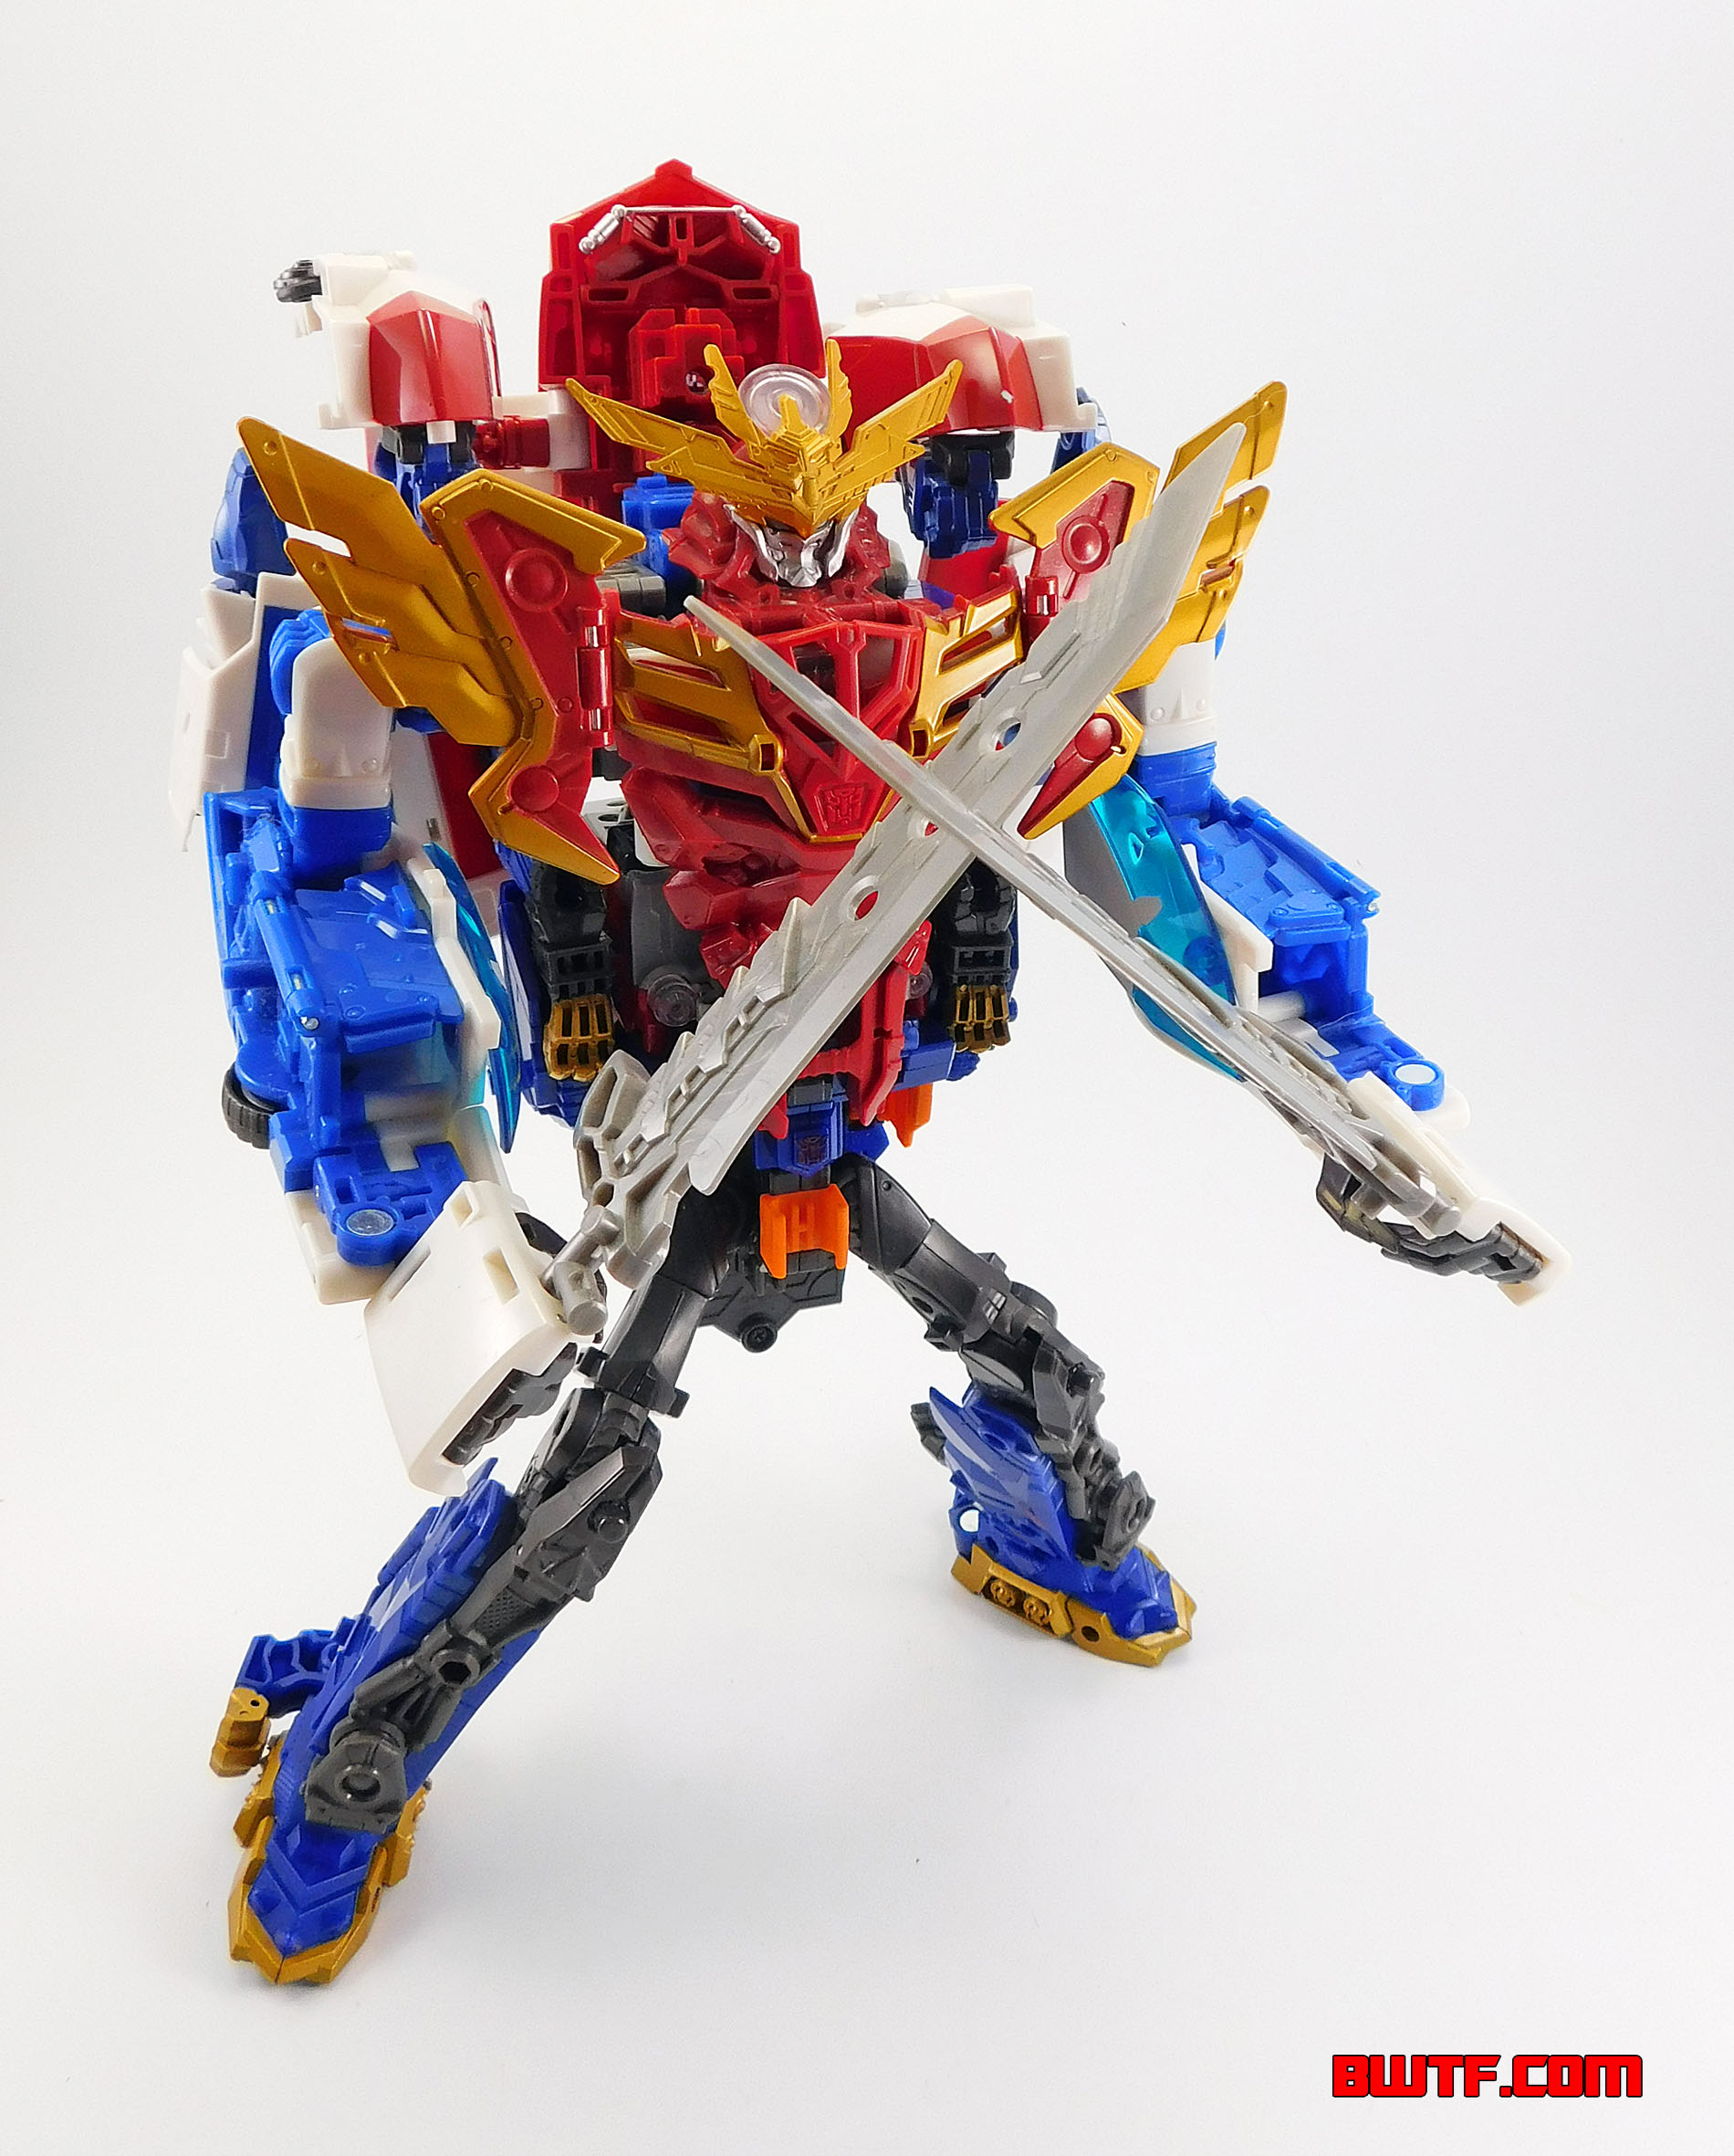
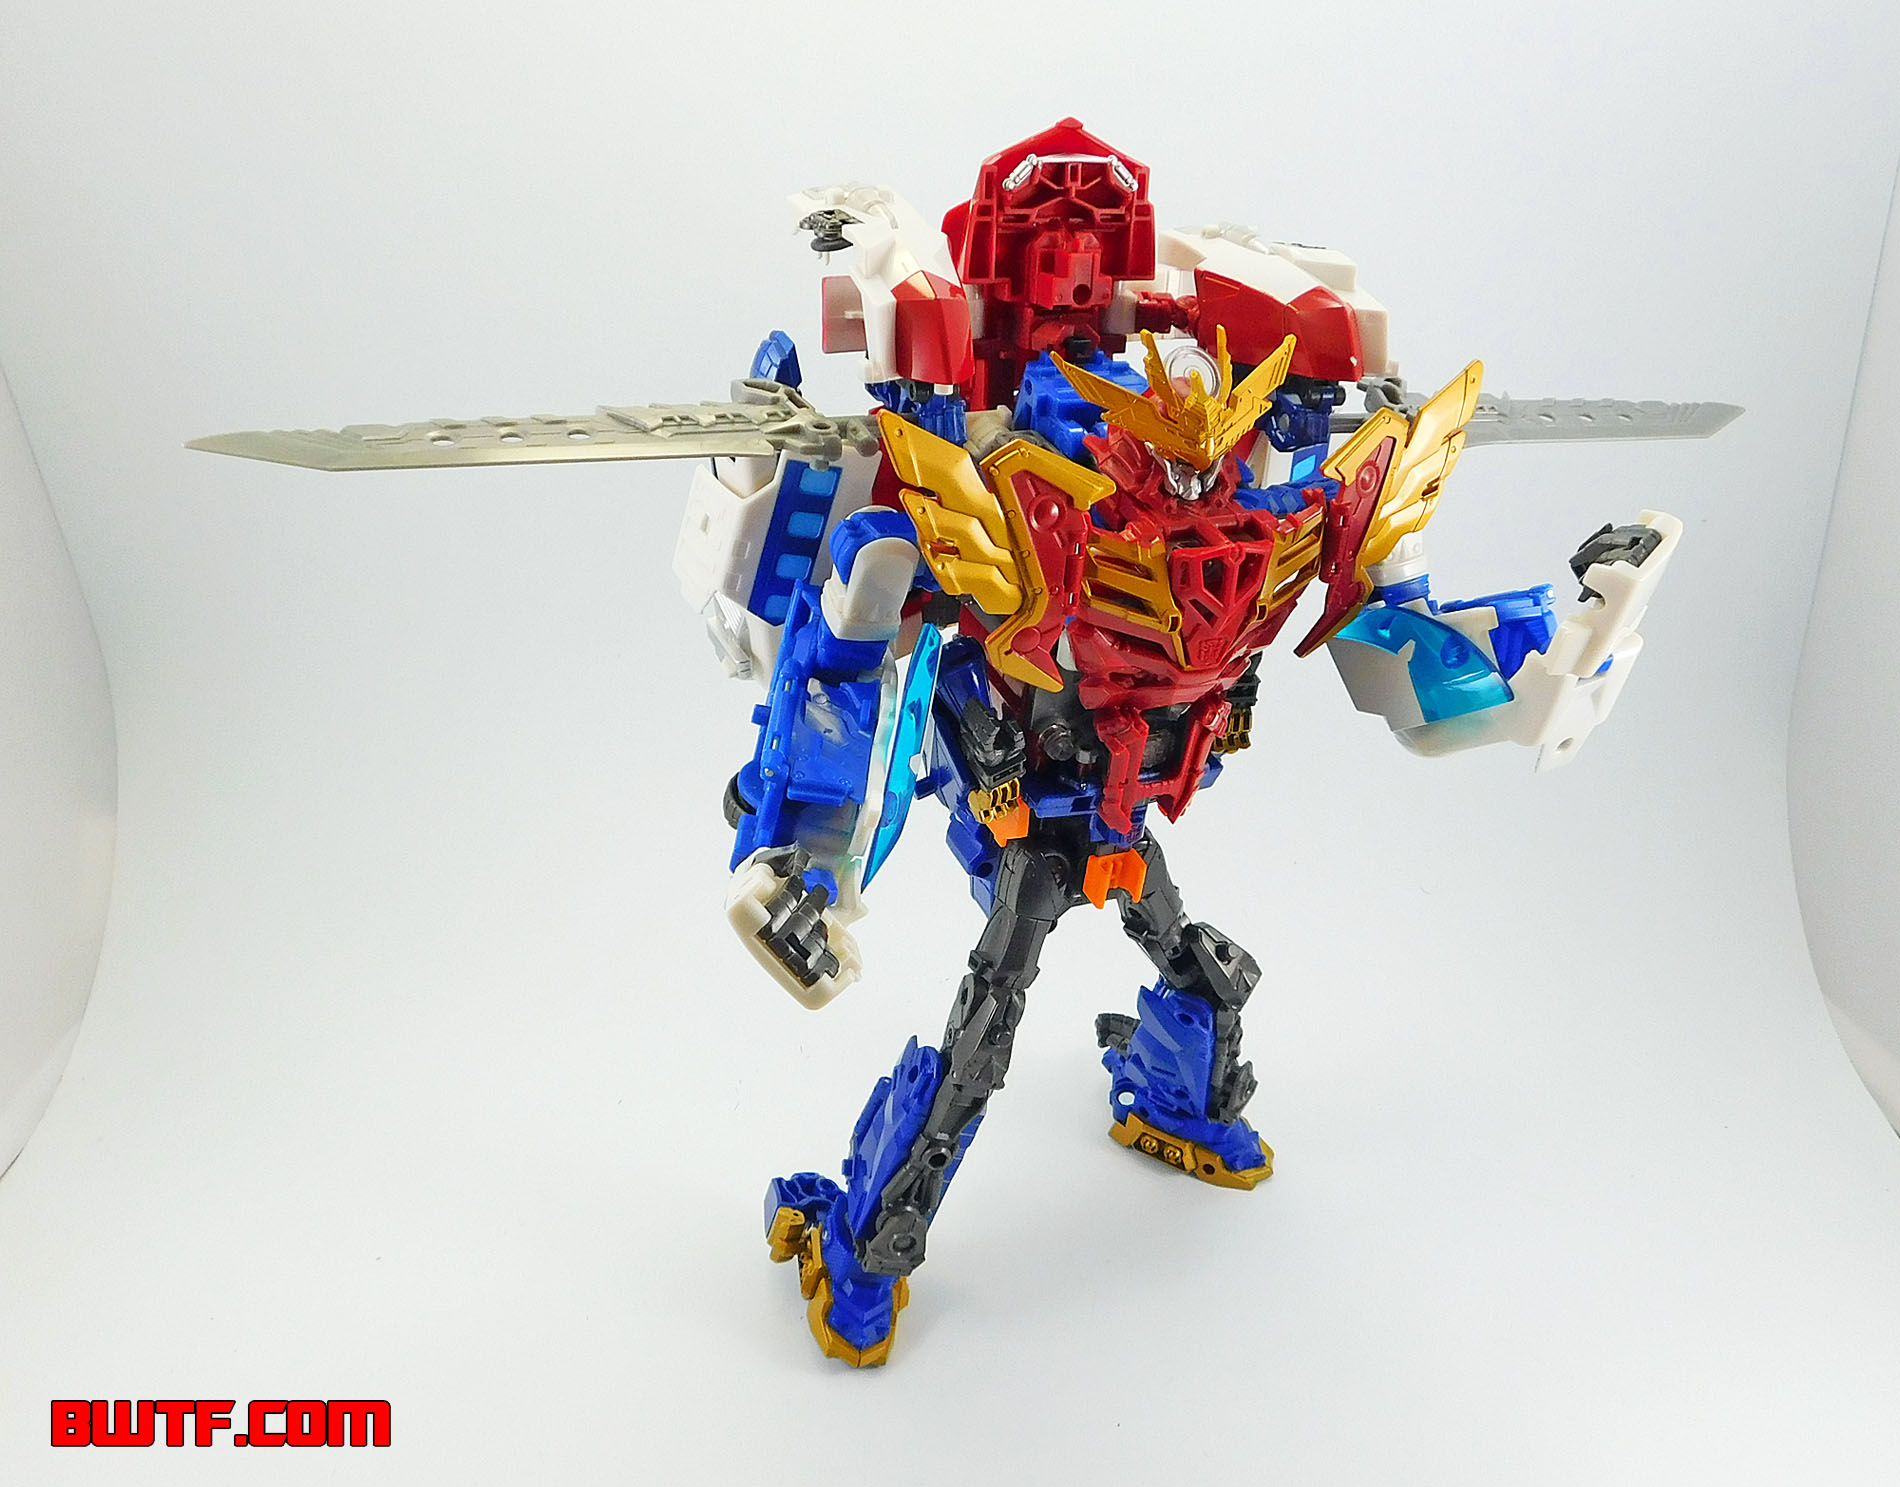
There are nineteen points of articulation on this figure. This includes four on each arm and five on each leg. The joints are all nice and tight, especially at the hips where they are ratchet joints. As mentioned in the "Accessories" section above you can have Optimus hold the Kabuto helmet pieces separately or together. The swords can also be held separately or in one fist as a double bladed weapon. You can also attach the helmet piece for DaiGekisou on the back. There are two round ports on it that connect to the two pegs on Optimus' back. In the middle of the body is an Autobot symbol that also acts as a button. Press it and the clear plastic lights up while the phrases cited above play. More than the vehicle mode, this gives you a good look at the lights that activate when the sounds play.
Transformation to DaiGekisou Torso (Starting in Robot Mode):
Note: This mode requires Gekisoumaru being in his head/torso/arms mode and Kenzan being in his leg/waist mode.
- Push the robot head down.
- Swing the chest panel up.
- Swing the waist panel up.
- Pull the upper and lower parts of the body apart and swing the lower section back.
- Swing the lower body half in and push it into the central body (as if you were changing it back to the vehicle).
- On each arm, rotate the halves of the vehicle's front end and swing out the dragon claws.
- Swing the top half of the body up and swing it back.
- On the silver section that forms the middle of the main body you will see two dark grey pieces. Swing them up.
- Swing the red panels on the back of the legs (with the train wheels on them) out.
- Swing the robot legs forward, using the blue tab on each leg to connect into the angled slot on the section next to the speaker.
- Point the feet down.
- On the bottom of Optimus, there is a large clip. This connects to grey the waist section formed by Kenzan.
- The torso/arms formed by Gekisou attach to Optimus via the orange clip on the torso sliding into the dark grey column on Optimus.
- Swing the claw arms down over the parts of the chest that angle out to the sides.
- Swing up Gekisoumaru's head.
- Connect DaiGekisou's helmet/chest armor over Gekisoumaru's head and the sides of the torso. The clear peg on the back of the helmet connects to a corresponding port on the bottom of Optimus' chest section. Near the claws are clips that slide into slots on Gekisoumaru.
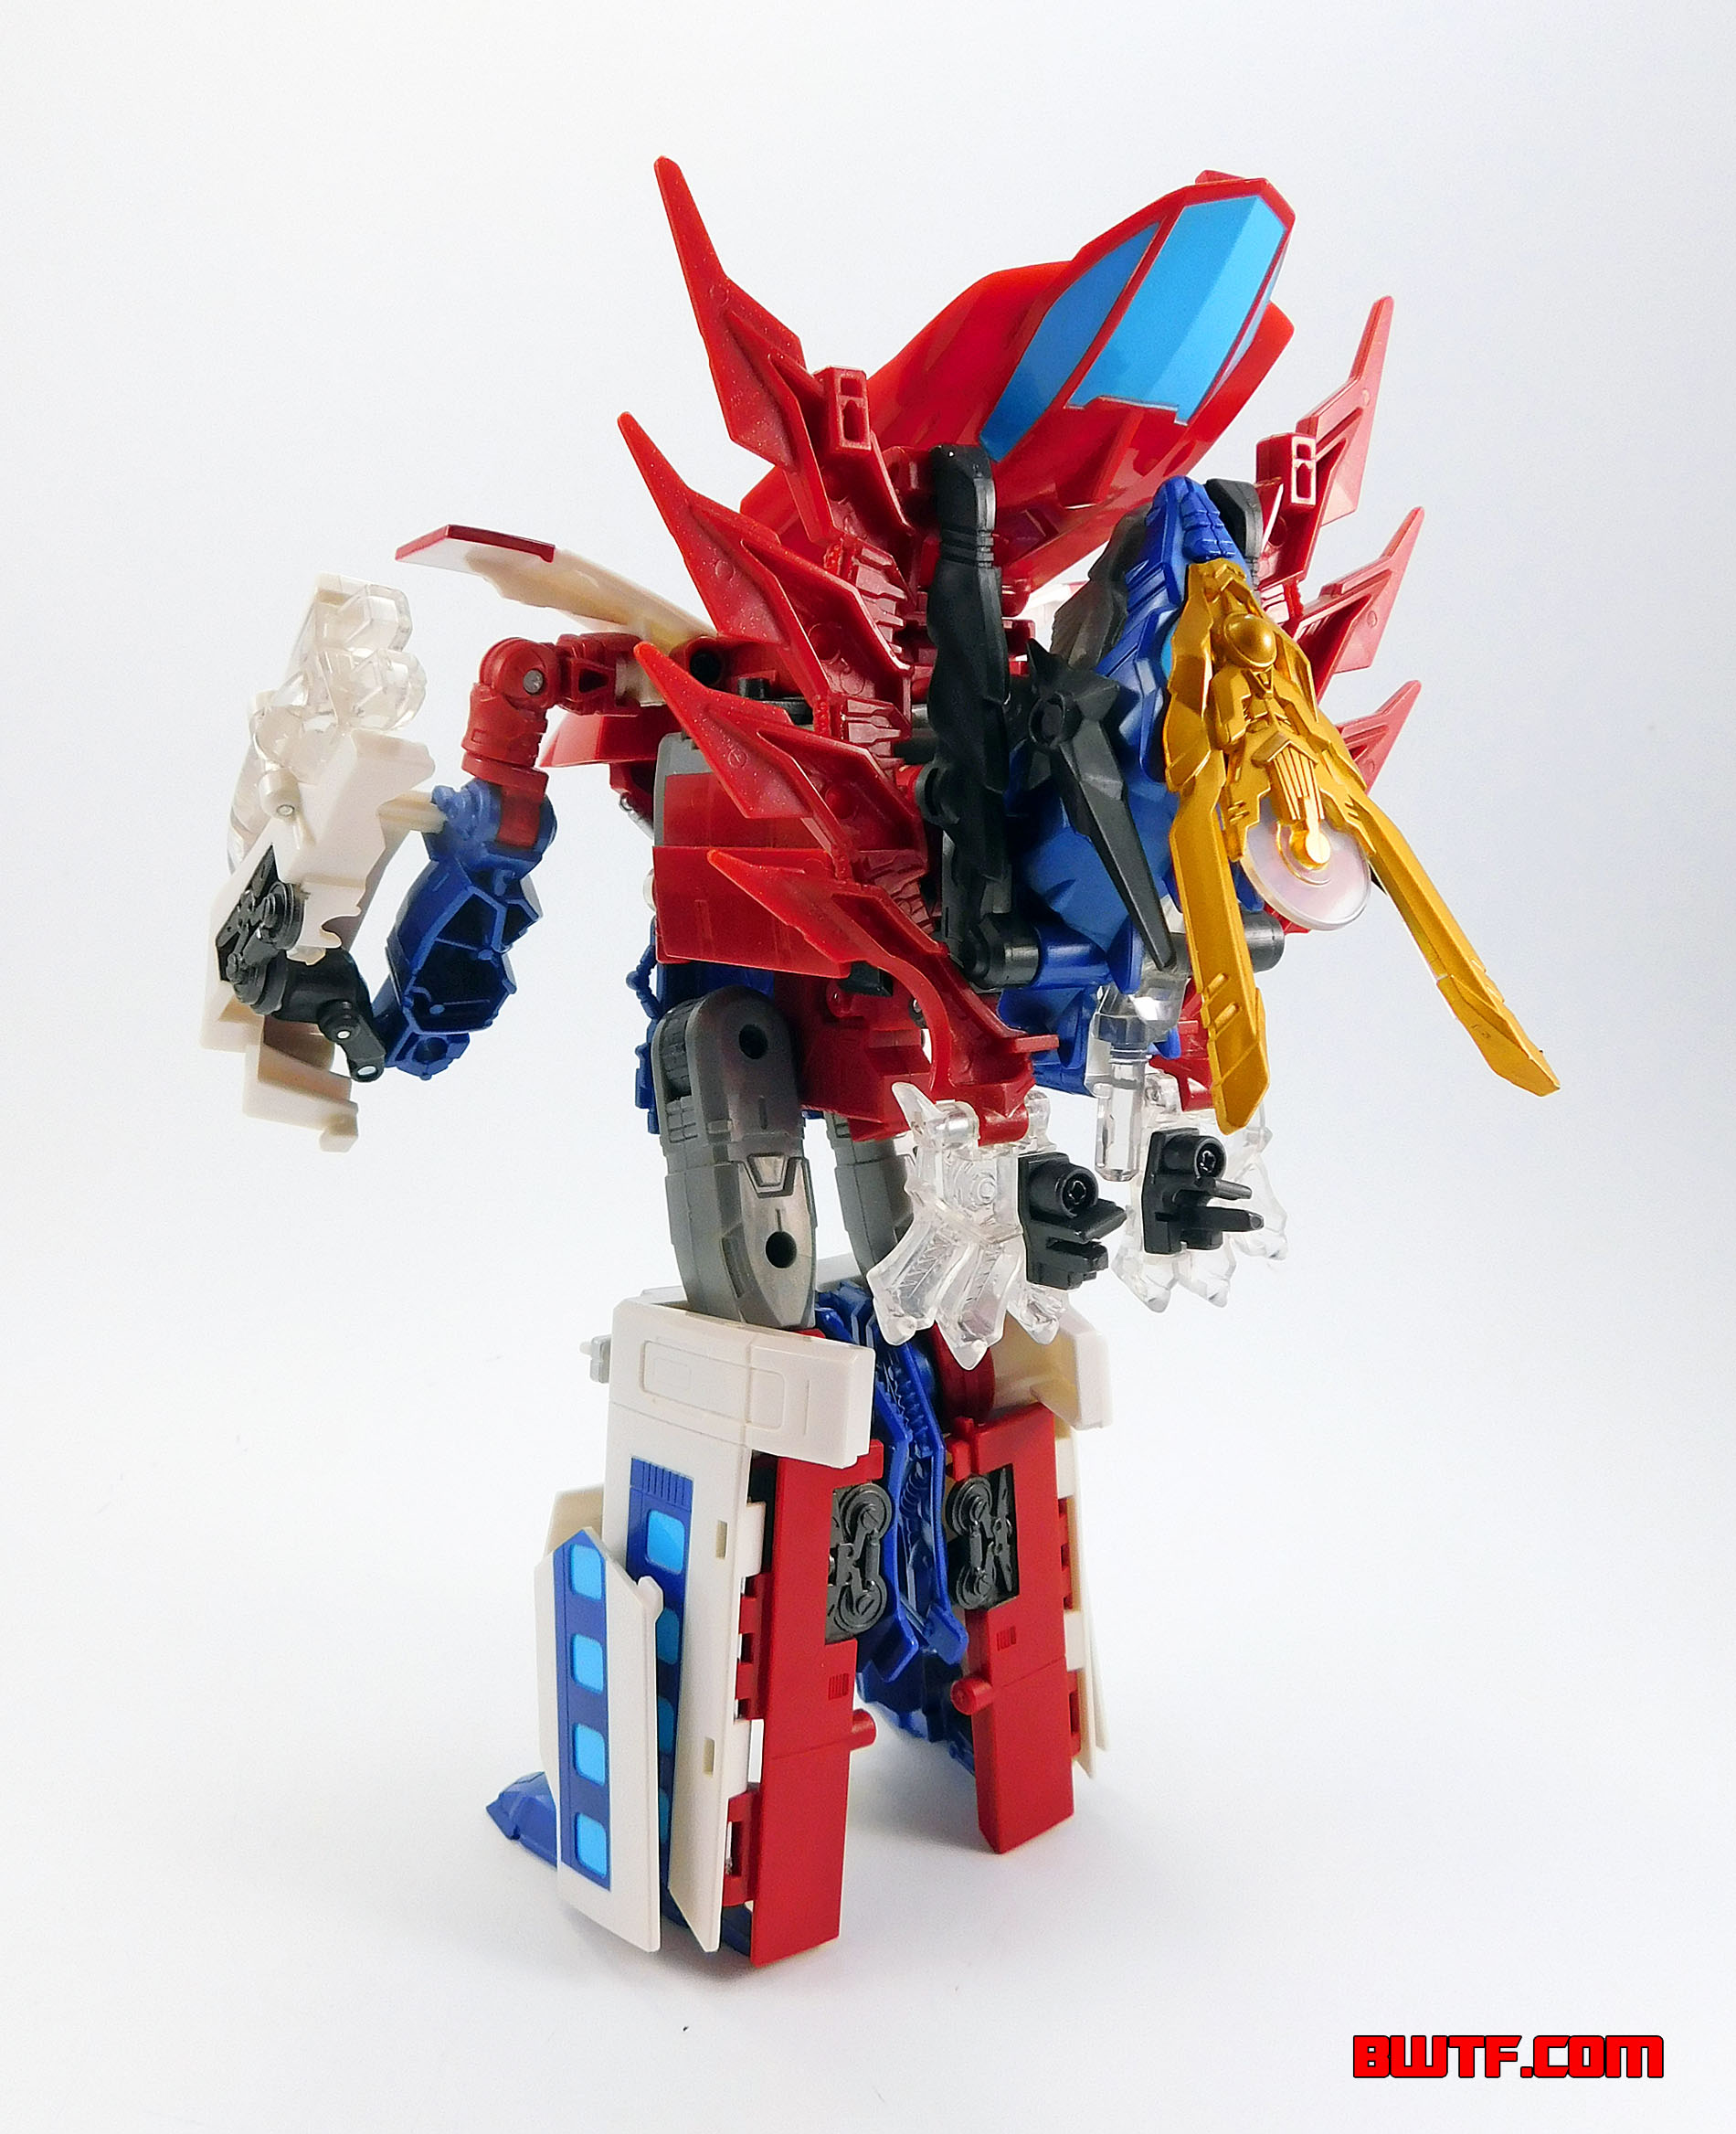
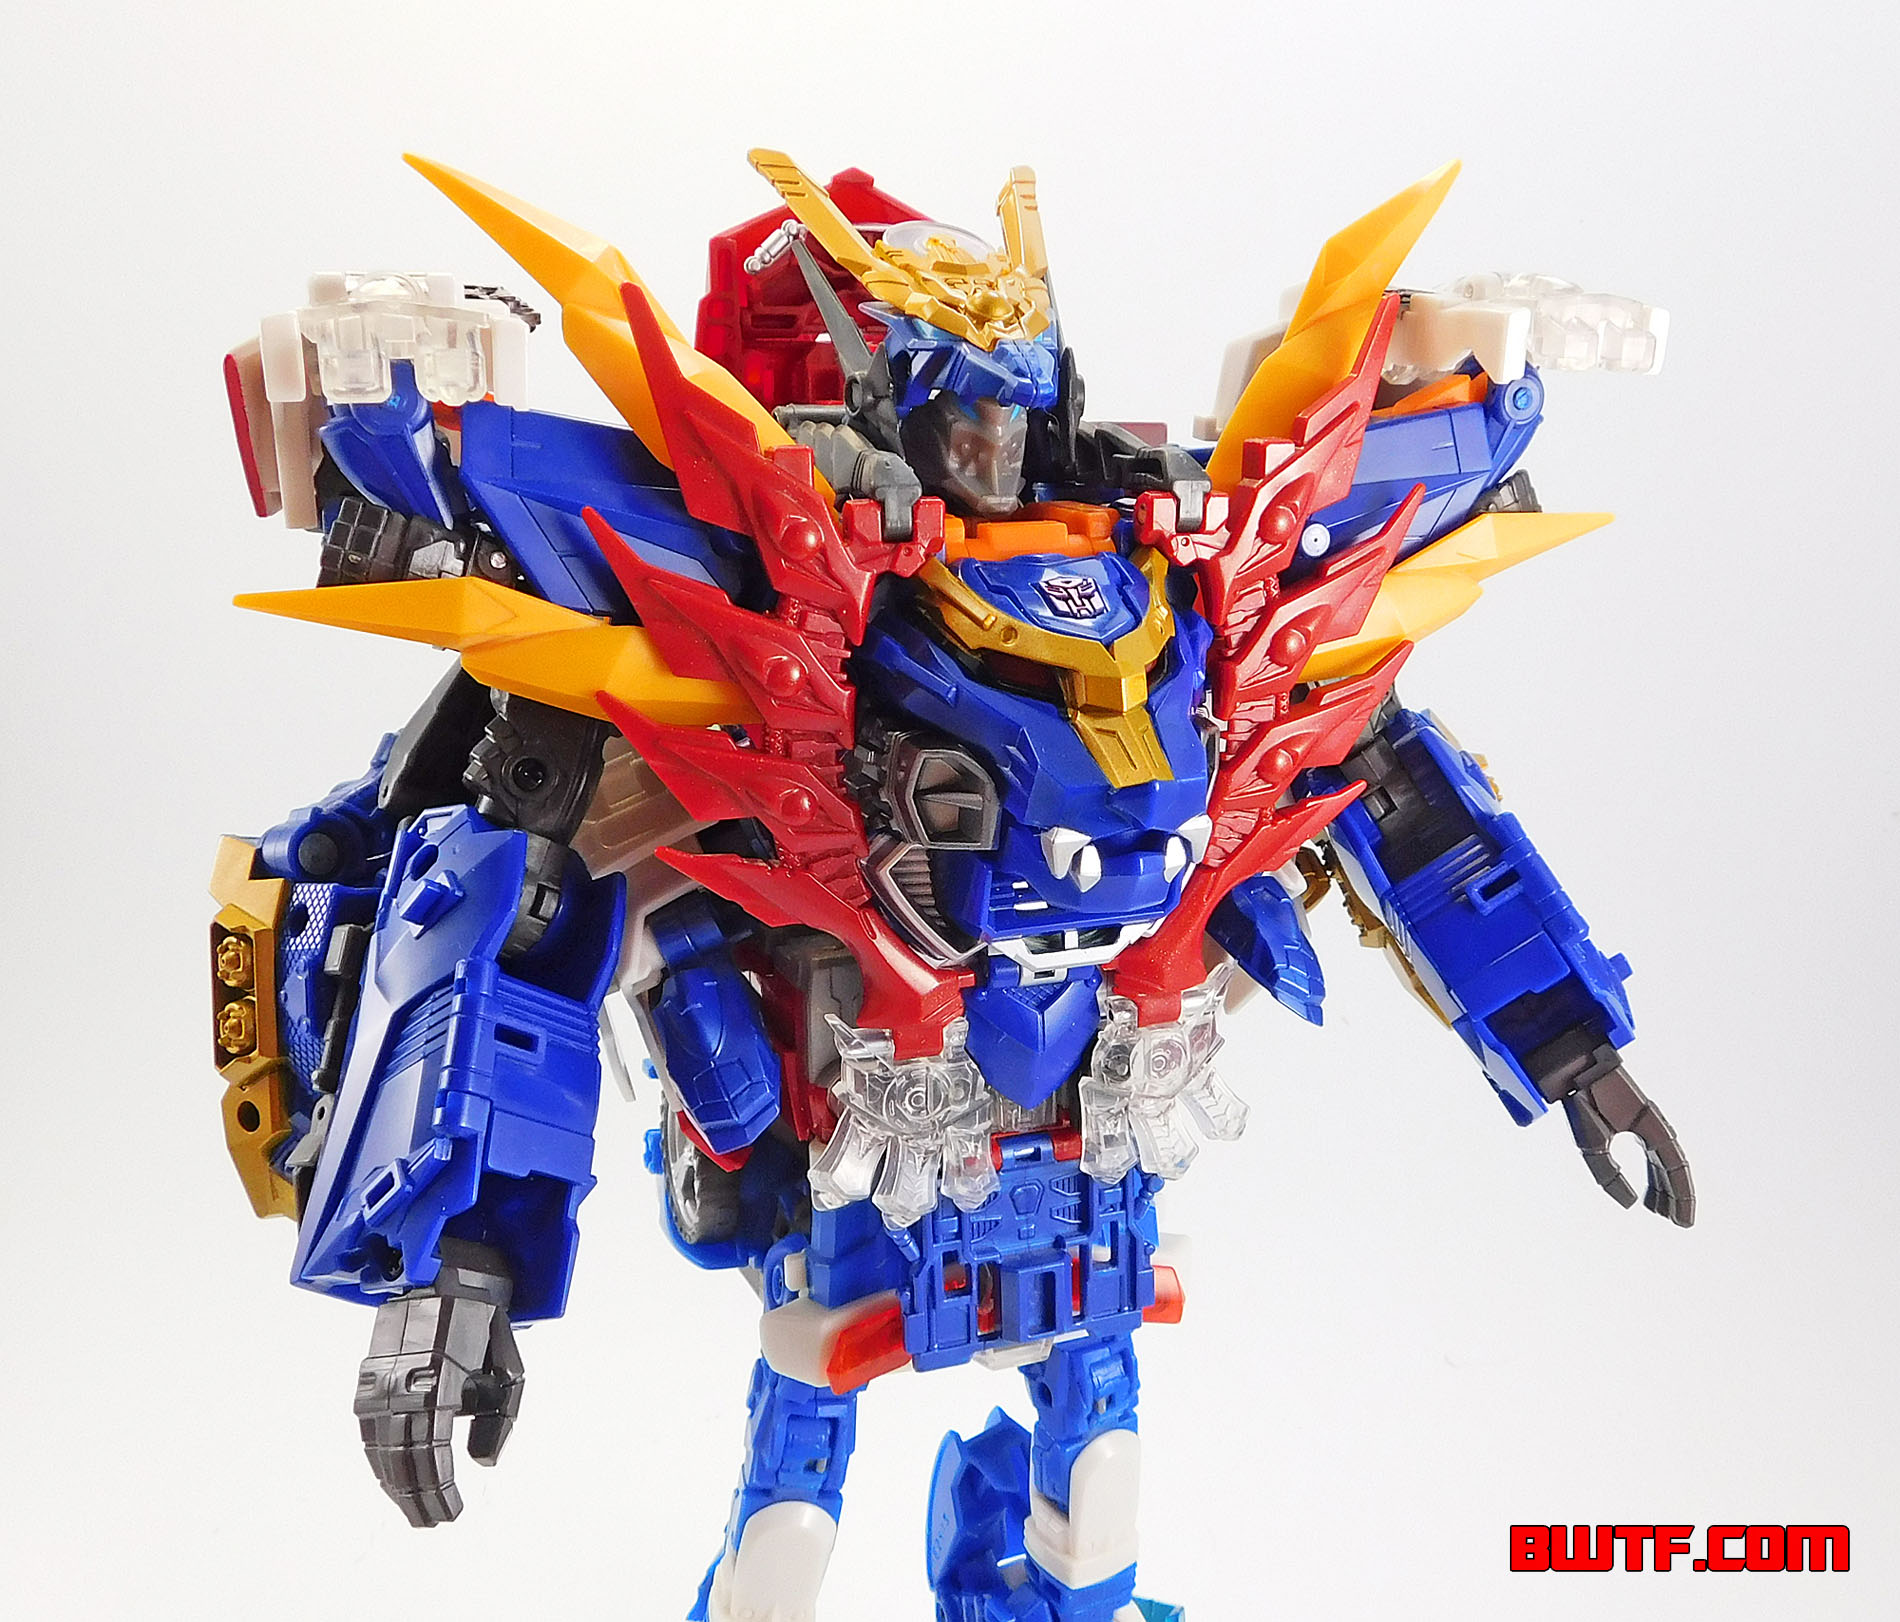
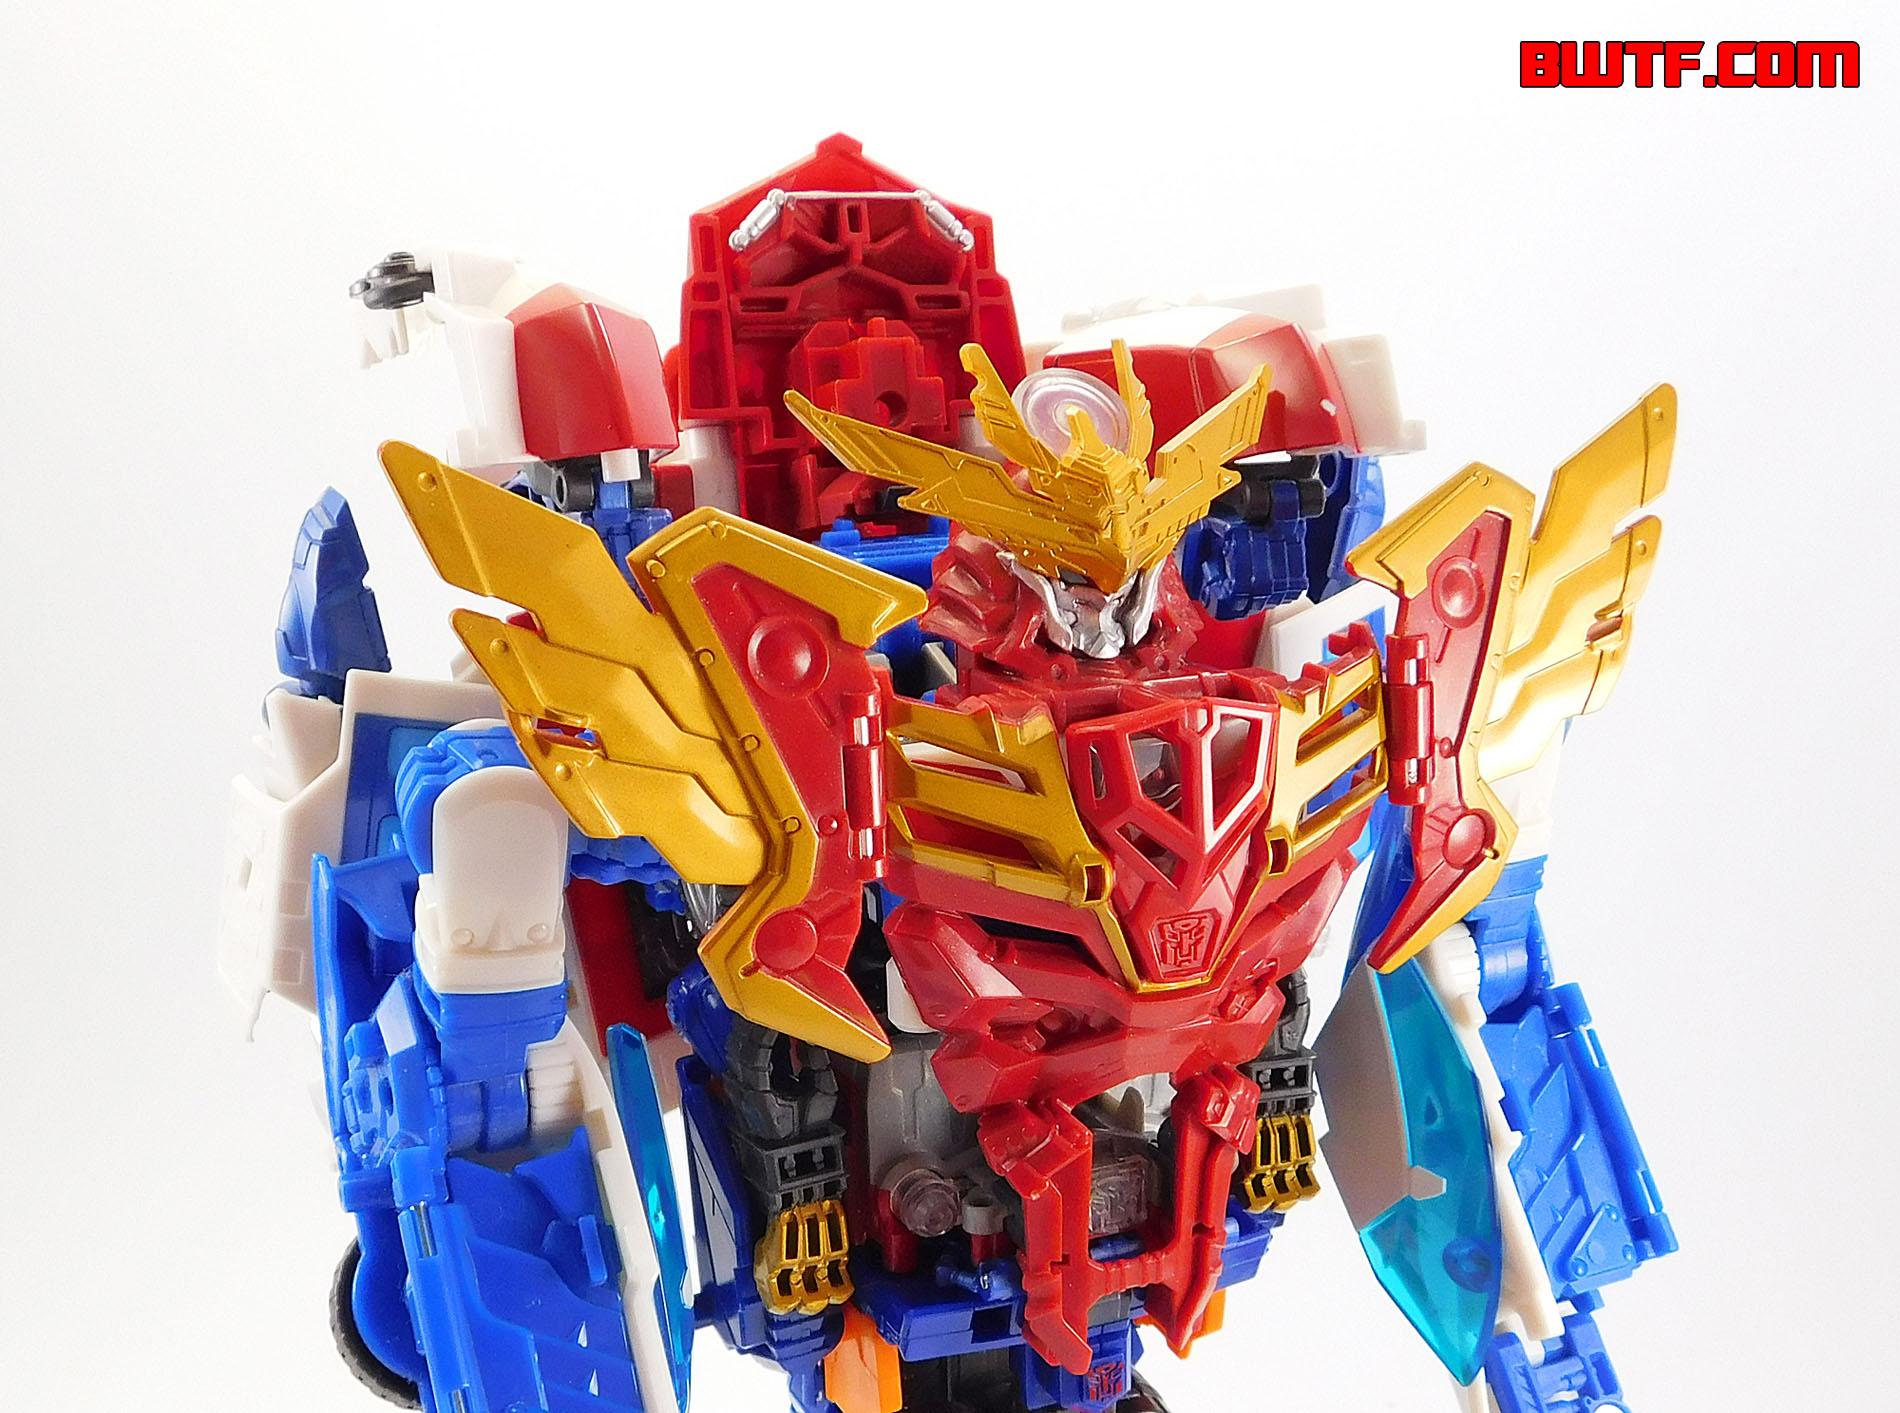
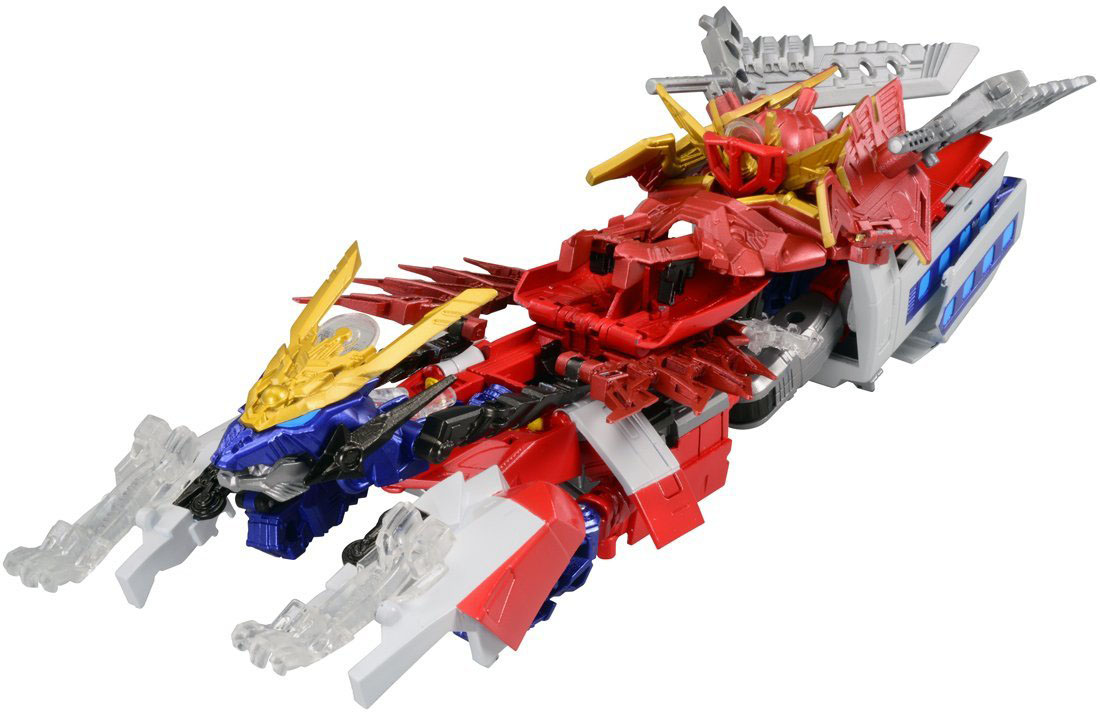
DaiGekisou
DaiGekisou (basically "Big/Giant Gekisou") is a really fascinating Combiner. First off, there are not a lot of Combiners that are formed from three characters combining (more common are Combiners in teams of five or six robots). The result is uneven (to say the least). A large majority of the bulk on this figure is formed by Gekisoumaru and Optimus Exprime, so he is very top heavy.
Meanwhile the waist and legs are formed entirely by Kenzan, so they wind up being somewhat skinny in comparison. The result is a Combiner that looks out of proportion when you compare the top of the body to the bottom. This affects not only the aesthetics but also the balance of the figure. It is a bit of a challenge to get DaiGekisou to stand properly. Your best bet is to point the feet forward for balance. Otherwise, even with ratchet joints on the hips and knees he tends to bend forward or back and fall over.
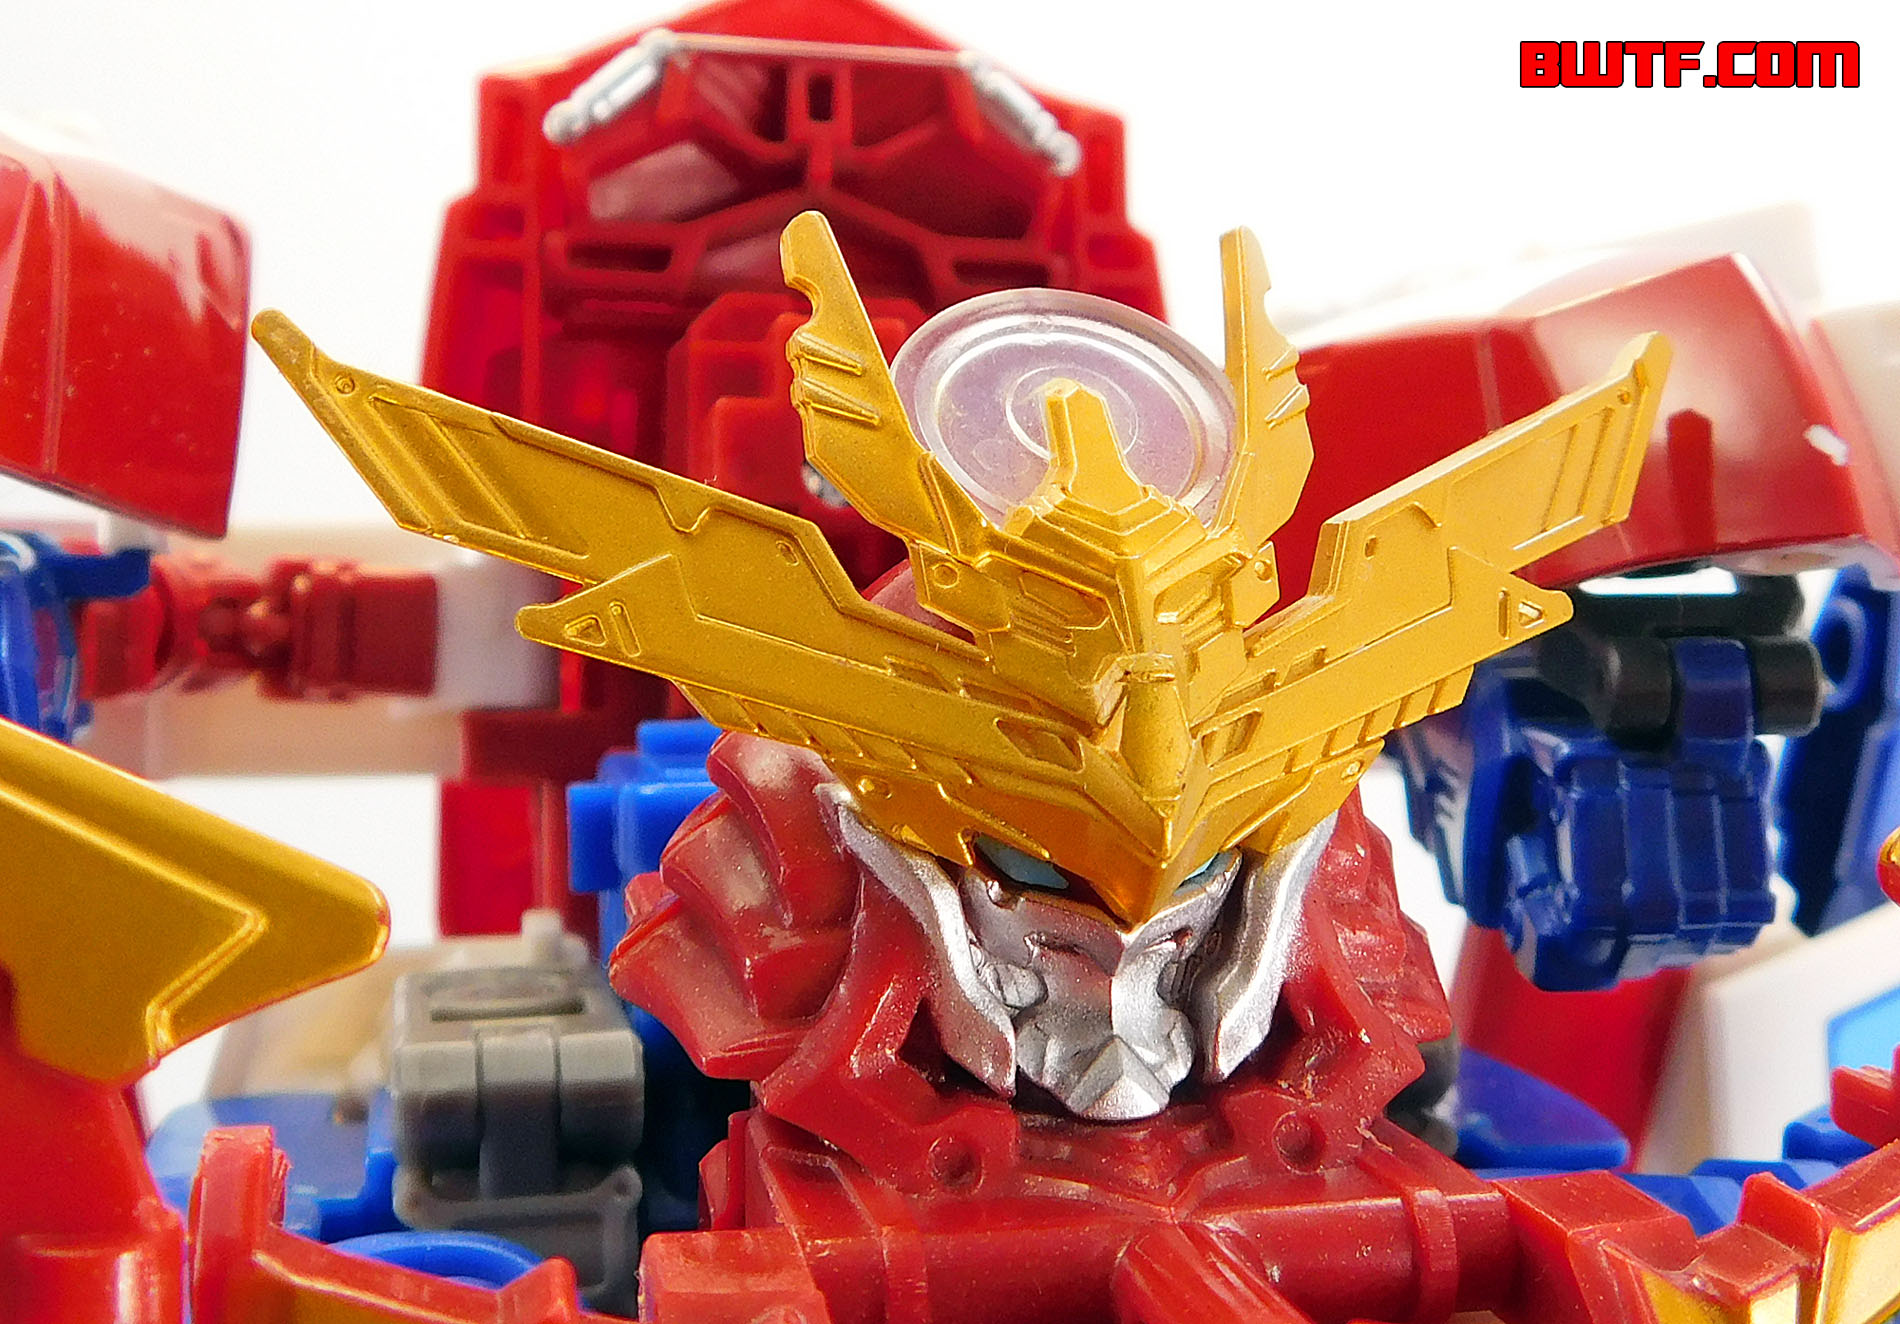
However, the figure is not completely without merit. Putting aside the "skinny legs" he actually looks awesome from the waist up! Seriously, the aesthetic of this figure is very different from your typical Transformers figure. The way the armor forms around the lion head on the torso looks like a metallic mane. The dragon head/Kabuto helmet aesthetic looks like it could have come from a totally different toy line (and I say that as a compliment) and the bulkiness of the upper body definitely conveys a certain amount of strength.
The colors on this combined form work really well together. The main plastic colors are a combination of dark blue, red, yellow, silver, dark grey, white and blue. Gold and silver appear on the chest while the eyes are painted light blue. When you just hear it described it sounds like the colors would be a bit too much together, but they work surprisingly well.
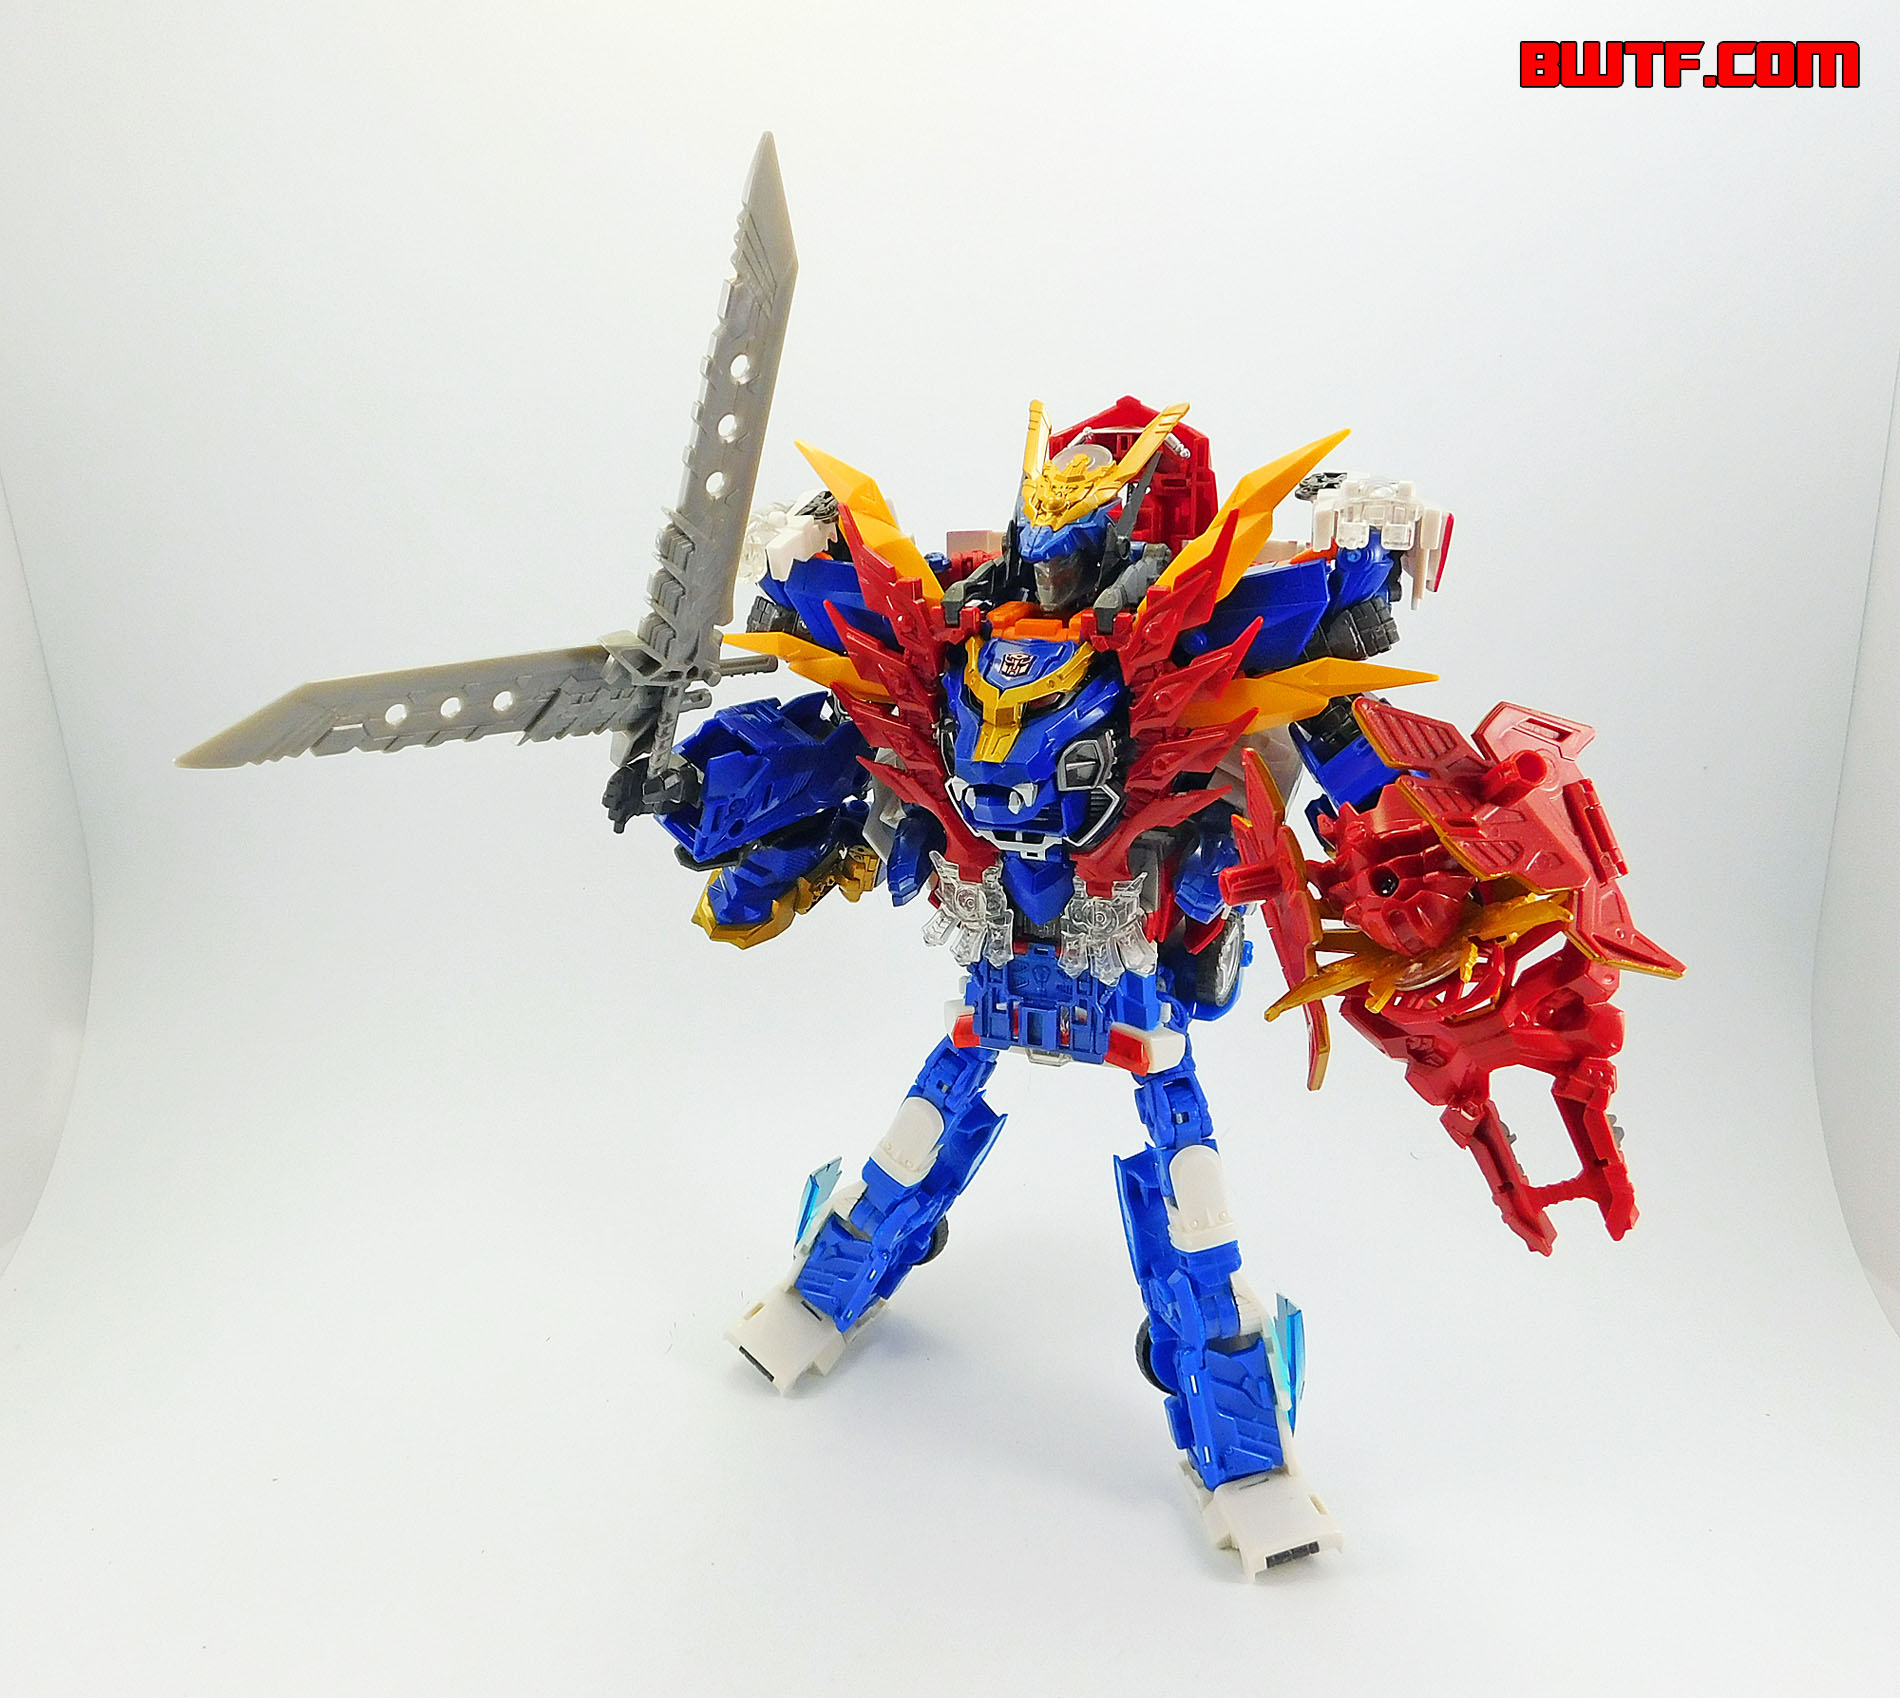
There are eighteen points of articulation on this figure. However only the four on each arm are actually useful. Unfortunately, DaiGekisou really cannot stand if you try to pose the legs. The hands each have 5mm ports on them, allowing DaiGekisou to hold the swords either combined or separate. He can of course also hold the other Kabuto helmet section as a shield.
As with the other modes, Optimus Exprime has several sounds that can be played in this form. When you first combine the figures Optimus yells out "Transform!" and you hear the classic G1 transformation sound. The other major sound happens when you connect the chest armor. Push the tab into the right side (near the hip) and a sound plays with lights. Continue to press the button on the waist area and more sounds play. Here's a list:
- "Kabuto souchaku!"
"Renketsu Sanjou Gattai! Dai-Dai-Daigekisou!" (Helmet equipped! Linked Tri-Vehicle Fusion! Dai-Dai-Daigekisou!) - "Daigekisou! Sanjou da zee!" (Daigekisou is here!)
- "Sono kokoro, uketometa!" (I accept your heart!)
- "Yatte yaru ze!" (Let's do this!)
- "Oretachi ha itsudemo kimi no soba ni iru ze!" (We'll always be by your side!)
- "Let's do this! Tri-vehicle ninja art! Strike-Strike-Strike Slash X-Drop!" (Let's do this! Tri-vehicle ninja art! Strike-Strike-Strike Slash X-Drop!)
Press the button on Gekisoumaru and the eyes on the chest light up and the following sounds play:
- "Shinobi no hiden, geki-shou-sen, oboete kure yo na!" (Remember the shinobi secrets: ferocity, flight, and concealment!)
- "Shinobi ninpou, Oni Taiji!" (Shinobi ninja art: Oni Extermination!)
- "Ore ha chi no shishi-nin, Gekisoumaru!" (I am Gekisoumaru, lion ninja of the land!)
Again, I love the touch of these sounds. It adds character and life to the figure and I appreciate the figure playing different sounds in this mode than Optimus Exprime plays when not combined.
Transformation to DaiKenzan Torso (Starting in Robot Mode):
This form requires Gekisoumaru being in his waist/leg mode and Kenzan being in his upper body mode.
- Push the robot head down.
- Swing the chest panel up.
- Swing the waist panel up.
- Pull the upper and lower parts of the body apart and swing the lower section back.
- Swing the lower body half in and push it into the central body (as if you were changing it back to the vehicle).
- Point the feet back.
- Swing each leg out to the sides, then up at the knees to form an "L" shape.
- Rotate each of the arms around so the front halves of the train face forward.
- Swing the chest/arm section back.
- Swing the blue waist piece down and back.
- Attach the orange clips on Gekisoumaru to the blue section on the bottom of Optimus Exprime's waist section.
- Connect the clips on the bottom of Kenzan's chest form onto the corresponding section on Optimus Exprime.
- Attach DaiKenzan's helmet/armor by connecting the clips to the base piece around Kenzan's head and by pushing the bottom of the armor into the waist using the clips.
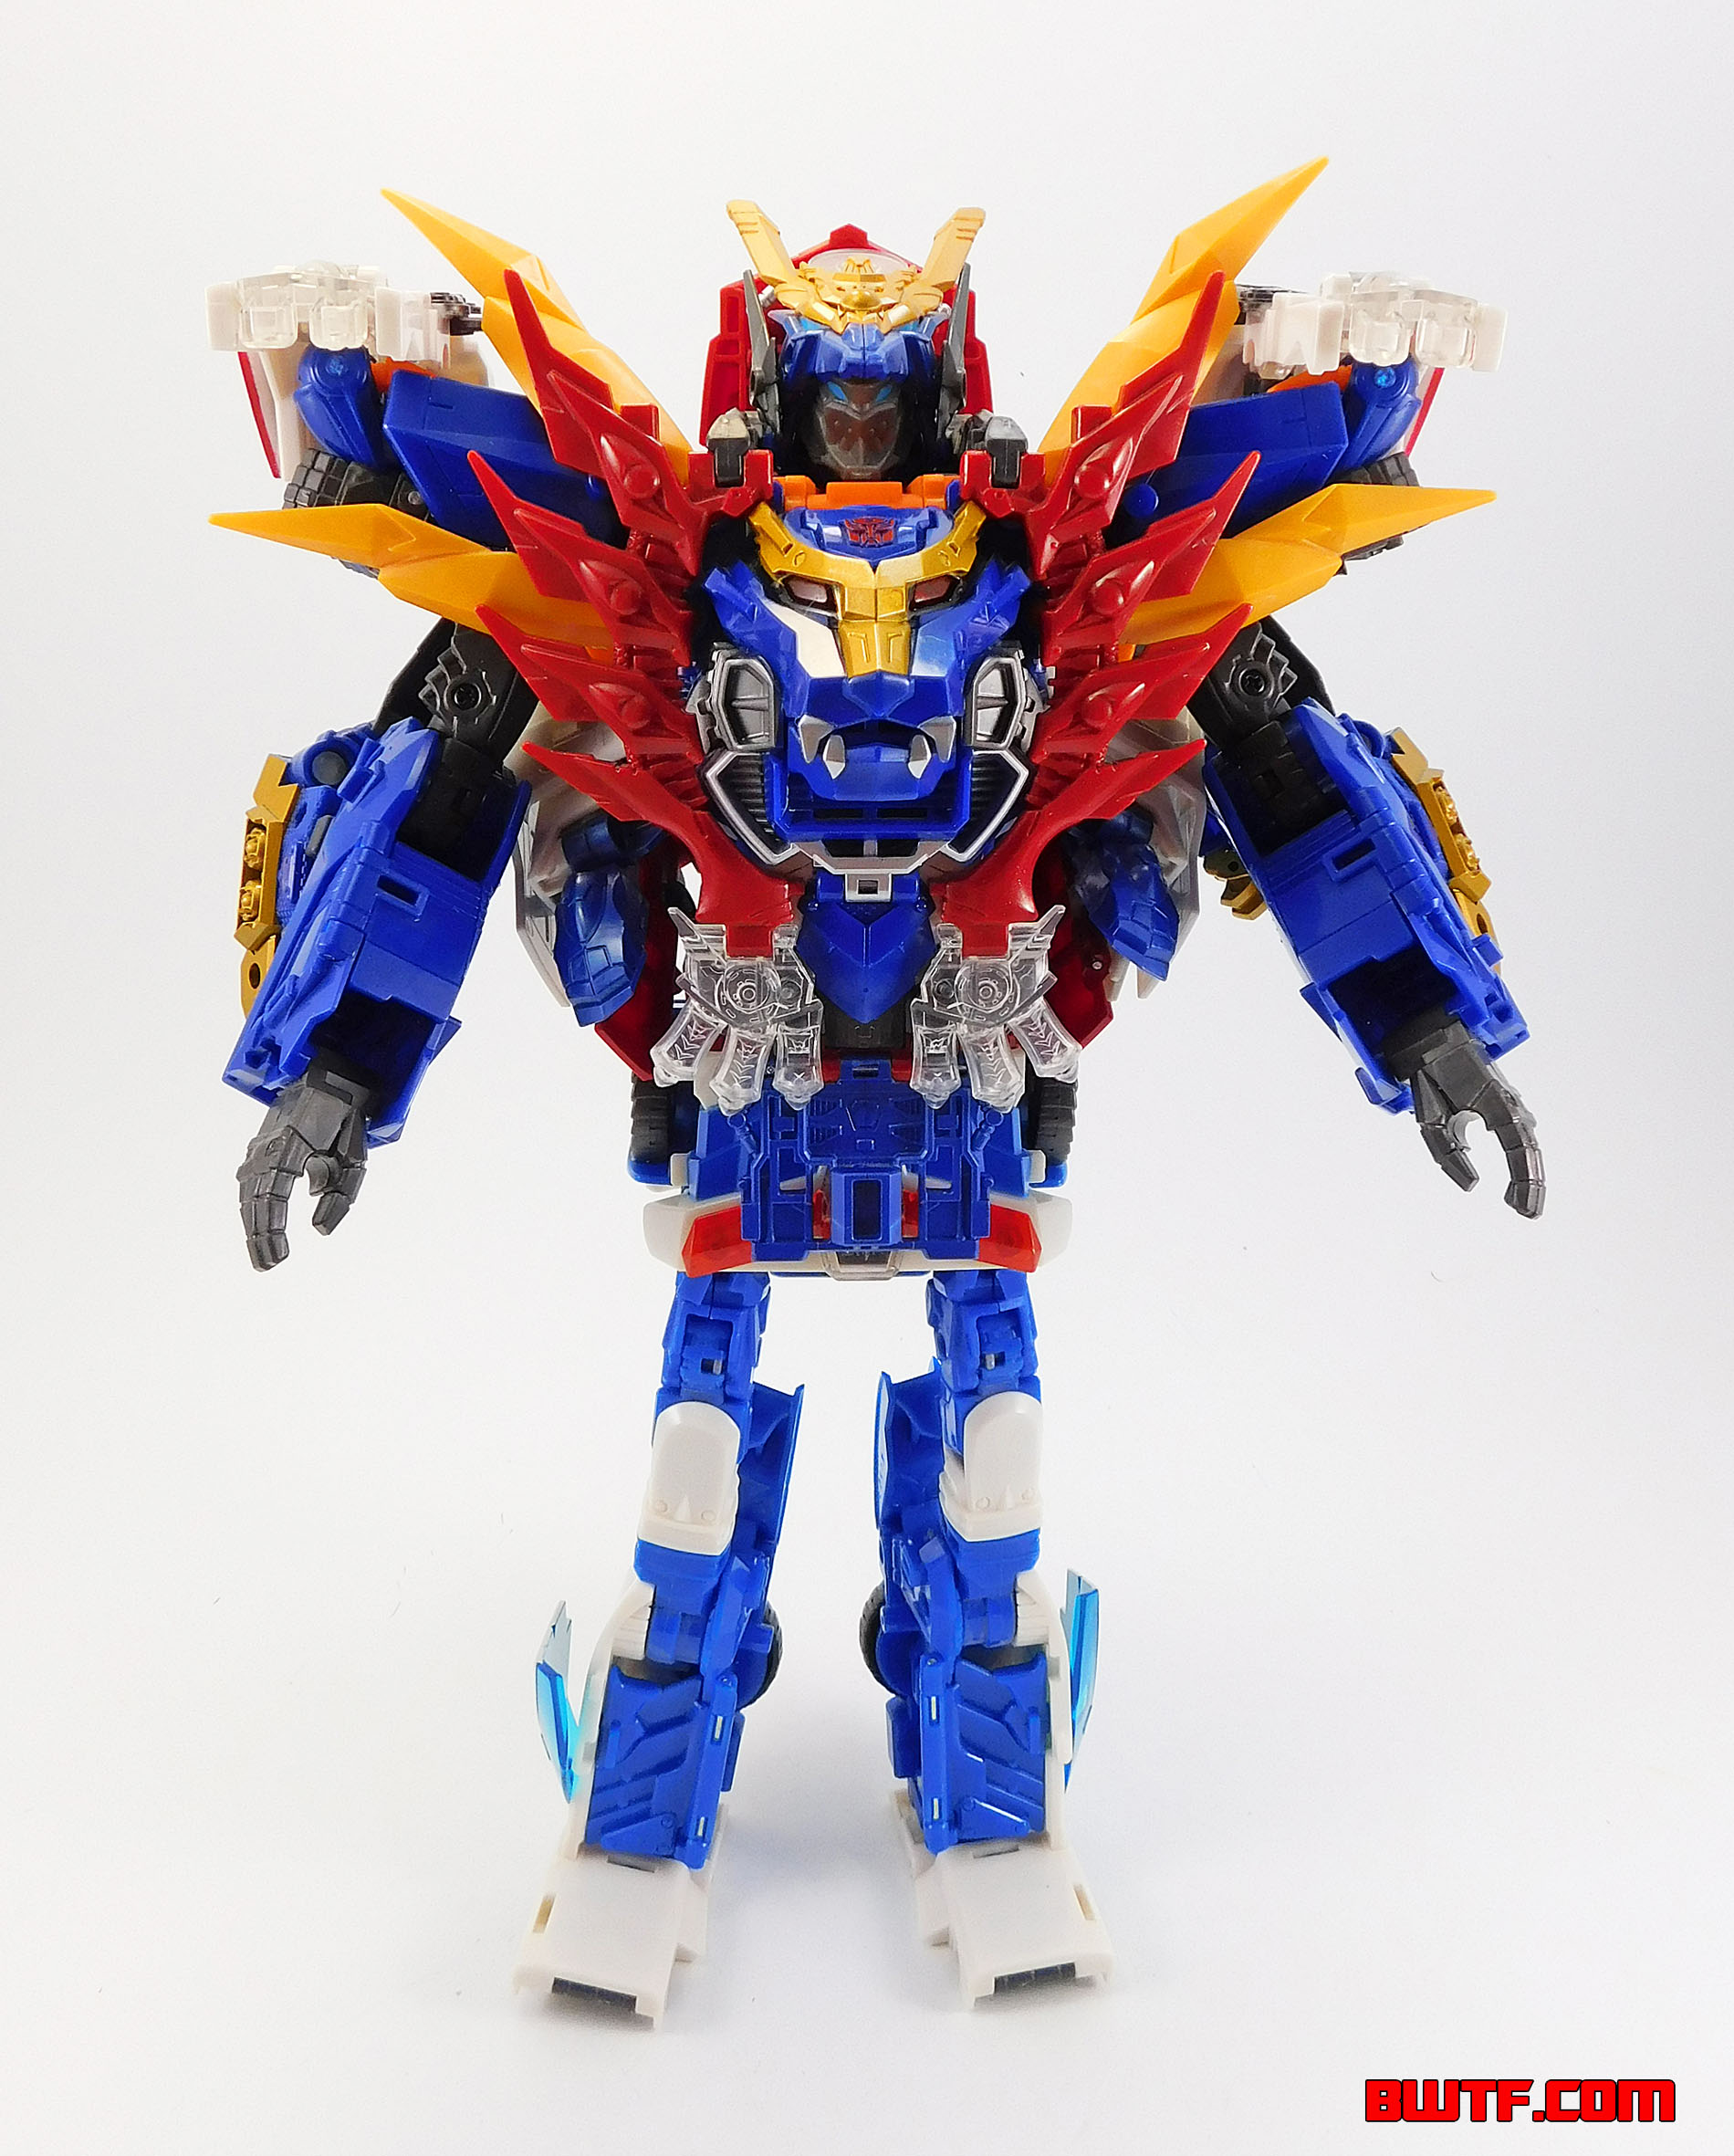
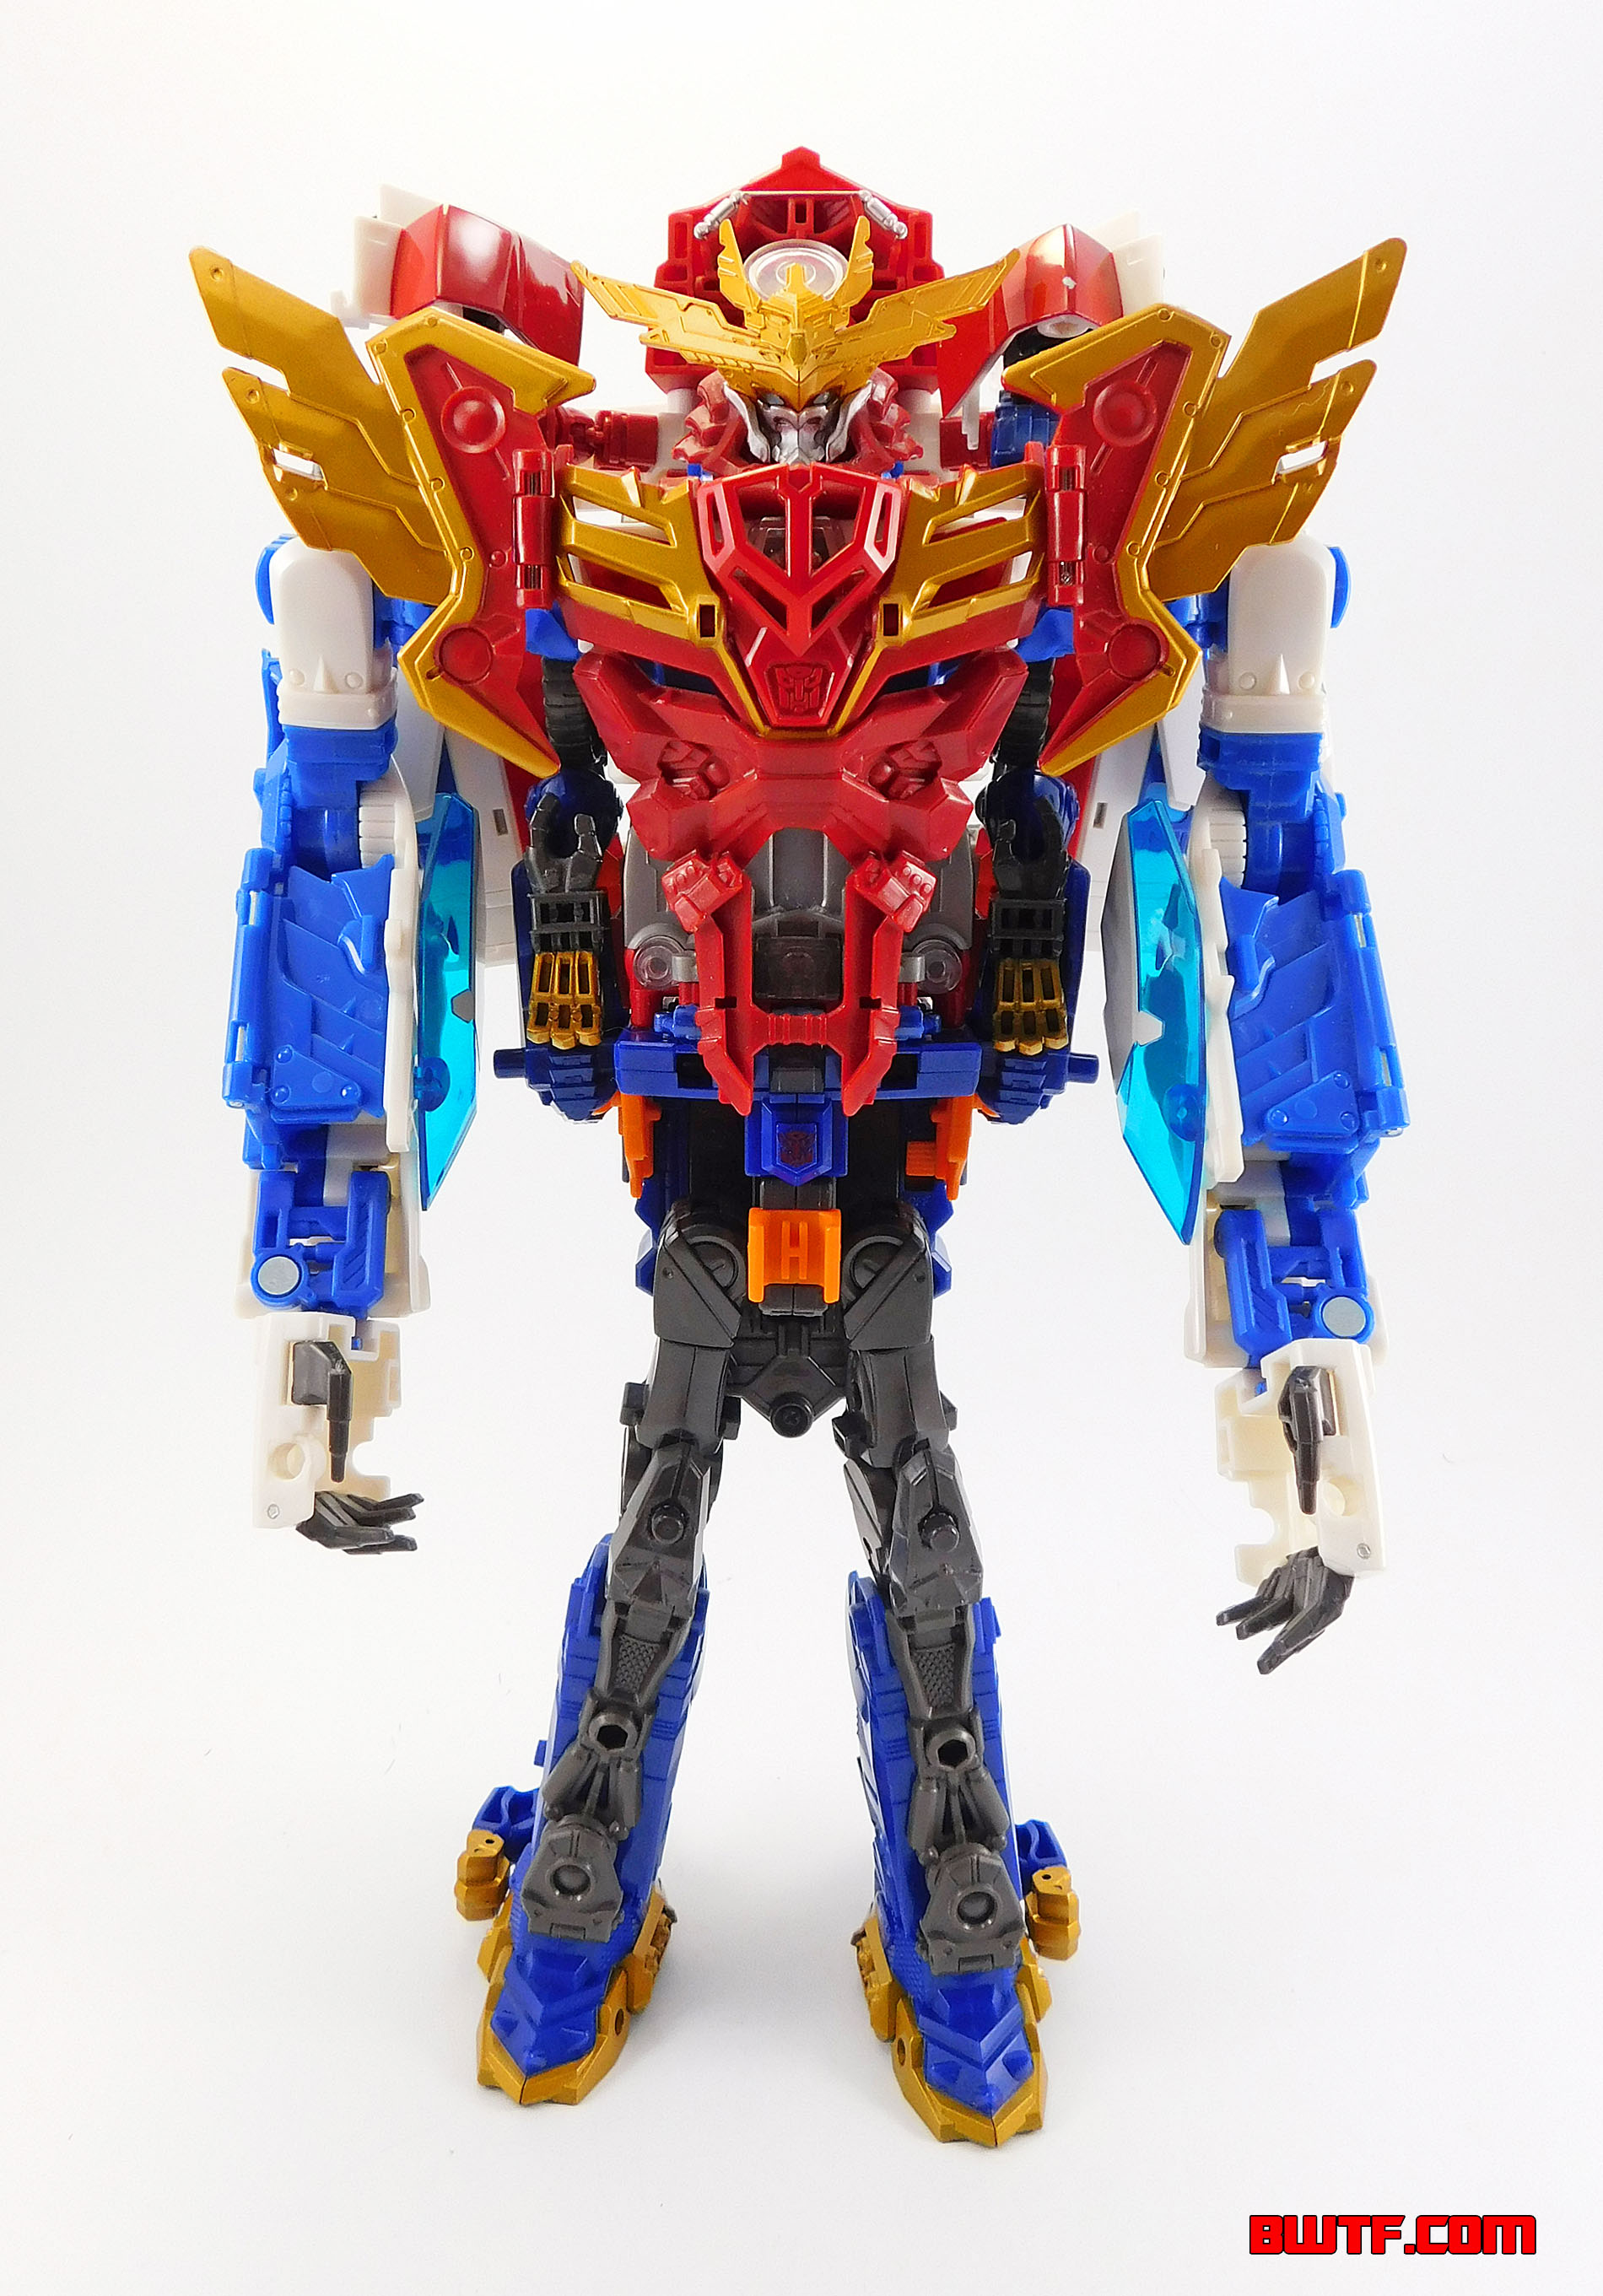
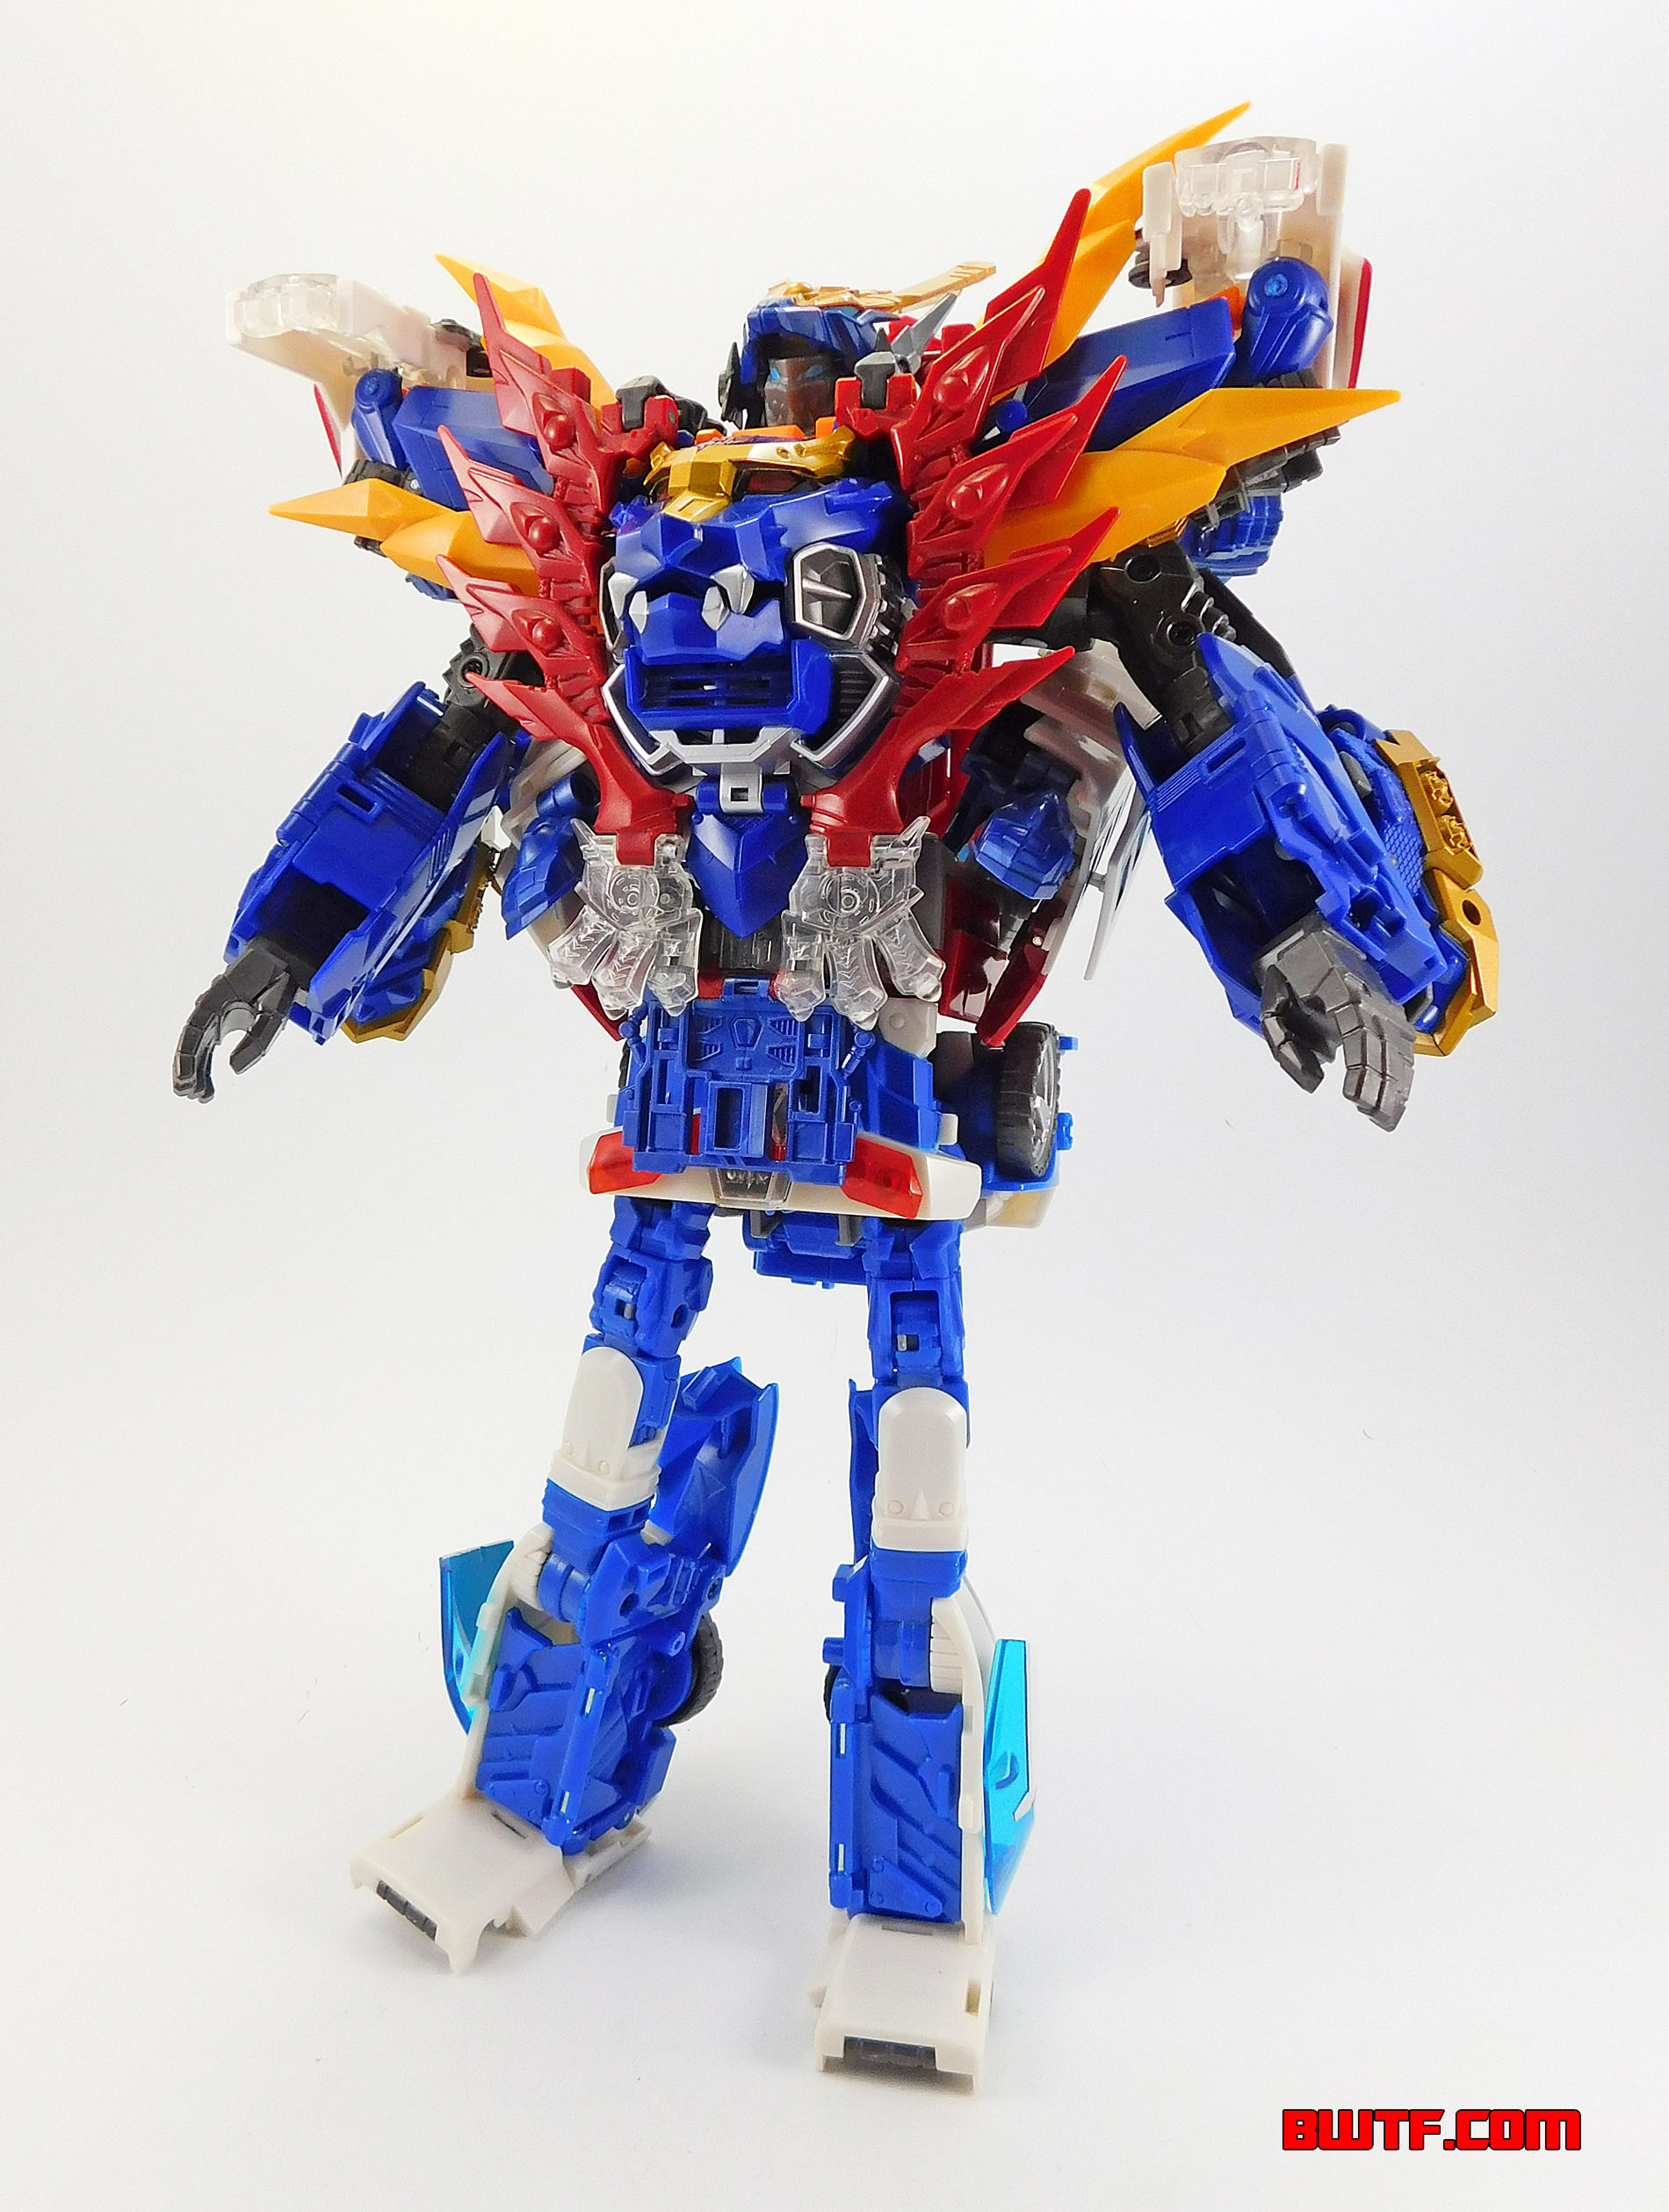
DaiKenzan
DaiKenzan suffers from some of the same issues as DaiGekisou, but thanks to some of the way the design works out, he winds up being a much better Combiner. Like DaiGekisou this figure winds up being very top heavy since Kenzan and Optimus create a bulk of the combined form. Gekisoumaru winds up forming the waist and legs and like the legs Kenzan forms they are rather thin looking compared to the rest of the body. On top of that, the arms formed by Kenzan's legs wind up being pretty long, reaching down to the knee area. From the perspective of its proportions, DaiKenzan is a rather odd looking figure.
All that said, like DaiGekisou this figure has some really beautiful design elements. The helmet/torso armor has a bird-theme that looks awesome. If you look at the forearms, there are some feather like details there as well. DaiKenzan's hands are also very different from DaiGekisou's. These are flat with the fingers in an open position, giving him a distinctive appearance.
All the same colors from DaiGekisou appear here but in a different configuration. That means there is still a beautiful mixture of blue, white, dark blue, red, silver and dark grey. Gold, silver and light blue paint are used to provide detailing.
Thanks to the way Gekisoumaru is designed, he makes for a much more stable pair of legs. He can stand with no issues. Posing his legs is still tricky, but at least it does not take a lot of effort to stand him up.
There are twenty points of articulation on this figure. This includes seven on each arm and three on each leg. As with DaiGekisou, the articulation points on his arms are much more useful than those on his legs due to the top-heavy weight of the figure. Each hand has a 5mm port, allowing you to attach Optimus Exprime's accessories.
Like DaiGekisou, DaiKenzan has a series of sound effects specific to this form. The first activates when you connect the clips from the torso armor. The rest can be activated by pressing either the button on the waist area or pushing in the armor in the middle of the chest. The result will be one of these phrases:
- "Kabuto souchaku!"
"Renketsu Sanjou Gattai! Dai-Dai-Daikenzan!" (Helmet equipped!" "Linked Tri-Vehicle Fusion! Dai-Dai-Daikenzan!) - "Daikenzan, sanjou nari!" (Daikenzan is here!)
- "Samurai no kokoroe, zan-jin-gan de tatakau!" (I shall fight with the honor of a samurai: sharpness, swiftness, and toughness!)
- "Kenzan!" "Jinbu!" "Gan'oh!" "Iza! Sanjou gattai!" (Kenzan!" "Jinbu!" "Gan'oh!" "Now! Tri-vehicle Fusion!)
- "Kono yo ni habikoru oni wo kiru!" (I shall cut down the oni infesting this world!)
- "Ware ha kinkyuu nitouryuu, Kenzan nari!" (I am Kenzan, of the Emergency Two-Sword Style!)
It is pretty amazing how these figures were designed to interact in this way and I am very impressed. The sounds may be among my favorite parts of these figures.
Final Thoughts:
Optimus Exprime is a very different figure than your typical Transformers toy. It takes the character of Optimus Prime in unexpected directions and I really like the design. That said, the chunkiness of the figure and the oddly proportioned Combiner forms may be turn offs for some fans. This figure is also not cheap. On the after market it averages $69 or more nowadays. If you can get it at a good price I think it will make a unique addition to your collection.
Pros:
- Unique design for Optimus Prime.
- Incorporates many G1 Optimus Prime design elements but interprets them in new ways.
- The sound feature is very cool, offering an extra level of play value to the figure.
- Beautiful sculpting on the figure and its own accessories.
Cons:
- The beast mode is less than successful.
- The DaiGekisou form is not particularly stable.
- The Combiner forms have odd proportions.