General Information:
Price: 4300 Yen (approximately $39 USD)
Retailer: Wonderfest and TakaraTomy Mall Exclusive
Release Date: March 24, 2018
Accessories: Stinger Blaster Arm; War Hammer

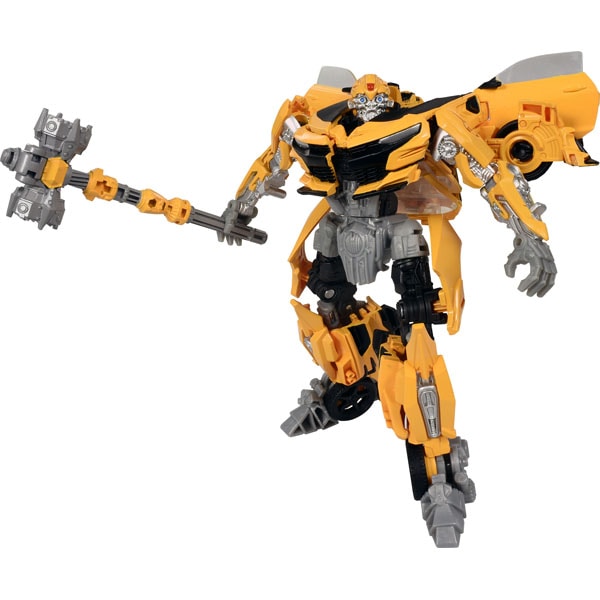
Takara Tomy released its second wave of "Movie the Best" Transformers figures after "The Last Knight" debuted on the big screen. This wave included War Hammer Bumblebee, based on the character's intense battle with Nemesis Prime in the film. This figure is a redeco and retool of the Deluxe Class Bumblebee from "The Last Knight". This review will focus on the changes made to the figure for this review.
Accessories:
The accessories are one of the main reasons to pick up this figure. The most obvious is Bumblebee's "War Hammer". He was seen using this against Nemesis Prime towards the end of "The Last Knight". This is a new accessory with lots of cool details sculpted along the handle and the hammer heads. This piece is cast in silver plastic with yellow paint details. To store the weapon in vehicle mode, you can split the hammer head section open and then clip it to the back of the spoiler. It winds up becoming something akin to a cannon if you want to stretch your imagination a bit.
The other accessory seems to be just a redeco of the "blaster forearm" from the previous release. However, Takara Tomy did something interesting here. On the original release the blaster forearm was made to be attached to the left arm. However, in the films Bumblebee generally transforms his right arm into his weapon. To fix this "error" the designers mirrored the blaster forearm accessory so this time out it could be attached to the right arm. This piece has the same functionality as the original release, complete with a small peg so Bumblebee can hold the weapon as a blaster and a tab so it can be attached to the side of the vehicle mode. This piece is cast in silver with yellow paint.

Vehicle Mode:
In vehicle mode Bumblebee is a Chevrolet 2017 Concept Camaro. This sculpt has a lot of the details from that vehicle including the unique front end, featuring a panel that sticks out in the front, a unique grille pattern and thin headlights. The middle of the front section features a sculpted Chevrolet logo. The front end curves towards the front wheel wells. The hood has a raised section in the middle with angled vent lines. The vehicle is so detailed it even features the small antennae on the top of the vehicle (which really just winds up looking like a small bump). It's a very sleek and futuristic looking car. Overall, this is a really nice sculpt that holds up a few years later.
In terms of colors, the deco is very similar to the original figure. However, the light yellow plastic has been replaced with a much deeper yellow. I prefer this yellow over the original. It just looks a lot more rich to the eye. Black paint is used on almost all the same parts of this mode as the original including the hood, the top of the cabin and the spoiler. However, one more color application has been added on the sides near the side view mirrors. The headlights are painted, but this time out they are silver as opposed to blue. Overall I prefer this deco over the previous one. The deep yellow plastic and paint are absolutely beautiful.
Transformation to Robot Mode:
- Detach any accessories you may have attached and set them aside for now.
- Swing the doors open.
- Flip the car over.
- Swing the front wheel wells out to the sides.
- Swing each robot arm up.
- Split the rear half of the vehicle.
- Swing the lower leg panels forward.
- Swing the rear halves of the vehicle in against the inside of the lower legs.
- Separate the robot feet from the back of the thighs.
- Swing the panel on the front of the rear wheel wells forward.
- Swing the feet and ankle pieces out to the sides.
- Rotate the feet forward and push them in.
- Swing the rear wheel well panels down.
- Push the middle of the vehicle's front end up and back.
- Swing the front of the car down and push the silver panel on the mid-body in to lock it into place.
- Move each arm down and swing the hands out.
- Fold the rear window under the cabin section cover, then tuck that under the hood piece and slide it into the back.
- Swing the ends of the side windows down.
- Rotate the headlight panels up a bit.

Robot Mode:
Much like the vehicle mode, the deco pattern in this mode is very similar to the original release. The main paint applications here are black and silver, and they cover all the same spots as the original release. The yellow color in this form is the same deeper color used in the vehicle mode. The colors look great, and again I have to say I prefer the deeper yellow over the original.
Most of the joints are tight on this figure, but it does suffer from one weakness that it inherited from the original: the ankles. When you press the feet up against the ankle section it should generally hold (and it does), but if it loosens just slightly the foot flops around. This is the biggest flaw on this figure and it makes it a bit difficult to pose it out, so be warned.
The War Hammer can fit into either of Bumblebee's hands. While the right arm is the one that is meant to come off to be replaced with the blaster arm, you can do the same with the left arm (it just looks odd if you do so). You can connect the two accessories together and then store them on the back of the figure.
Final Thoughts:
The deco and new accessories on War Hammer Bumblebee definitely improve upon the original figure. The average retail price for the figure online is around $35, which is worth it if you are a fan of the design or the character. Recommended but only for a very specific set of collectors.
Pros:
- Good sculpt.
- New accessories are cool.
- New deco is nicer than the original.
Cons:
- Ankle issue in robot mode can be frustrating.
- I would have liked a tad more deco.
