General Information:
Release Date: October 2019
Price Point: $49.99 (depending on retailer)
Retailer: General (Amazon, BigBadToyStore, Entertainment Earth, Target, Wal-Mart etc.)
Accessories: "JF-50 Ionic Displacer Blasters" x 2, "JF-30 Astro Blaster," "W-15 Destabilizer Cannon," "W-40 Turbo-Core Derailer", Train Caboose/Launch Base
Note: This figure was provided to Ben's World of Transformers during Hasbro's NYCC 2019 unboxing event. I was unable to preserve a box as part of the process but I did take photos that you can see here. BWTF thanks Hasbro for the kind consideration in providing this sample for review.

Official images and text below in italics are from Amazon.com:
- Build the ultimate battlefield: discover an expansive ecosystem of collectible figures and weapon accessories with Siege figures. (Each sold separately. Subject to availability).
- Customizable weapon load out: astronaut figure comes equipped with 5 weapon accessories that combine to form a larger weapon. Multiple weapon ports on figure and vehicle enable custom weapon accessories configurations
- Expandable weapon selection: fans can build bigger mission loadouts by compiling an arsenal of additional weapon accessories from other Siege figures. (Each sold separately. Subject to availability)
- Inspired cybertronian Alt modes: leader class wfc-s51 astrotrain toy is a triple changer that features classic conversion from robot to Train to shuttle mode in 36 total steps
- Add battle effects: attach fire blasts accessories (not included. Included with battle Masters figures. Each sold separately. Subject to availability) to the ends of weapon accessories to simulate blaster fire coming from weapons.
Build the ultimate battlefield with siege figures (each sold separately). siege plunges fans into the epic fight to survive on the final day of the Autobus and deception battle to control Cybertron. The Deception resistance army and the Autobus counter-resistance fighters gear up with the C.O.M.B.A.T. (Cybertronian omnifuctional modular battlefield assault Tech) system, the universe's most advanced modular weaponry -- including the cruel deception army Captain and transport, Astrotrain.
Astrotrain was introduced in 1985. This unique Decepticon was a Triple Changer, able to transform into both a space shuttle and a locomotive train. His booming voice and memorable appearances made him a fan favorite. Over the years there have been many versions of the character released in various sub-lines. These include:
- Classics Astrotrain
- Platinum Edition Astrotrain
- Movie Advanced Micron Astrotrain
- Titans Return Astrotrain
It may seem odd to fans that a new Astortrain figure has been released so soon after Titans Return Astrotrain was on shelves. However, this new Astrotrain figure is intended to represent a stylized version of G1 Astrotrain.

Packaging:
Taking a cue from "Studio Series", the Deluxe figures in "Siege" are packaged in boxes instead of the traditional bubble card used for Deluxe Class figures. These boxes are beautiful featuring an unusual shape with one flat side and one angled side. While elements of previous packaging are still found on the boxes (ex: the vertical Transformers logo, the "Generations" logo, a largely black background etc.) there is a lot more added on. First, the background is not solid black. There are designs on it that look like sparks or perhaps embers from flames On the angled side is the character's package art. In this case it shows Astrotrain running into battle. The figure itself is in robot mode behind a clear plastic window. To the left is a chevron with the character name. Below that is the "War for Cybertron: Siege" logo.
In a fun extra, shining a black light on the packaging will reveal Cybertronian glyphs. Input them on Hasbro's "Teletraan-1" web site and you get a translation. In Astrotrain's case it is "IONICDISPLACER", referring to Astrotrain's G1 weapon. Enter that into the Teletraan-1 site and it reveals a wallpaper featuring his package art (and line art in white). It also tells you his function (Transport) and location (Protihex) along with the following location data: "Patrol report: Critical waypoint of superhighway compromised. Decepticon presence detected."
Accessories:
Astrotrain is really a Voyager Class figure with a lot of extra parts to "add up" to the mass of something approaching a traditional Leader Class figure. Here's a rundown of what comes with this figure:
- JF-50 Ionic Displacer Blasters: There are two blasters with this designation included with this set. This is a stylized version of the rifle that came with G1 Astrotrain. Each of these weapons have two 5mm pegs on the bottom and one on the sides (each one has the horizontal peg on different sides however). The front and back both feature pegs for Blast Effects. These pieces are cast in black plastic with no paint applications.
- W-15 Destabilizer Cannon: This weapon is a thicker one than the JF-50, featuring a wide barrel in front and a targeting scope on top. The blaster features one 5mm peg on the bottom and 5mm ports on both sides. The front of the weapon can accomodate Blast Effects. This piece is cast in black with no paint applications.
- JF-30 Astro Blaster: This weapon is sort of a middle ground between the JF-50 and W-15. It has a regular sized round barrel leading to a boxy back end. There is a connector on the back to attach to the W-15 Destabilizer Cannon and a 5mm peg on the bottom. This piece is cast in black.
- W-40 Turbo-Core Derailer: Unlike the other weapons, this is not a blaster but more like a rocket pod. It features five (non launching) rockets in front, one 5mm peg on the side and one on the bottom.
You can combine all the weapons above to form the "Omni-Force Orbital Cannon". First you attach the JF-30 Astro Blaster to the W-40 Turbo-Core Derailer. Then connect the W-15 Destabilizer Cannon to the back of the JF-30 Astro Blaster. Then connect the JF-50 Ionic Displacer Blasters to the sides of the W-15 Destabilizer Cannon. The result is a giant weapon that Astrotrain can hold by connecting his fists to the 5mm pegs.
The other accessory included with this figure is a caboose for the train mode. The design is interesting as it has a very militaristic look it. There are treads instead of traditional round looking wheels and there are lots of nice details on the sides that look like the lines where armor panels meet. This piece is made up of grey and black plastic with purple paint on the sides. In its caboose mode this piece can attach to the back of the train mode using the three pegs in front and the thrusters on the back of Astrotrain.
Unfold the sides of the train, then fold the panel with the three 5mm pegs forward. This forms a "launch base" that you can attach Astrotrain to in shuttle mode. The panels in front and on the sides basically serve as ramps. The ends of the side ramps have attachment points, but these are not intended to attach to Titans Return bases. Instead, I believe these are meant to attach to next year's Earthrise bases which have different connection points. I would have greatly preferred them keep the connection points the same between Titans Return and Earthrise but I still love the play pattern. In an additional bit of additional play value, you can detach the grey panels in the front to form (for lack of a better term) "shoes" for Astrotrain to wear.
You can also lay all the parts of this flat except the "launchpad" and put the shuttle on top horizontally. I believe this is meant to emulate a real life Crawler Transporter vehicle to carry the shuttle to its launch site. While the "vehicle" is rather flat, it does have a series of treads sculpted along the sides.
Finally, you can use the caboose as a sort of "storage locker" for Astrotrain's weapons. Lay them out as you see in my robot mode photos below and you can fold it up with the weapons inside.

Robot Mode:
Siege has redefined the Leader Class as a Voyager Class figure with extra accessories (a move which definitely has pros and cons). In the case of Astrotrain, he is a roughly Voyager Class in size measuring 6 inches (about 15.24 cm) tall. In contrast, Siege Megatron measures a little over 6.5 inches (about 16.51 cm) tall. However, toys are not just about height. Astrotrain weighs in at 10.4 oz (all weapons included). In contrast, Siege Megatron is 6.6 oz while Siege Ultra Magnus is 12.3 oz. So Astrotrain winds up floating in an odd middle ground between the two.
Of course, a toy is not just about height and weight. Of all the Astrotrain toys created in the last few years, this figure most resembles the Astrotrain animation model used in the G1 cartoon. Here are some of the key details this figure shares with its G1 animated counterpart:
- The head sculpt has a curved helmet with a thick crest running down the middle.
- Flanking the head are two thick, raised panels. In the G1 version however these were curved with smaller, thin pieces on top. On this there are what apear to be small rocket launchers.
- The torso and arms are all blocky shapes. For instance, the chest panels are square while the panels under them are rectangular.
- The forearms are designed in such a way that the sides of them come over the fists slightly.
- The legs are long and rather boxy looking.
- The shuttle mode wings are situated on the back.
Where Astrotrain differes significantly from the G1 cartoon model is the level of detailing on him. The G1 model had circles on the shoulders, and those are present here. However he also has a ton of panel lines and machinery details going from head to toe on this figure. Some fans will dig this, others won't. Personally I like the way it looks. The details help make him look like a complex, living machine.
Astrotrain is cast in grey, purple and black plastic. Yellow, silver, red, purple and gunmetal grey paint are used to fill in detailing. The yellow is most prominent on the head. Silver and red are used for the face. Meanwhile, the designs that angle upward on the mid-body are red and purple, just like the cartoon model. The gunmetal grey is used for the "battle damage" effects on the legs. I personally like the battle damage deco, but I wish there were a bit more. Perhaps a bit on the torso or arms. That said, those fans who are not fans of the battle damage deco likely prefer those parts unblemished.
There are eighteen points of articulation on this figure. This includes four in each arm and leg. For the most part, the joints on my copy of this figure are tight with one curious exception: the left knee joint. If you were to shake the figure a little, the left lower leg goes flopping back and forth (but not the right). Clearly this is not ideal. However, when the figure is standing, the leg can be posed just fine.
There are fifteen 5mm ports on this figure, each allowing you to attach Weaponizer parts or weapons. Six of these are on the arms, three on the back (though it's hard to actually utilize all three at the same time), one on each leg and one under each foot. There is also a 5mm port on each wing, but they are really meant to be used in shuttle mode. You can however swing the wheels on the back of the wings out of the way to use them. There are also four pegs to attach Blast Effects.
Transformation to Train Mode:
- Detach all accessories and set them aside for now.
- Straighten out the arms and legs.
- Swing each fist into the forearms.
- Swing each panel in front of the thighs up.
- Swing each arm up.
- Rotate the lower arms around.
- Swing the arms up at the shoulder hinges.
- Swing the forearms up, clipping them against the shoulders.
- SWing the wings up so they cover the arms.
- Fold the panel with the thrusters on them over the arms.
- Fold the wings down, tabbing the ends of the wings to the arms.
- Rotate the wheel sections around.
- Swing each leg panel out to the sides.
- The inner legs each have a half of the train's front end. Rotate these pieces around. Then push down the piece with the wheels on them. Now fold out the halves of the train's light and smokestack.
- Connect the two halves of the train's front end.
- Swing the leg panels back.
- Each leg has a panel with wheels on them. Swing them down.
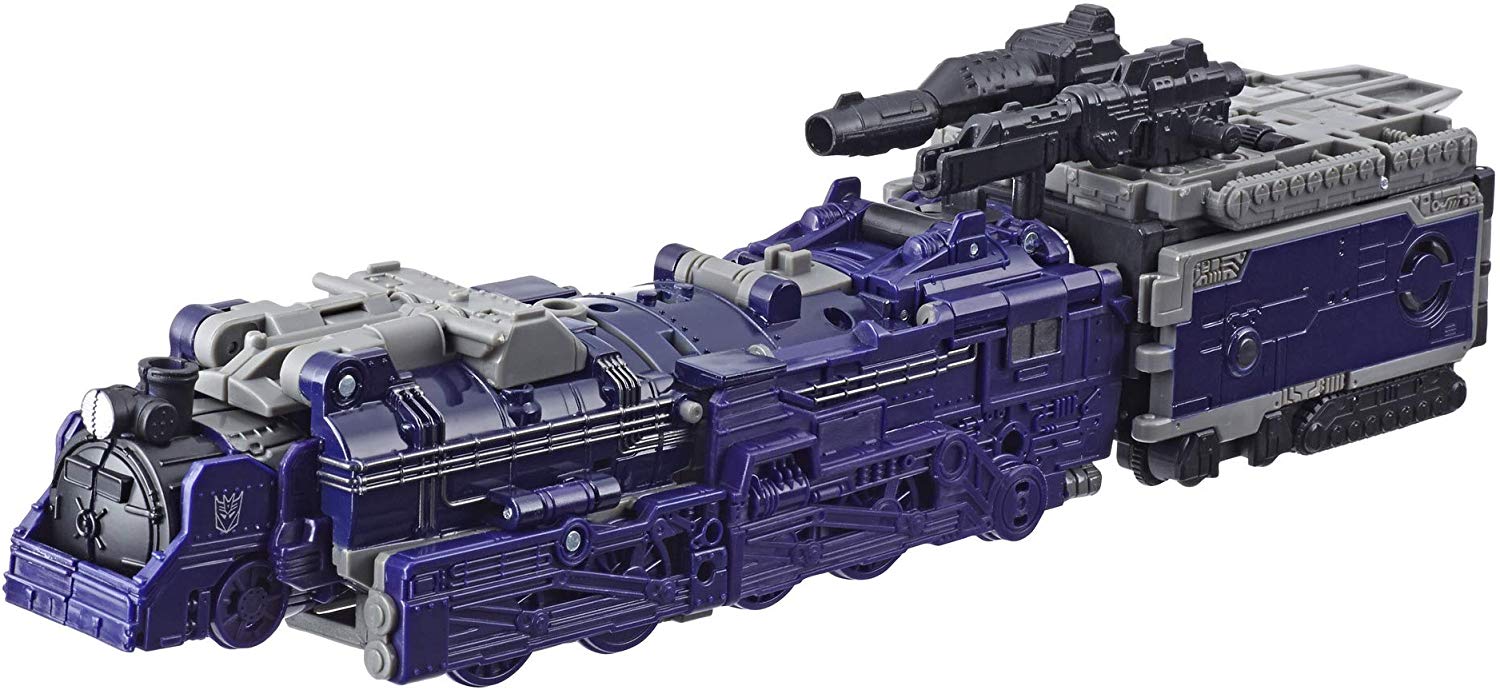
Train Mode:
In keeping with the theme of returning to Astrotrain's G1 form for visual inspiration, this Astrotrain figure transforms into a locomotive train. This ditches all pretense of a Cybertronian form and goes for a good old fashioned Earth Mode. In a way this is a preview of the upcoming Earthrise follow up to Siege.
I have to say, I absolutely love this mode. Is it a perfectly disguised locomotive train? Well, no. It is way too bulky and there are giant thrusters in the back, but that does not matter. This looks like Astrotrain's G1 locomotive mode only beefed up. Like the G1 version the train has a round front end, train wheels on the sides and a series of thin tubes running along the side. I love the detailed and industrial look of this train mode.
The train mode is made up of purple, grey and black plastic. This mode mostly shows off purple and black, which really helps distinguish it from the robot mode. Silver is used to paint small details like the tubes running down the sides and windows towards the back. The thrusters in the back are also colored silver. On either side of the front end are tampographed silver and purple Decepticon symbols. There is not a ton of deco in this mode, but frankly it does not need it. Old style locomotive trains are not generally the most colorful vehicles so the dark colors here with some silver work nicely.
There are three 5mm ports on Astrotrain in this mode. There is one on top, but you need weapons with 5mm pegs that are tall enough to clear the foot pieces in the front of the train. There are two on the sides, but they are partially obscured by the rear train wheels, so any weapons you attach will wind up angling upwards. Now attach the caboose in the back and you add on four 5mm ports, two on top and two on the sides. You can have a lot of fun with this, turning Astrotrain into a battle train!
Transformation Space Shuttle Mode (from Train Mode):
- Detach the caboose and any weapons and set them aside.
- Swing the front wheel panels up.
- Split the front end of the train and swing the side panels out.
- Swing the light/smokestack pieces in, then rotate the pieces around to reveal the halves of the shuttle's front end.
- Push the halves of the shuttle together.
- Rotate the rear train wheels back.
- Swing the wings out to the sides.
- Swing the side panels on the robot chest out.
- Swing the chest panel out to reveal the shuttle's vertical fin and swing that back.
- Push the leg panels in and connect them together.
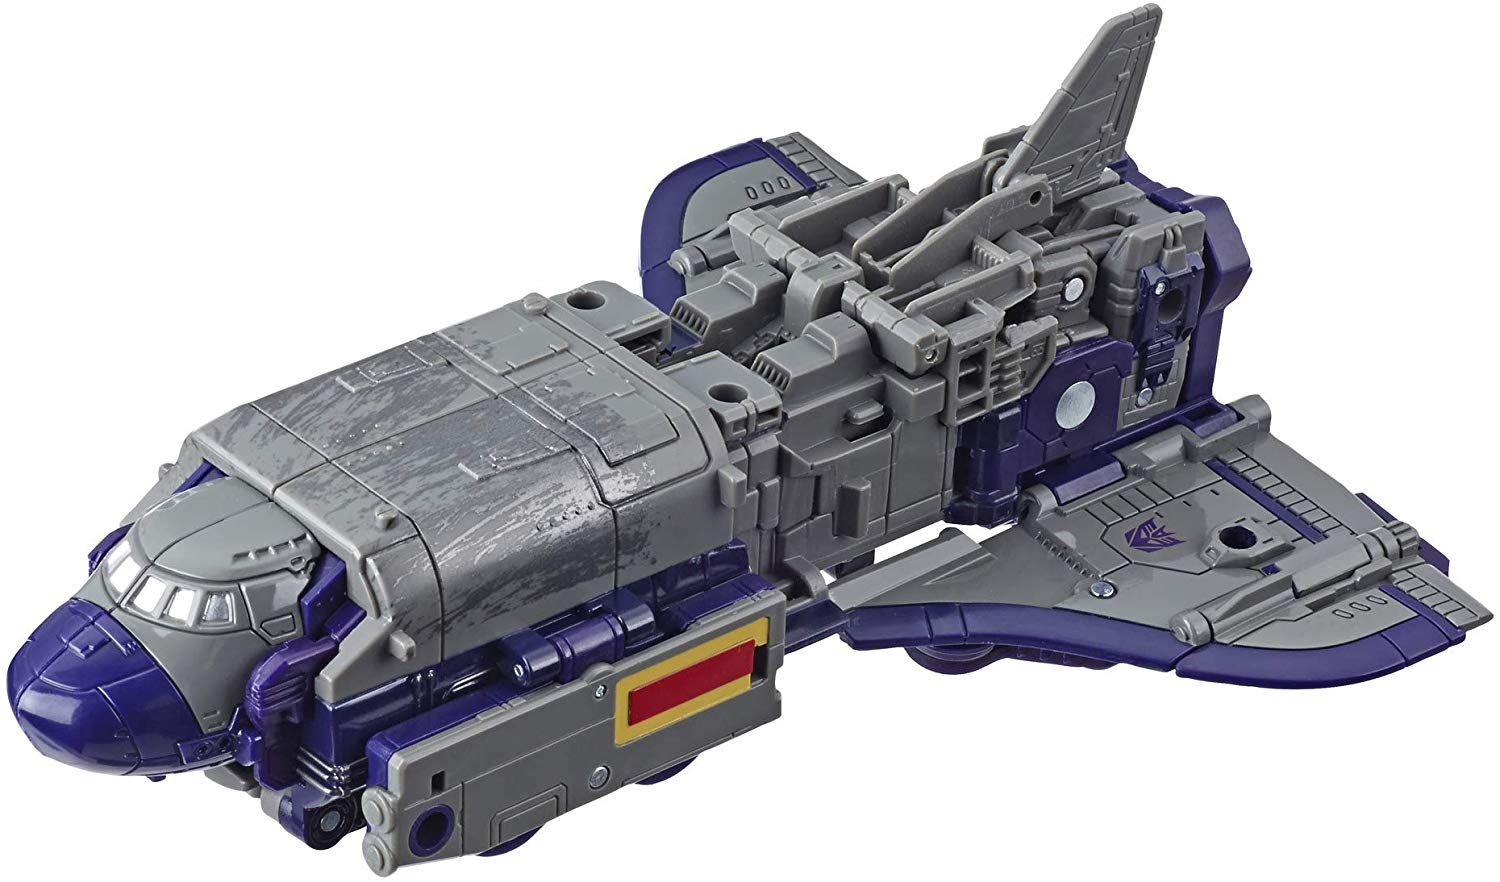
Space Shuttle Mode:
Astrotrain's shuttle mode is an 80's style shuttle. It features a rounded front end, a boxy middle section and curved wings. He has a lot of great details including a series of windows in the front and lots of line details on the wings. Of course, being a triple changer, it is nearly impossible to avoid some design compromises. The wheel panels on the sides stick out a bit, making the front look extra bulky. However once you get to the middle of the vehicle it suddenly narrows to the back. It does look like a piece is missing or that this section could use a cover. This does not ruin the shuttle mode or anything, but I have already heard rumblings of fans hoping someone will create a third party cover for this section, and I totally get that.
This mode mostly shows off grey plastic with purple trim here and there, mostly on the wings. The side panels feature yellow and red details. These reflect a detail used on the G1 animation model. Silver is used to paint the windows in the front. The gunmetal grey "battle damage" from the robot mode winds up on the panels towards the front and wind up looking like re-entry burn marks. This is a rather clever bit of deco design, but I wish some had been added to the nose of the shuttle. The finishing touch is a purple Decepticon symbol on each wing. Overall I like the deco in this mode a lot.
There are nine 5mm ports in this mode. There are two on the sides towards the front, two on top towards the middle and one on each wing. The other three are on the thrusters in the back. The ones on the wings, the middle and sides are mainly intended for weaponry. The ones on the thrusters are more appropriate for Blast Effects to make it look like there is exhaust coming out of them. There are two pegs on the top for Blast Effects. When you attach enough parts and weapons to the shuttle it looks fantastic.
Final Thoughts:
There is a lot of debate about whether Astrotrain is a "true" Leader Class figure, and I get it. With a retail price of $49.99 USD (and higher in other countries) you want to be sure you're getting your money's worth. I will say that if you love the design or are a huge Astrotrain fan, the price tag is just at the edge of being worth it. I personally think $40-45 would be more appropriate for this figure. Recommended.
Pros:
- Fantastic sculpt in all three modes.
- Nice deco.
- Lots of play value.
Cons:
- The back section of the shuttle mode looks somewhat "incomplete".
- Some fans may have issues with the actual "Voyager-ish" size of the figure.